Keeping your workshop clean and free of fine dust is essential not only for your health but also for the longevity of your tools. A DIY Cyclone Dust Collector can separate heavy chips from airborne dust before it reaches your vacuum or filter, dramatically improving collection efficiency. You can find affordable cyclone dust collector kit options that fit any budget and pair them with your existing shop-vac.
Why You Need a Dust Collection System in Your Workshop
Woodworking, sanding, and cutting metal or composites generate clouds of fine particles that can infiltrate lungs, machinery, and the surfaces around you. Over time, this dust buildup can corrode metal surfaces, degrade motor windings, and clog filters. Installing a dust collection system like a cyclone separator protects both your health and investment in power tools. For even more protection, consider pairing your system with high-quality dust extractors for power tools to capture residual particles.
Beyond health concerns, a clean workspace improves accuracy and prevents fire hazards from combustible dust. Fine sawdust can settle on power cords, electronics, and ventilation intakes, creating maintenance headaches. A dedicated system keeps critical areas clear, reducing cleaning time and facilitating smoother project workflows in your home workshop.
Understanding the Basics of Cyclone Dust Collection
How Cyclone Separators Work
Cyclone separators use centrifugal force to spin incoming dust-laden air and fling heavier chips and larger debris to the container walls. As the airflow spirals downward, heavy particles drop into the collection barrel, while finer dust remains suspended and travels onward to a vacuum or filter. This two-stage process reduces filter clogging and extends the life of your shop-vac or dust extractor.
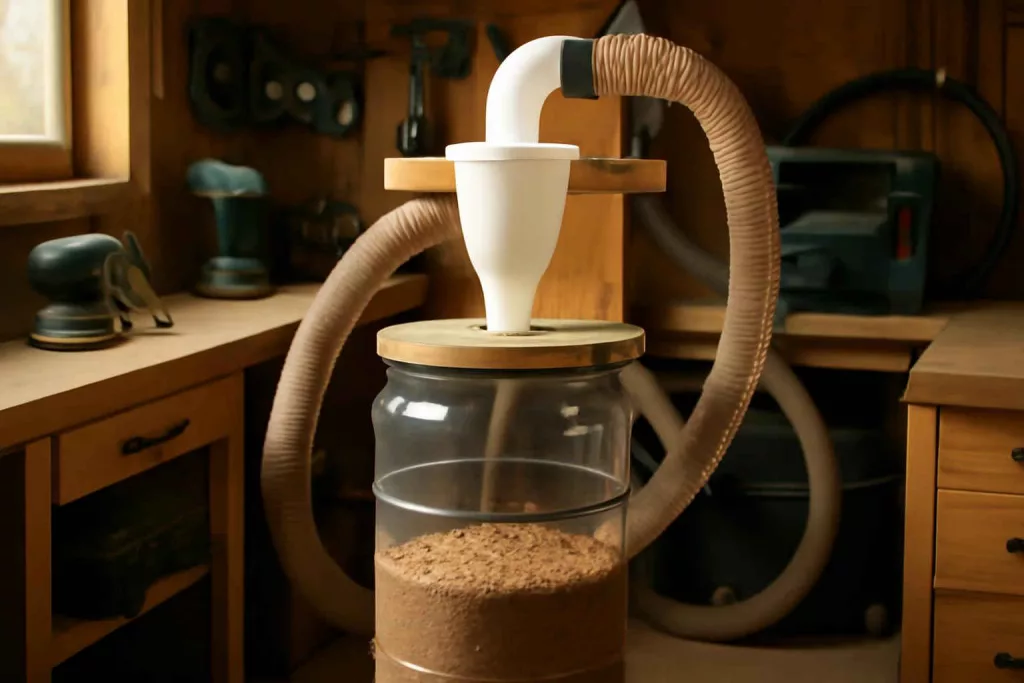
Components of a Cyclone Dust Collector
A typical DIY cyclone system has three main parts: the inlet where dust enters, the cyclone body where separation occurs, and the collection barrel at the bottom. You’ll also need hoses or pipes to connect tools to the cyclone inlet, plus a suitable shop-vac or dust extractor at the outlet. Many hobbyists adapt a standard 5–6 gallon bucket or barrel for the collection bin, sealing the lid and fitting it with quick-release clamps for easy emptying.
Materials and Tools Required for a DIY Cyclone Dust Collector
Essential Components
To build your DIY Cyclone Dust Collector, you’ll need:
- Cyclone separator unit (buy a kit or repurpose parts)
- 5–6 gallon barrel or bucket with airtight lid
- Rigid PVC pipe or metal tubing for inlet and outlet connections
- Hoses or flexible ducting to reach tools
- Hose clamps, quick-release couplers, and sealant tape
Many off-the-shelf cyclone separator kits include the body and adapter fittings, so you can focus on assembly rather than fabrication.
Tools You’ll Need
While no complex machining is required, you should have basic tools on hand:
- Drill with hole saw bits
- Screwdriver or impact driver for clamps
- Utility knife or PVC cutter
- Measuring tape and marker
- Silicone sealant or plumber’s tape for airtight seals
If you need to expand your work area or add storage for accessories, consider integrating this system with a mobile workshop storage cart for ease of movement.
Step-by-Step Guide to Building Your Cyclone Dust Collector
1. Prepare the Collection Barrel
Start by selecting a sturdy bucket or barrel with an airtight lid. Mark the positions for the inlet pipe near the top and the outlet fitting at the center. Use a hole saw to cut holes slightly smaller than your pipe diameters to ensure a snug fit. Seal the edges with silicone or plumber’s tape to eliminate air leaks.
2. Mount the Cyclone Separator
Attach the cyclone body to the barrel lid or directly to the barrel top, depending on your kit instructions. Ensure the separator’s inlet aligns with your tool connection hose, and the outlet points toward your shop-vac. Tighten clamps to secure the connection, then apply sealant around base joints for an airtight system.
3. Connect Hoses and Ducting
Measure and cut hoses to reach your most-used power tools, such as your table saw or sander. Use quick-release couplers to switch between tools easily. When routing hoses, avoid sharp bends that can restrict airflow. Secure hoses to the separator inlet with hose clamps for a reliable seal.
4. Attach to Shop-Vac or Dust Extractor
Connect the cyclone outlet to your shop-vac’s intake port. For best performance, pair it with quality Shop-Vac attachment kits to adapt multiple port sizes. Ensure your shop-vac filter is clean and rated for fine dust capture to prevent backflow of particles.
5. Test and Adjust
Switch on your shop-vac and test air flow through the system. You should see chips dropping into the barrel immediately, while finer dust continues onward. If separation is weak, check for leaks at seams and inlet joints. Adjust hose lengths and positions for optimal suction at each tool.
Tips for Optimizing Performance and Maintenance
Regular maintenance keeps your DIY Cyclone Dust Collector working efficiently. Empty the barrel before it overflows, and inspect seals for wear. Clean the cyclone body and inlet ports periodically with compressed air or a soft brush to remove buildup. Replace or clean your shop-vac filter according to the manufacturer’s instructions to maintain suction power.
To further enhance performance, ensure all hose connections are airtight. Upgrade to quick-release fittings for faster tool changes. If you notice airflow drops, check for clogs in hoses or the separator throat and clear debris promptly. Consistent upkeep ensures long-term effectiveness with minimal downtime.
Integrating Your Dust Collector into Your Workshop
Placement and accessibility are key to getting the most from your DIY system. Position the cyclone and barrel on a sturdy platform or small cart for easy emptying. Keep hoses coiled neatly when not in use to prevent tripping hazards. Place the shop-vac within reach of power outlets but out of the direct workspace to reduce noise.
Pair your dust collector with dust ports on stationary tools like your table saw or miter saw. Consider installing blast gates in duct runs to channel suction only where needed. This zoning strategy reduces power loss in unused lines and maximizes collection at active tools.
Budget-Friendly Upgrades and Accessories
If you want to customize further without breaking the bank, shop for aftermarket filters rated for HEPA-level capture. Installing a secondary filter on your shop-vac prevents particles from escaping back into the air. You can also find replacement gaskets and flanges online to maintain a perfect seal over time.
Adding a digital pressure gauge at the inlet helps monitor airflow and alerts you when cleaning is needed. For mobile setups, mount a small magazine rack on your cart to store connectors, clamps, and cleaning brushes. These small touches transform a basic DIY Cyclone Dust Collector into a professional-grade system.
Conclusion
Building a DIY Cyclone Dust Collector is an affordable way to dramatically improve workshop cleanliness and protect your health. By separating debris before it reaches your shop-vac, you save on filter replacements and maintain stronger suction. With basic materials, common tools, and a few hours of assembly, you can craft a system tailored to your space and budget. Ready to get started? Browse affordable cyclone collector kits and measure your workshop plans today to weld dust control into every project.