Proper upkeep of your garden shears is essential to ensure clean, precise cuts and extend the life of your tools. Whether you’re a weekend gardener or a seasoned horticulturist, investing time in shears maintenance prevents plant damage, reduces hand fatigue, and keeps your tools ready for action throughout the growing season. This guide covers every aspect of garden shears maintenance—from cleaning away sap to sharpening blades, applying lubricants, storing for the off-season, and troubleshooting common issues. You’ll also find links to must-have supplies and relevant resources for comprehensive garden tool care. Ready your pruning shears for their next big job with our expert tips.
Why Proper Maintenance of Garden Shears Matters
Garden shears, also known as pruning shears or secateurs, endure significant wear and tear as they cut through woody stems, thick branches, and pliable shoots. Over time, sap buildup, rust, and dull blades can lead to ragged cuts that stress plants and invite disease. In fact, studies by horticultural experts show that blades sharpened regularly can improve cutting efficiency by up to 40%, translating into healthier plant regrowth and fewer pruning mishaps.
Regular maintenance is not just about blade sharpness. Proper cleaning removes plant pathogens that can spread disease between plants. Lubrication prevents the pivot mechanism from seizing, while protective coatings fend off moisture and rust. If you’re already familiar with maintenance practices from our robotic lawn mower maintenance guide, you’ll recognize the parallels in keeping garden shears in top shape.
Skipping maintenance leads to more forceful cuts, increasing hand fatigue and the risk of repetitive strain injuries. Dull or dirty shears pinch plant tissue instead of slicing cleanly, leaving jagged edges prone to rot. Ultimately, investing as little as 15 minutes per month in shears care can prevent costly replacements and keep your garden thriving year after year.
Essential Tools and Supplies for Garden Shears Maintenance
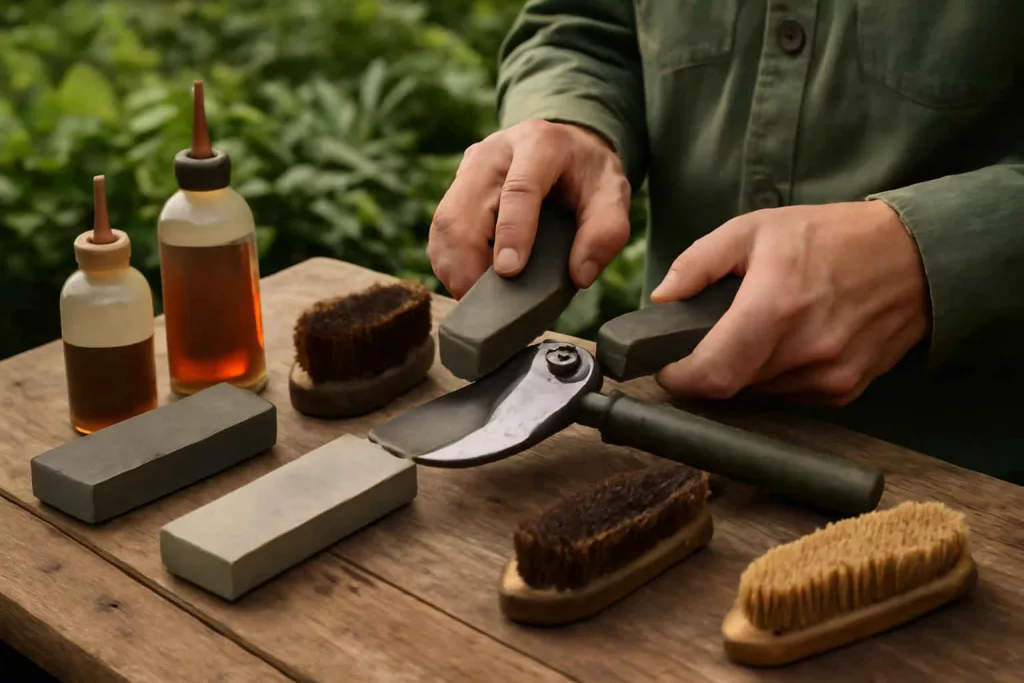
Before diving into cleaning and sharpening, assemble the right tools and supplies. Having everything on hand streamlines the upkeep process and ensures you can tackle every step without delay. Here’s what you’ll need:
Sharpening Stones
A quality sharpening stone or whetstone designed for garden tools is crucial. Coarse grits (100–400) remove nicks and reshape blades, while medium (600–1000) and fine grits (1200+) hone a razor-sharp edge. Diamond stones are another popular choice for their durability and speed but come at a higher price. Whichever type you choose, make sure it’s flat and well-maintained, wiping away metal filings between grits to avoid uneven sharpening.
Honing Oils and Lubricants
Manufacturers often recommend light machine oil or specialized garden tool lubricant to prevent rust and maintain smooth pivot action. Some gardeners swear by biodegradable oils to avoid environmental impact. Lubricants with added corrosion inhibitors provide extra protection, especially if you store tools in humid sheds or garages.
Cleaning Brushes and Rags
Soft brass brushes gently remove rust and sap without scratching the metal surface. Stiff nylon bristles work for heavier residue. Microfiber cloths or old denim rags help apply cleaning solutions and wipe away debris. For stubborn sap, keep rubbing alcohol or a citrus-based cleaner at the ready.
Protective Gear
Don’t forget safety goggles and gloves. Metal filings and cleaning chemicals can irritate skin and eyes. A firm grip on shears is essential when working on blades—slippage can lead to serious injuries.
Step-by-Step Guide to Cleaning Your Garden Shears
Regular cleaning prevents sap, dirt, and rust from building up on shears. Follow these steps after each major pruning session or at least once a month:
- Disassemble Parts: Open shears fully. If possible, remove the pivot bolt and take apart blades, springs, and handles for thorough access.
- Soak in Soapy Water: Submerge metal parts in warm, soapy water for 10 minutes to loosen sap and soil. Avoid soaking springs and handle grips for extended periods to prevent corrosion.
- Scrub Away Debris: Use a brass brush or nylon bristle brush to scrub blade surfaces, cutting edges, and pivot areas. Apply rubbing alcohol on a rag for sticky sap spots.
- Remove Rust: Light rust is common. Gently scrub with the brush or use fine steel wool. For more persistent rust, soak parts in a 1:1 vinegar and water solution for 15 minutes, then scrub clean.
- Dry Thoroughly: Water is the enemy of metal. Wipe all parts with dry rags, paying special attention to pivot holes and joint areas to ensure no moisture remains.
- Disinfect Cutting Edge: Dip a rag in isopropyl alcohol or a 10% bleach solution, then wipe blade edges to kill any remaining pathogens. Rinse with water and dry again.
- Reassemble: Once all parts are clean and dry, reassemble shears. Ensure the pivot bolt is snug but not overly tight—blades should open and close smoothly.
Consistent cleaning after every use keeps blades cutting cleanly and minimizes the effort needed for sharpening down the road.
How to Sharpen Garden Shears Effectively
A sharp blade makes all the difference in precision pruning. Dull shears crush stems and stress plants. Follow this sharpening routine every 2–3 months or when you notice resistance during cutting:
Using a Sharpening Stone
1. Secure the Blade: Clamp the blade in a vise or hold shears firmly with a cloth. Maintain safety precautions to avoid slips. 2. Angle Matters: Most pruning shears have a bevel angle of 25–30 degrees. Hold the stone at the same angle, sliding it along the outside edge from heel to tip in a sweeping motion. 3. Alternate Sides: For bypass shears (scissor action), only one blade moves against a flat anvil. Sharpen the beveled blade, then hone the flat side with a light touch to remove burrs. 4. Progress Through Grits: Start with coarse grit to reshape damaged edges, then move to medium and fine grit for a polished edge.
Using a Diamond File
Diamond files are handheld tools shaped to fit blade contours. Hold the file parallel to the bevel edge, matching the factory angle. Stroke from heel to tip in one direction without back-and-forth sawing. Diamond files cut quickly but require lighter pressure and fewer strokes. Finish with a fine stone or ceramic rod for a razor edge.
After sharpening, wipe blades with a damp cloth to remove metal shavings, then dry and lubricate pivot points to maintain smooth operation.
Lubricating and Protecting Your Shears
Lubrication reduces friction, prevents rust, and ensures smooth cutting action. Incorporate this step after every cleaning or sharpening session:
Choosing the Right Oil
Light machine oil, 3-in-1 oil, or specialized garden tool lubricant work well. Biodegradable oils are eco-friendly but may need more frequent application. Look for oils with rust inhibitors if you store tools in damp conditions.
Proper Application Techniques
1. Apply Drop by Drop: Place a few drops directly on the pivot joint, making sure oil penetrates between moving parts. 2. Wipe Down Blades: Run a lightly oiled rag along the cutting edge to coat and protect from moisture. 3. Operate Shears: Open and close shears several times to distribute oil evenly. Wipe away excess to avoid attracting dirt.
For additional protection, consider a thin coat of camellia oil or a specialized blade protectant spray, especially before long-term storage.
Storing Garden Shears to Extend Lifespan
How you store your shears can either protect your investment or accelerate wear. Follow these storage tips to keep blades and mechanisms in prime condition:
- Use a Protective Sleeve: Many models include plastic or leather sheaths. Slip blades into sheaths to guard edges against accidental nicks.
- Install a Magnetic Tool Holder: Mount a magnetic tool holder in your workshop or garden shed. This keeps shears off damp surfaces and within easy reach, preventing bending and misalignment.
- Opt for Weatherproof Storage: If you keep tools in an outdoor shed or garage, invest in weatherproof garden storage boxes. These lock out moisture and temperature extremes, reducing rust risk.
- Avoid Piling Tools: Never toss shears into a crowded toolbox. Avoid contact with other metal tools to prevent dulling or chipping blades.
- Hung Clean and Dry: Always store shears completely dry and lightly oiled. Moisture left on blades is the primary cause of rust.
Proper storage not only preserves sharpness but also makes tools safer and more accessible for your next gardening tasks.
Troubleshooting Common Issues
Even with diligent care, shears can sometimes malfunction. Here’s how to address common problems:
Sticky Blades
Symptoms: Blades resist opening and closing, leaving residue on plant stems. Remedy: Deep-clean with rubbing alcohol, then scrub with a brass brush. Lubricate pivot thoroughly and operate shears to loosen movement.
Loose or Wobbly Pivot
Symptoms: Blades misalign, causing uneven cuts. Remedy: Tighten the pivot nut or bolt until blades move smoothly without side play. Avoid over-tightening, which can cause blade pinching.
Blade Chips or Dents
Symptoms: Small nicks visible on cutting edge, leading to ragged cuts. Remedy: Use a coarse sharpening stone to grind out nicks, then refine the edge with medium and fine stones. For severe damage, consult a professional sharpening service.
Rust Spots
Symptoms: Brown or orange spots on the metal surface. Remedy: Gently scrub with steel wool or a brass brush, apply a rust remover if necessary, then clean, dry, and lubricate.
Acting early on these issues ensures your shears stay reliable and efficient throughout the pruning season.
Conclusion
Garden shears are indispensable for maintaining healthy plants and achieving clean, precise pruning cuts. By dedicating time to regular cleaning, sharpening, lubrication, and proper storage, you’ll extend the life of your tools and enhance garden performance. Remember to stock up on quality sharpening stones, lubricants, and cleaning supplies so you’re always ready. With these maintenance techniques, your garden shears will remain sharp, rust-free, and easy to use year after year—significantly reducing effort and improving results in every pruning task.
Ready to upgrade your maintenance routine? Check out our guide on garden tool maintenance kits for all-in-one solutions.


