If you’re tackling a bathroom or kitchen tile project, a reliable tile leveling system DIY kit can make all the difference between a smooth, professional outcome and uneven grout lines that mar your work. Investing in a quality tile leveling system kit helps maintain consistent spacing between tiles and prevents lippage, saving you hours of frustration.
Whether you’re renovating a backsplash or retiling a shower floor, these tools streamline alignment and significantly reduce finishing time. In this guide, we’ll explore why you need a leveling system, the different types available, top product recommendations, and step-by-step instructions on using them for flawless results.
Why Use a Tile Leveling System for DIY Projects
Traditional tile installations rely on careful hand placement and constant visual checks for level. Even experienced DIYers struggle with slight height variations, especially when working with large-format tiles or uneven substrates. A tile leveling system ensures every tile sits flush by clamping adjacent tiles together while the adhesive cures.
This system controls tile lippage—the uneven height difference at tile edges—which not only looks unprofessional but can also create tripping hazards. Using a leveling system also speeds up installation by eliminating the need for continual adjustments and rework. Once tiles are set and the adhesive has dried, you simply remove the clips or caps without damaging the tiles or surface.
For multi-room projects like a full bathroom remodel, consistency is key. Pairing a leveling system with proper underlayment and tile-cutting tools ensures every transition, from floor to wall, looks seamless. You can even integrate your multi-tool blades guide recommendations for cutting around fixtures and edges, enhancing precision and efficiency throughout your project.
Types of Tile Leveling Systems
Understanding the various DIY tile leveling tool options helps you choose the best fit for your skill level and project scope. There are three primary categories:
- Clip and wedge systems
- Screw cap systems
- Cap-balanced systems
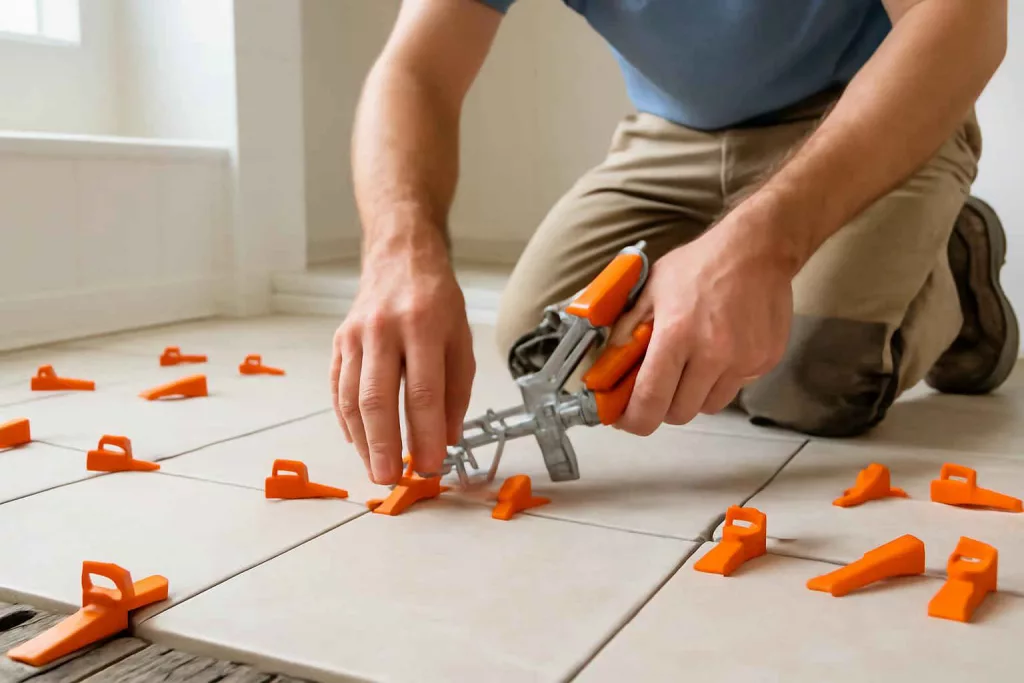
Clip and Wedge Systems
Clip and wedge systems use plastic clips inserted under tiles at the edges. After placing the tile, you slide a matching wedge into the clip, aligning adjacent tiles. This method is cost-effective and ideal for beginners. Once the adhesive sets, wedges and clips snap off cleanly at the base, leaving no surface damage.
Brands like Raimondi and T-Rex offer versatile kits with hundreds of clips and wedges in various thicknesses to match tile sizes from 3/16” to 1/4”. The wedges distribute pressure evenly, correcting minor substrate irregularities. For extended projects, consider purchasing extra wedges to avoid running short mid-job.
Screw Mechanism Systems
Screw mechanism systems replace wedges with reusable caps that screw onto plastic or metal posts. The posts sit between tiles, and the cap tightens down to pull tiles level. These systems offer greater precision for large-format or heavy porcelain tiles. The caps and posts typically disassemble after curing and can be reused indefinitely.
While more expensive upfront, screw cap systems are ideal if you’re using heavy-duty adhesives and working on multiple projects. They’re also less prone to breakage under high pressure, making them suitable for professional-level DIYers.
Top 5 Tile Leveling Systems for DIY
Our research evaluated affordability, ease of use, durability, and customer feedback to select the top five systems for home renovators.
- Raimondi Tile Leveling System Kit — Includes 500 clips and 500 wedges for small and large-format tiles. View on Amazon
- T-Rex Tile Leveling System — Features reusable screw caps and posts, perfect for heavy porcelain. View on Amazon
- Rubi Star Levelling System — Professional-grade screw cap design with ergonomic tightening tool. View on Amazon
- On The Level Tile Leveling Clips — Budget-friendly clip and wedge combo, ideal for small rooms. View on Amazon
- QEP Pro Premium Tile Leveling System — All-in-one kit with pliers for quick removal. View on Amazon
Each kit comes with enough components for at least 100 sq ft of tiling. If you’re tackling a full bathroom floor or kitchen backsplash, consider purchasing multiple kits or bulk accessories.
How to Use a Tile Leveling System: Step-by-Step Guide
Proper technique is essential for a successful DIY tile leveling system installation. Follow these steps for best results:
- Prepare the Substrate: Ensure the floor or wall surface is clean, flat, and free of debris. Repair any deep gouges or bumps, then apply a suitable tile underlayment if needed.
- Mix and Spread Adhesive: Use a notched trowel matched to tile size. For large-format tiles, apply adhesive with the flat side first, then comb through with the notched edge.
- Insert Clips or Posts: Place the clip base or post directly under the tile edge. Space clips every 8–12 inches for floors and 10–14 inches for walls.
- Set the Tiles: Press each tile onto the adhesive, ensuring the clips or posts are fully engaged. Adjust tiles so edges touch the clip tops or post caps.
- Apply Wedges or Caps: Insert wedges into clips or screw caps onto posts. Use the supplied pliers or turning tool to tighten until adjacent tile edges are flush.
- Allow Adhesive to Cure: Follow the adhesive manufacturer’s recommended drying time, typically 24–48 hours.
- Remove Clips and Caps: For wedge systems, tap the clips sideways to break at the base. For screw systems, unscrew caps and retract posts. Avoid prying under tiles.
- Grout and Finish: Once all leveling components are removed, clean the joints and apply grout. Wipe down tile surfaces promptly to prevent haze.
For detailed tool recommendations like specialized trowels and spacers, check our miter saw setup tips for accurate cuts and clean edges when trimming around obstacles.
Tips for Achieving Professional Tiling Results
Beyond using a leveling system, these expert tips will elevate your DIY tile project:
- Plan Your Layout: Dry-stack tiles before applying adhesive to determine the best layout and minimize small edge cuts.
- Use Quality Adhesives: Choose a polymer-modified thin-set suitable for your tile type and substrate. This improves bond strength and eliminates settlements.
- Control Temperature and Humidity: Ideal working conditions are between 50°F and 80°F. Extreme temperatures can affect adhesive curing and tile alignment.
- Clean as You Go: Remove excess adhesive from joints with a damp sponge before it dries. This prevents sanding later and ensures crisp grout lines.
- Check Levels Frequently: Even with a leveling system, periodically use a spirit level to verify large sections and make minor adjustments early.
- Protect New Tiles: Cover the area with cardboard or foam boards if you’re walking on the surface before grout sets. This prevents chips and alignment shifts.
When dealing with dust and debris during mixing and clean-up, consider using a dust extractors from our guide to maintain a safe and tidy workspace.
Maintaining Your Tile Leveling Tools
Proper care extends the life of your leveling system and ensures consistent performance:
- Clean Immediately After Use: Remove adhesive residue from clips, caps, and pliers before it hardens. Warm water and a mild detergent usually suffice.
- Inspect for Wear: Check wedges and clips for cracks or deformations. Replace any components that no longer hold tiles securely.
- Store in a Dry Place: Moisture can warp plastic parts over time. Keep your leveling kit in a sealed container or toolbox.
- Lubricate Moving Parts: For screw cap systems, apply a light silicone spray to threads every few uses to prevent binding.
- Organize Accessories: Use small containers or the organizer cabinets to separate clips, wedges, and caps for quick access.
Regular maintenance and organization will reduce downtime and ensure your DIY tile leveling tool remains ready for the next installation, big or small.
Conclusion
Mastering a DIY tile leveling system can transform your home renovation projects, delivering professional-grade floors and walls without hiring expensive labor. From clip-and-wedge sets to reusable screw caps, there’s a system tailored to your tile type, room size, and budget. By following these selection criteria, step-by-step instructions, and maintenance tips, you’ll achieve perfectly aligned tiles and dependable, lasting results.
Ready to get started? Equip yourself with a top-rated Raimondi tile leveling system kit today and take the first step toward flawless tiling in your next DIY remodel.