Are you tired of sweltering summers and eye-watering installation bills? DIY window air conditioner installation can save you money and empower you to control your cooling comfort. In this comprehensive guide, we’ll walk you through selecting the right window air conditioner, gathering essential tools, and carrying out a safe, professional-looking installation. To get started with a wide selection of models, view window air conditioner options on Amazon and find the perfect unit for your home.
Why Choose DIY Window Air Conditioner Installation?
Opting for DIY window air conditioner installation brings several advantages. First, professional installation fees can range from $100 to $300, depending on your region and the complexity of your window setup. Tackling the project yourself eliminates these costs and allows you to redirect savings toward a higher-quality unit.
Second, scheduling a contractor often means waiting days or weeks. When you handle the installation, you decide the timeline—perfect for last-minute heatwaves. Knowing your window’s exact dimensions and installation process also ensures you select the right model without hidden surprises.
Finally, DIY installation builds confidence and skill. Once you’ve successfully installed a window AC unit, you’ll be equipped to handle seasonal maintenance, adjust settings, and even replace the unit in the future. For guidance on organizing your workspace before starting, check out our DIY rolling tool cart project to keep tools at your fingertips.
How to Choose the Right Window Air Conditioner for Easy Installation
Measure Your Window and Room Size
Accurate measurements are crucial for a snug fit and efficient cooling. Begin by measuring the interior width and height of your window opening. Then, calculate your room’s square footage by multiplying length by width. Use this chart as a guideline:
- Up to 150 sq. ft.: 5,000–6,000 BTU
- 150–250 sq. ft.: 8,000–10,000 BTU
- 250–350 sq. ft.: 12,000 BTU
- 350–450 sq. ft.: 14,000–18,000 BTU
Choosing a unit rated for your room’s square footage ensures optimal performance and energy efficiency.
Consider Cooling Capacity (BTU) and Energy Efficiency
British Thermal Units (BTUs) indicate a unit’s cooling power. Higher BTUs cool larger spaces but may consume more energy. Look for Energy Star–certified models, which use at least 10% less energy than standard units. An Energy Efficiency Ratio (EER) of 10 or higher is ideal for lower electricity bills.
Window AC Features to Simplify Installation
Select a window air conditioner with features designed for easier installation:
- Expandable side panels: Cover any gap between the AC and window frame.
- Built-in tilt: Allows the unit to drain condensation outward without additional shims.
- Support bracket compatibility: Some models include brackets or mounting kits.
- Lightweight design: Easier for one person to lift and position.
If your chosen model doesn’t include mounting hardware, you can purchase a universal window air conditioner support bracket to reinforce stability and safety.
Tools and Materials Needed for Window AC Installation
Gathering the right tools and materials before you begin will streamline the process. You’ll need:
- Measuring tape and pencil (for marking placement)
- Level (to ensure unit tilts slightly outward)
- Power drill and drill bits
- Screwdriver set (flathead and Phillips)
- Support bracket and hardware kit
- Weather stripping or foam insulation seals
- Metal L-brackets (if additional support is needed)
- Protective gloves and safety glasses
- Utility knife (for cutting seal foam)
Keep your work area organized by storing tools on a nearby DIY rolling tool cart. Having everything within reach reduces interruptions and mistakes.
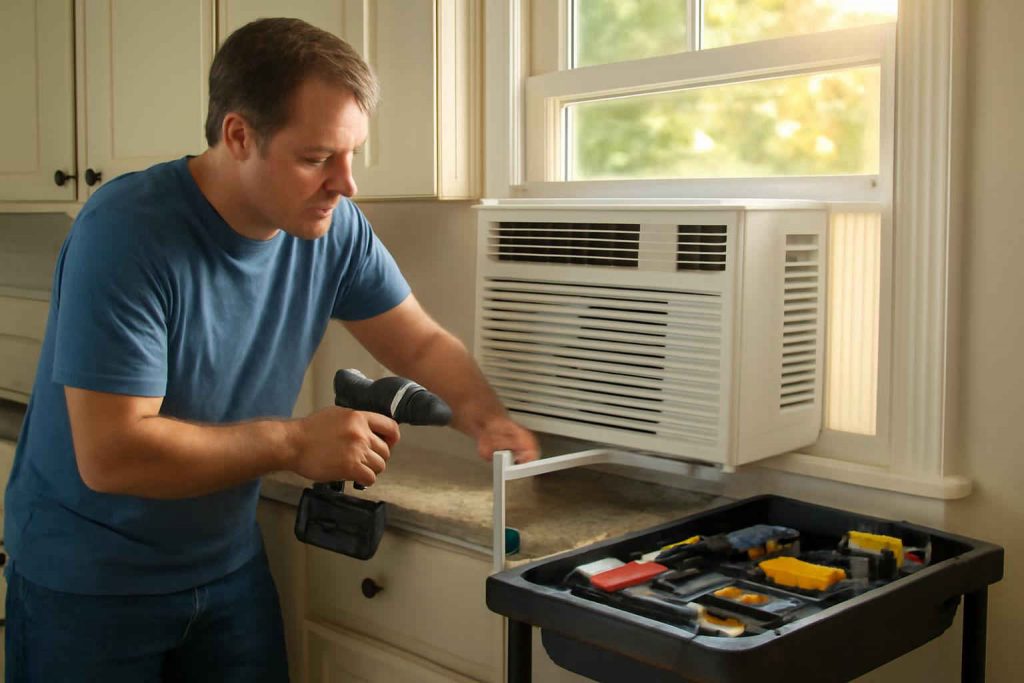
Step-by-Step DIY Window Air Conditioner Installation Guide
Step 1: Prepare the Window and Tools
Start by clearing the window of curtains, blinds, or screens. Clean the sill and frame to ensure proper sealing. Place the support bracket under the window, adjusting it so that the top sits about 1–2 inches below the open window sash. Use the level to confirm the bracket is even from side to side.
Step 2: Install the Support Bracket
Follow the manufacturer’s instructions to secure the bracket to the exterior wall or window frame. Typically, this involves drilling pilot holes and fastening screws through the bracket’s base. Double-check that the bracket is level and firmly attached before proceeding. An unstable bracket can lead to rattling noises and potential damage.
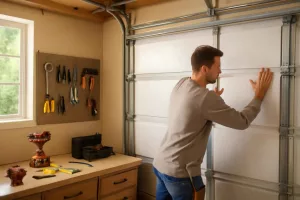
Step 3: Place the AC Unit in the Window
With help from a second person, lift the window air conditioner and slide it onto the support bracket. Inside, rest the bottom edge of the unit on the window sill. Slowly lower the upper window sash behind the unit’s top flange, ensuring a snug fit. The expandable side panels should extend outward to fill gaps between the unit and window frame.
Step 4: Secure and Seal the Unit
Most units come with screw holes on the top flange—drive screws up into the sash to prevent it from being pushed open. Use metal L-brackets or additional screws as needed for extra stability. Apply foam insulation seals around the sides and top to prevent drafts and moisture intrusion. The slight outward tilt will channel condensation outside, protecting your window frame.
Step 5: Electrical Connection and Testing
Plug the air conditioner into a dedicated, properly rated outlet. Never use an extension cord or power strip. Turn the unit on and set it to a moderate temperature. Listen for unusual noises and verify the unit is draining properly to the exterior. Use the thermostat and fan settings to confirm all functions are working.
Common Installation Challenges and Solutions
Even experienced DIYers encounter hurdles. Here are solutions to common issues:
- Double-hung vs. sliding windows: Sliding windows require custom brackets or L-brackets; ensure panels seal tightly.
- Window tilts or leans: Adjust the support bracket height or add shims under one side to maintain a slight outward tilt.
- Condensation leaks: Check the unit’s built-in tilt and reseal gaps with foam tape.
- Excessive vibration or noise: Ensure bracket and sash screws are tight; add weather stripping to dampen vibration.
- Weight and handling: Always lift with a partner and avoid tilting the unit excessively.
For insights on professional-grade installation techniques, our complete DIY installation guide offers additional tips on measuring and mounting hardware.
Maintenance Tips Post-Installation
Maintaining your window air conditioner extends its lifespan and performance. Follow these recommendations:
- Clean or replace filters every 30 days during peak use.
- Inspect and clear the drain pan to prevent mold growth.
- Cover the unit with a breathable cover in winter to block debris and moisture.
- Check seals and insulation each season for wear and replace foam strips if necessary.
- Test the thermostat accuracy and calibrate as needed.
Regular maintenance helps avoid costly repairs and keeps your home cool and comfortable all summer long.
Conclusion
DIY window air conditioner installation is an affordable, rewarding project that lets you stay cool without professional fees. By choosing the right unit, gathering the proper tools, and following our step-by-step guide, you can complete the installation safely and efficiently. Ready to shop? Browse window air conditioner models on Amazon and pick the best fit for your home today. With the right preparation and materials, you’ll beat the heat and enjoy energy savings all season long.