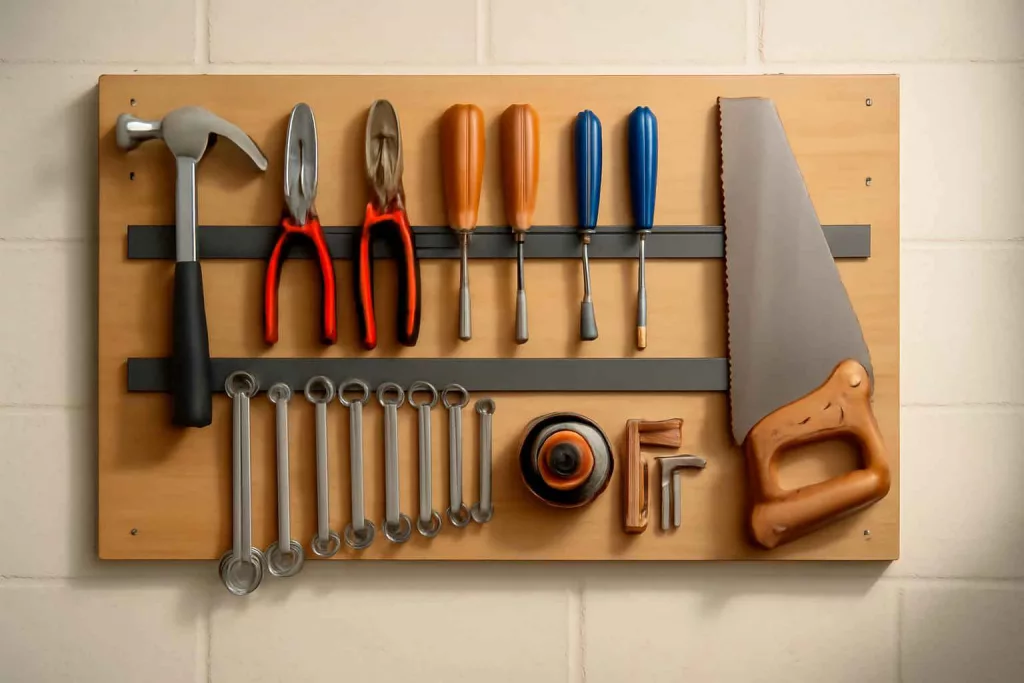
Keeping your tools within easy reach and neatly organized is essential for any home workshop or garage. A DIY magnetic tool holder wall organizer is a simple, space-saving solution that brings order to cluttered workspaces. By mounting magnetic strips or bars on your wall, you can display screwdrivers, pliers, wrenches, and other metal tools in a visually appealing and functional way. Ready to transform your workshop? Let’s explore how to create a reliable magnetic tool holder wall organizer that will keep everything in sight and at your fingertips.
Whether you’re tackling a full renovation, building furniture, or simply doing routine maintenance, having tools on display speeds up workflow and protects them from damage. In this comprehensive guide, we’ll cover everything from selecting the right materials to advanced customization tips. You’ll also find links to helpful internal resources like our rolling tool cart plan for mobile storage and the mobile battery charging cart tutorial for powered tool management. Let’s dive in.
Why Choose a DIY Magnetic Tool Holder?
Benefits of a Magnetic Wall Organizer
A magnetic tool holder offers several advantages over traditional pegboards or closed cabinets. First, visibility: tools are displayed openly, making it easy to spot the one you need at a glance. Second, accessibility: magnetically held tools can be grabbed or replaced with one hand, speeding up your workflow. Third, space efficiency: magnetic bars take up minimal wall space yet hold multiple tools in a compact line. Fourth, customization: you can adjust the position, length, and arrangement of magnetic strips to fit evolving tool collections. Finally, protection: tools aren’t rattling in drawers or banging against surfaces, reducing wear and tear.
Ideal Applications in Home Workshops
Magnetic tool holders are perfect for garages, home workshops, basement workspaces, and even utility pantries. Use them to: organize hand tools near your workbench, display wrenches above a mechanical station, keep screwdrivers sorted by size, and store small metal accessories like drill bits, socket adapters, or scissors. A magnetic strip by the entry door can hold keys, tape measures, and safety glasses for quick grab-and-go. For DIYers working on home improvements, a dedicated magnetic rail near drywall or painting areas ensures that your tools stay clean and ready.
Materials and Tools Needed
Choosing the Right Magnetic Bar or Tape
Selecting the proper magnetic element is the foundation of a sturdy organizer. You can opt for pre-made steel-backed magnetic bars, magnetic tool strips, or adhesive magnetic tape. Steel-backed bars typically mount with screws and offer strong holding power for heavy tools such as hammers and pliers. Adhesive magnetic tape attaches directly to wood or drywall and works well for smaller items like screwdrivers, wrenches, and drill bits. When choosing, consider: weight capacity (look for at least 50 pounds per foot for bar systems), length (bars come in 12, 18, or 24 inches), and finish (powder-coated steel resists rust).
Additional Supplies and Equipment
Gather these basics before you start the build:
- Measuring tape and pencil for planning layout
- Level and straightedge to keep bars aligned
- Drill with appropriate bits (masonry bit for concrete walls)
- Screws, wall anchors, or toggle bolts for secure mounting
- Wood strips or mounting blocks (optional for raised mounting)
- Safety goggles and gloves for installation
Having these materials ready ensures a smooth installation without last-minute trips to the hardware store.
Step-by-Step Installation Guide
Planning and Measurement
Start by determining the best location for your magnetic holder. Ideally, place it near your workbench or central workspace to minimize reach time. Use a measuring tape to mark the desired height—typically shoulder height or slightly below for easy access. Plot the length of each magnetic bar on the wall with a pencil. If you’re installing multiple bars, maintain at least 2 inches of space between them for tool clearance.
Preparing the Wall Surface
Before mounting, ensure the wall surface is clean, dry, and free of loose paint or dust. For drywall installations, locate studs with a stud finder and mark their positions. Mounting bars directly into studs provides the strongest support for heavy tools. If studs aren’t available, use high-quality wall anchors or toggle bolts rated for the weight you’ll hang.
Mounting the Magnetic Bars
Follow these steps for a secure attachment:
- Hold the magnetic bar or mounting block in place and check with a level.
- Mark screw locations through the mounting holes.
- Drill pilot holes for screws or anchors.
- Insert wall anchors if not screwing into studs.
- Align the bar and drive screws loosely at first, then tighten fully once all screws are in place.
For adhesive magnetic tape, peel the protective backing and press firmly against the wall, applying even pressure along the entire length. Wait 24 hours before hanging tools to allow adhesive to fully bond.
Testing and Adjusting
After installation, test the holding power by placing a moderate-weight tool on each bar. Slide the tool along the strip to verify the magnet grabs securely. If tools slide down, add a drop of clear-drying construction adhesive at the back of the bar or consider mounting a wooden face strip behind the magnet to create a recessed lip.
Advanced Customization Tips
Adding Decorative or Protective Wooden Accents
To enhance appearance and protect walls from scratches, mount magnetic bars on a wooden backer board. Choose a hardwood like oak or maple for a polished look. Cut the board to match the length of the magnet, sand and stain to your desired finish, then screw the magnet to the board. Finally, secure the assembly to the wall. This approach adds a touch of craftsmanship and hides mounting hardware.
Creating Interchangeable Sections
If you frequently change tool layouts, consider a modular panel system. Attach thin plywood or MDF panels to the wall with French cleats. Then mount magnetic strips on the panels. When you need to adjust or expand, simply lift a panel off its cleat, rearrange strips, and rehang. This design also allows you to store specialized sets of tools on dedicated panels, improving organization by project type.
Alternative Magnetic Holder Designs
Under-Shelf Magnetic Strips
If wall space is limited, attach magnetic strips to the underside of shelves. This hidden storage is perfect for small hand tools, scissors, or drill bits. Align strips flush with the front edge of the shelf, ensuring tools won’t fall off when you slide them in. Because they’re out of sight, under-shelf magnets keep your workspace looking clean while preserving quick access.
Framed Magnetic Tool Board
Combine a framed cork or pegboard with integrated magnetic strips for a versatile organizer. Mount magnets in horizontal rows between peg holes—or embed them in recessed channels cut into the board. Frame the edges with wood molding for a finished look. This hybrid board lets you hang magnetic tools and use peg hooks for non-metal items like flashlights or clamps, creating a comprehensive storage solution.
Conclusion
A DIY magnetic tool holder wall organizer is an efficient, customizable, and visually pleasing way to streamline your workshop or garage. By following our step-by-step installation guide, selecting the right materials, and exploring advanced customization ideas, you can create a tailored storage solution that grows with your tool collection. Don’t forget to check out our rolling tool cart and mobile battery charging cart tutorials to further enhance your mobile storage and charging setup. With your new magnetic organizer in place, tools will always be within reach, saving you time and frustration on every project.
Ready to shop? Find the perfect magnetic tool strips on Amazon and start building your ultimate tool wall today.