Capturing rainwater is an eco-friendly way to water your garden, reduce your utility bills, and conserve local water resources. Whether you’re an experienced gardener or a weekend DIY enthusiast, a properly installed rain barrel can provide a reliable source of free, chemical-free water. In this guide, you’ll learn every step of a comprehensive DIY rain barrel setup, from selecting the ideal barrel to integrating collected rainwater into your irrigation system. You’ll also find practical maintenance tips and troubleshooting advice to keep your rain harvesting system running smoothly.
Why Harvest Rainwater for Your Garden?
Harvesting rainwater offers numerous advantages for both home gardeners and the environment. Natural rainwater is free of chlorine, salts, and other additives commonly found in municipal water supplies, making it healthier for plants and soil biota. By capturing rainfall from your roof instead of letting it run off into storm drains, you can significantly reduce erosion and help prevent local flooding.
Using a rain barrel diverter kit allows you to channel water directly from your downspout into a storage barrel. Over time, these small contributions accumulate, providing a substantial reserve during dry spells. This method also cuts your dependence on municipal or well water, lowering water bills and reducing demand on overloaded treatment facilities.
Additionally, many communities offer rebates or incentives for installing rain harvesting systems, making it even more cost-effective. Beyond financial benefits, you’ll take pride in adopting a sustainable practice that conserves precious resources and supports healthier plant growth.
Selecting the Right Rain Barrel
Choosing the correct barrel is the foundation of any successful rain harvesting project. Common options include plastic, metal, and repurposed wooden barrels. Plastic barrels are lightweight and resistant to rust, while metal barrels—often made of food-grade steel—tend to be more durable. Reclaimed wooden barrels offer an attractive aesthetic but require careful sealing to prevent leaks and mold growth.
Capacity is another crucial consideration. A standard 55-gallon barrel collects about 0.7 gallons for every square foot of roof surface per inch of rain. Calculate your roof’s catchment area to estimate the size of barrel you’ll need. For small gardens, a single 50- to 100-gallon barrel might suffice. Larger landscapes can benefit from multiple interconnected barrels.
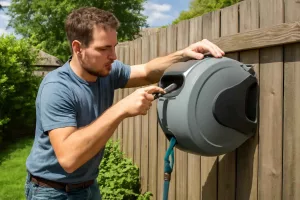
Look for a barrel with built-in spigots or pre-drilled outlets. If your barrel lacks these features, you may need to drill and seal appropriate openings using food-safe sealants. Some barrels include mosquito-proof screens or lids to prevent contamination and insect breeding. If your chosen barrel does not come with covers, consider ordering a rain barrel lid to keep debris and pests out.
Site Selection and Installation Preparation
Picking the right location ensures efficient water capture and safe, stable installation. Ideally, position your barrel beneath a downspout on a sturdy, level base. A raised platform—built from concrete blocks, paving stones, or a 2×6 pressure-treated wood crate—elevates the barrel for better spigot accessibility and improved gravity-fed flow to watering cans or hoses.
Before installation, clear vegetation and debris from around the base area. Check that gutters and downspouts are clean and in good repair, ensuring water flows freely toward the barrel. If needed, install a downspout extension or elbow to align the discharge point directly over the barrel’s diverter kit.
For multiple barrels, plan a layout that allows overflow water to feed sequentially from one barrel to the next. Use flexible tubing or PVC pipe connectors between barrels, securing joints with hose clamps or waterproof tape. Ensure each barrel is level to prevent tipping or uneven pressure on the joints.
Step-by-Step Installation Guide
1. Prepare the Barrel Base
Begin by constructing a stable, level foundation. Place concrete blocks or paving stones in a compacted gravel bed to prevent shifting. Check the level with a carpenter’s level. A solid base ensures your barrel can bear the full weight of water—approximately 8.34 pounds per gallon—without risk of collapse.
2. Install the Diverter Kit
Follow manufacturer instructions to cut your downspout and attach the diverter. Most kits require a 3- to 4-inch section of downspout removal, replaced by the diverter housing. Secure the diverter with sheet metal screws, ensuring it is tight and leak-free. Position the diverter outlet directly over the barrel’s inlet.
3. Drill Spigot and Overflow Holes
If your barrel isn’t pre-drilled, measure and mark spigot height—typically 6 to 12 inches from the base for watering cans. Drill a hole large enough for your spigot threading, insert the spigot, and seal around it with a silicone-based, food-safe sealant. Drill a smaller overflow hole near the top, and attach an overflow outlet fitting or hose to direct excess water away from your house foundation.
4. Install Insect Screen and Lid
Cover the barrel inlet with a fine mesh screen to prevent debris and mosquito larvae. Secure the mesh under the diverter inlet plate or under a custom-cut lid. Ensuring a tight seal here reduces contamination and maintenance needs.
5. Connect Multiple Barrels (Optional)
For larger storage capacity, link barrels by installing inlet and outlet fittings at corresponding levels. Use flexible tubing or PVC pipe to connect the overflow of the first barrel to the inlet of the second. Secure connections with hose clamps, checking for leaks.
6. Test and Adjust Flow
Run water through your gutters using a hose to simulate rainfall. Observe flow into the barrel, check for leaks around fittings, and adjust tubing angles to ensure smooth water transfer. Tighten any loose connections and reapply sealant if needed.
Maintenance and Winterizing Your Rain Barrel
Regular upkeep prolongs the life of your rain harvesting system. Inspect the diverter, spigot, and overflow connections quarterly. Remove leaves and debris from the screen, and flush the barrel annually to prevent sediment buildup. A simple garden hose flush works well for most setups.
Before the first freeze, drain your barrel completely. Disconnect the diverter and spigot, tipping the barrel on its side to allow any trapped water to escape. Store detachable components—screens, lids, hoses—in a frost-free location. If you leave the barrel intact, damage from ice expansion can crack the barrel walls.
In colder climates, consider installing a frost-proof diverter or adding insulation around the barrel. Some gardeners wrap barrels in foam insulation or burlap sacks for added protection.
Integrating Rainwater into Your Irrigation System
Collected rainwater can be delivered to your garden in several ways. The most basic approach is manual: use a watering can or attach a hose with a nozzle to your barrel spigot. For automated systems, connect the barrel to a drip irrigation network. Use a small submersible pump to pressurize the flow, or rely on gravity for low-pressure drip lines.
If you already use smart irrigation controllers, integrate your barrel by installing a low-power pump controlled by the system’s zone scheduler. Many controllers support relay outputs for pump activation, allowing you to blend rainwater and municipal water sources seamlessly. Maintain regular sensor checks to ensure consistent soil moisture.
Another eco-friendly option is creating a gravity-fed soaker hose layout. Elevate the barrel on a sturdy stand of 2 to 3 feet, then snake a soaker hose through garden beds. Slow, even water release reduces runoff and promotes deep root growth.
Troubleshooting and Common Issues
Even well-built systems can encounter hiccups. If your barrel isn’t filling properly, inspect the diverter inlet for clogs or misalignment. Debris buildup in gutters can divert water away from the barrel. Clean gutters regularly and install gutter guards to reduce blockages.
Leaks around spigots or overflow fittings typically stem from incomplete sealing. Tighten fittings and reapply food-safe silicone sealant. For cracks in plastic barrels, use a waterproof epoxy resin suitable for potable water containers.
Mosquito breeding can be a concern in warm climates. Ensure mesh screens are intact and secure. Adding a small amount of mosquito dunk (Bt-based larvicide) can control larvae without harming plants or wildlife.
Conclusion
A DIY rain barrel setup offers an efficient, cost-effective way to harness free water for your garden while promoting sustainability. By selecting the right barrel, preparing a stable site, and following a careful installation process, you’ll enjoy years of reliable rainwater collection. Regular maintenance and proper winterizing will keep your system in top shape, and integrating collected water into manual or automated irrigation ensures your plants thrive with minimal additional cost. Ready to get started? Gather your materials, choose the perfect spot beneath your downspout, and turn every rainfall into a resource that benefits both your garden and the environment.