Building a custom DIY rolling tool chest can transform your workshop into a more organized, efficient space. By creating your own rolling tool chest, you tailor the dimensions, drawer layouts, and mobility features to fit your exact needs. Whether you’re storing wrenches, screwdrivers, or power tool accessories, a well-designed chest keeps everything within easy reach. Plus, crafting your own cabinet often costs significantly less than purchasing a high-end, pre-built model.
If you’ve been searching for a rolling tool chest to optimize your workspace, building one yourself offers unmatched flexibility. From choosing heavy-duty casters to selecting durable drawer slides, this guide provides detailed steps and storage solutions. Let’s dive into why a DIY rolling tool chest makes sense and how you can construct one from scratch.
Why Choose a DIY Rolling Tool Chest
Investing time in a DIY rolling tool chest allows you to create a storage solution that aligns perfectly with your workshop layout. Commercial models often come with compromises in height, drawer spacing, or overall footprint. When you build your own, you can customize every dimension, ensuring it fits seamlessly under a workbench or slides neatly along a garage wall.
Benefits of Mobility
Mobility is a key advantage of rolling tool chests. Heavy-duty casters make it easy to move the chest to wherever you’re working, reducing the need to carry heavy tools across the workshop. Look for swivel casters with locking brakes to keep the chest stationary when you need stability. This combination of movement and stability maximizes both convenience and safety.
Cost Savings vs. Pre-Built Cabinets
High-quality commercial tool chests can cost hundreds or even thousands of dollars. By sourcing materials and hardware yourself—such as casters, drawer slides, and plywood—you can stay well under that price point while achieving equal or better durability. Many DIY enthusiasts find that the savings alone justify the effort, and the custom fit is a major bonus.
Planning Your Rolling Tool Chest
Proper planning is crucial to ensure your rolling tool chest meets your storage needs and fits your workspace. Start by measuring the available floor space and workbench clearance. Decide on the overall height, width, and depth. Common dimensions range from 30 to 40 inches wide, 18 to 24 inches deep, and 30 to 36 inches high, but adjust these to suit your specific workshop layout.
Determining Size and Capacity
Consider the types of tools you own: long-handled tools, power tool accessories, and hand tools all have different storage space requirements. Plan drawer heights so that deep sockets, power tool batteries, and other bulky items fit comfortably. Draw a simple layout sketch marking drawer dividers and compartments to visualize the interior organization.
Selecting Materials
Many builders use 3/4-inch plywood for the chest body due to its strength, affordability, and ease of cutting. Marine-grade plywood offers extra durability in humid environments. For the top surface, consider adding a hardwood butcher block or MDF with a laminate finish for extra sturdiness. Heavy-duty steel drawer slides rated for at least 100 pounds per drawer ensure smooth operation under load.
Tools and Hardware Needed
Gather essential woodworking tools before you begin. A table saw or circular saw, drill/driver, pocket hole jig, and a finish sander will streamline the build process. Don’t forget clamps, a tape measure, a framing square, and wood glue. For hardware, choose 4-inch swivel casters with 360-degree rotation, 1 pair of full-extension drawer slides per drawer, and quality handles or drawer pulls.
Step-by-Step Construction Guide
1. Building the Frame
Start by cutting the side panels, top, bottom, and back panel from 3/4-inch plywood. Use pocket hole joinery or screws and wood glue to assemble the basic box frame. Ensure all corners are square with a framing square. Attach a solid plywood sheet as the back for rigidity.
2. Installing Drawer Slides
Measure and mark slide placement for each drawer slot. Full-extension slides should be level and perfectly parallel to ensure smooth drawer operation. Secure one half of each slide to the interior side panels, and the matching halves to the drawer boxes once assembled. Test each slide with the drawer before fully tightening all screws.
3. Constructing Drawers
Construct drawer boxes to match your layout sketch. Use 1/2-inch plywood or hardwood for drawer bases and sides. Reinforce corners with dovetail or box joints if you have the equipment, or opt for simple butt joints reinforced with screws and wood glue. Sand all edges smooth to prevent tool edges from catching on rough spots.
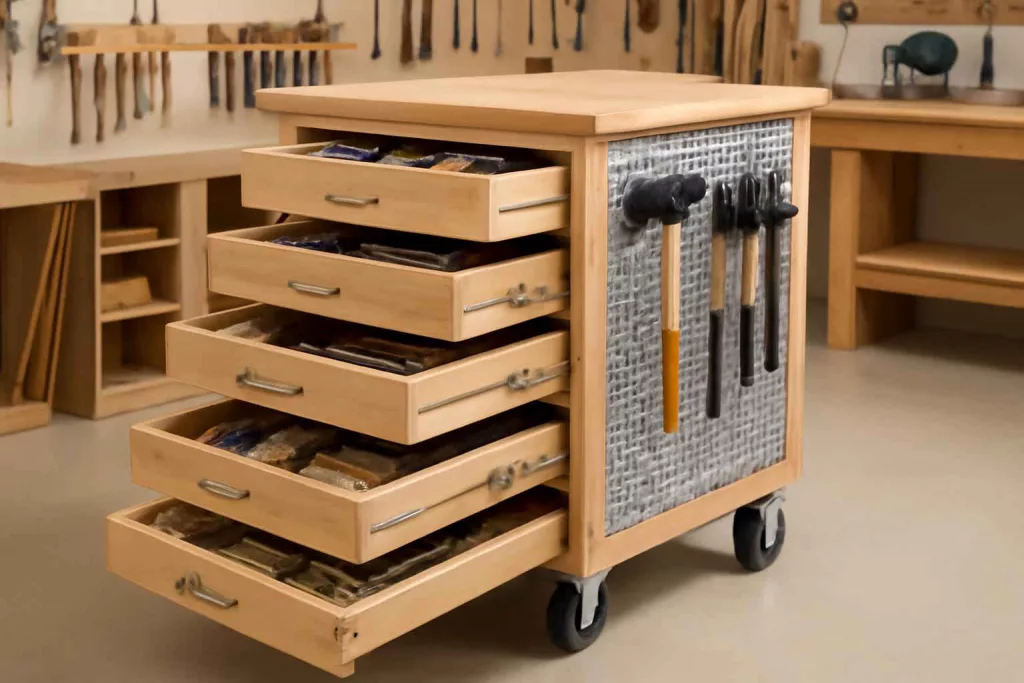
4. Attaching Casters
Flip the chest on its top to access the bottom panel. Mark mounting locations for the casters, ensuring they’re inset slightly from the edges for stability. Pre-drill holes for the caster plates, then secure the casters with 1/2-inch bolts and locknuts. Once all casters are attached, flip the chest upright and test mobility and brake function.
Customization and Storage Solutions
Adding Pegboard and Accessory Mounts
To maximize vertical storage, add thin plywood or metal pegboard sections to the sides of your chest. Use small hooks to hang wrenches or pliers for quick access. For a ready-made solution, integrate sections of steel pegboard kits onto the side walls of the chest for modular tool placement.
Integrating Power Management
Drill out a hole in the back panel to pass through extension cords and install a universal power strip inside the chest. This lets you charge batteries and power lights without trailing cords across the workshop floor. Consider adding a magnetic holder inside a drawer for small drill bits or screws to keep them secure while charging.
Enhancing Organization with Dividers
Custom drawer dividers let you separate sockets, fasteners, and small parts. Use thin plywood strips or plastic bins cut to fit. Label each compartment for quick identification. You can integrate magnetic strips inside drawer lids to hold metal bits or sockets. For easy cable storage, mount a set of garage slatwall panels on a nearby wall and hang coiled air hoses or extension cords within arm’s reach.
Finishing Touches
Sand all exterior surfaces smooth, then apply a durable finish. Spray-on polyurethane or a two-part garage floor coating offers excellent resistance to scratches and oils. Paint the chest in a color that matches your workshop theme—or leave the natural wood grain visible for a classic look. Install ergonomic handles or drawer pulls for both style and functionality.
Maintenance and Safety Tips
Regular maintenance keeps your rolling tool chest operating smoothly. Every few months, remove all drawers and clean debris from slides. Apply a silicone-based lubricant to caster wheels and drawer slides to maintain easy movement. Inspect casters and mounting bolts, tightening any loose hardware.
For safety, always lock the casters before loading or unloading drawers. Never overload individual drawers beyond the rated capacity of your slides. Keep heavy tools in lower drawers to maintain a low center of gravity and prevent tipping. If you notice wobble or uneven movement, check that all casters are level and the chest frame remains square.
Conclusion
Constructing a DIY rolling tool chest is a rewarding project that yields a customizable, cost-effective storage solution. By carefully planning dimensions, choosing quality hardware, and following detailed assembly steps, you can create a chest that enhances both organization and mobility in your workshop. Add personalized storage features like pegboard sides and drawer dividers for maximum efficiency. Your workshop will enjoy a professional-grade tool chest without the professional price tag.
Ready to get started? Gather your materials, sketch your layout, and begin building the ultimate mobile storage solution for your tools.