A solid home recording gear setup goes beyond the microphone itself. Accessories like shock mounts and pop filters can make the difference between a noisy, uneven recording and clear, professional-sounding audio. Investing in quality microphone accessories not only protects your equipment but also ensures that every vocal take or instrument capture is free from unwanted vibrations and plosives. Whether you’re podcasting, streaming, or laying down vocals, these add-ons are essential for achieving studio-quality recordings at home. Shock mounts isolate your mic from desk and floor vibrations, while pop filters tame plosive sounds. Ready to upgrade your recording space? Let’s explore the key accessories that every home recording enthusiast should have.
Microphone Mounting Solutions
Shock Mounts: Protect Against Vibrations
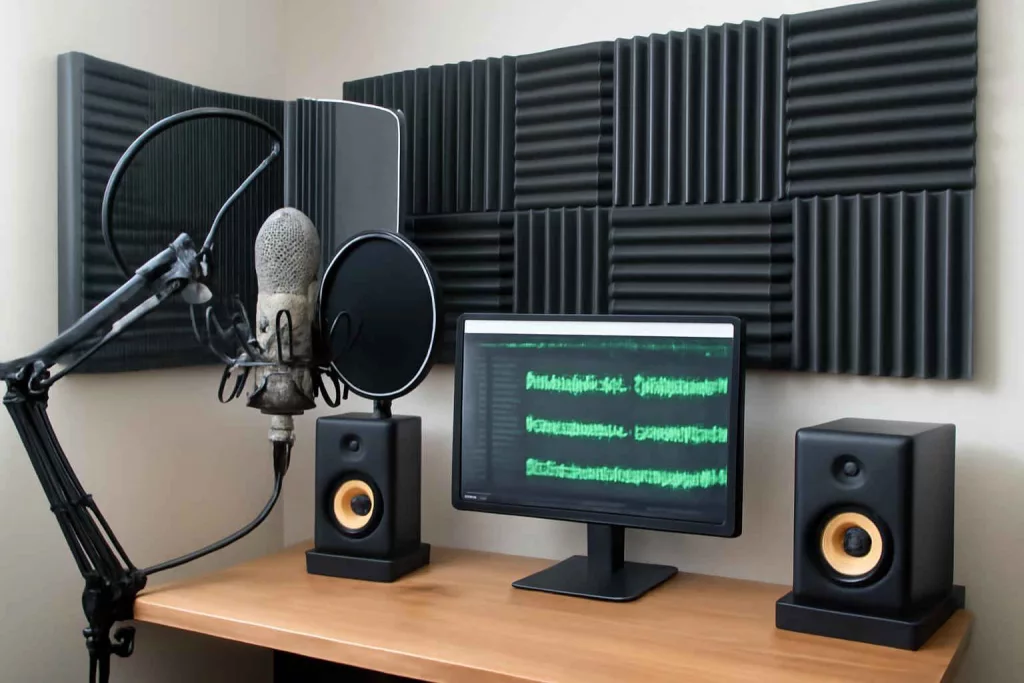
Shock mounts are designed to suspend your microphone with elastic bands or rubberized mounts that absorb low-frequency bumps and knocks. When used correctly, they drastically reduce handling noise and desk rumbles, especially if you record near a keyboard or mixer. High-quality shock mounts are constructed from metal frames and premium rubber bands that retain tension over time. Cheaper models use less durable materials and can sag, reintroducing the very noise they’re meant to eliminate. For a reliable setup, look for shock mounts specifically tailored to your microphone’s diameter and weight. Best shock mounts for home recording typically feature adjustable clamps and universal threads to fit boom arms and standard mic stands.
Microphone Stands and Boom Arms
Choosing the right stand or boom arm is crucial for positioning your microphone exactly where you need it. Desktop stands are compact and stable, perfect for podcast hosts at a desk. However, boom arms provide greater flexibility and keep your workspace clear. Durable steel construction and silent spring mechanisms are key features to consider. Some boom arms even include integrated cable management channels to hide XLR or USB cables neatly along the arm’s length. With adjustable tension knobs, you can lock the microphone in place without slippage, ensuring consistent placement session after session.
Pop Filters and Windscreens: Clean Captures
Types of Pop Filters
Pop filters come in various shapes and materials, each offering different levels of plosive protection. Traditional pop filters use a mesh screen stretched across a circular frame and mount in front of the mic on a gooseneck arm. Metal pop filters are more durable and easier to clean, though they may slightly affect high frequencies. Foam windscreens slip directly over the microphone capsule, providing minimal airflow obstruction. While foam windscreens are more portable, mesh filters offer superior plosive reduction. Choosing the right type depends on your recording environment and desired tonal response.
DIY Pop Filter Options
For budget-minded home engineers, creating a DIY pop filter is simple. Stretch pantyhose or fine nylon stocking across an embroidery hoop, attach it to a metal or plastic gooseneck, and clamp it to your mic stand. This homemade solution filters plosives effectively and costs just a few dollars. Just ensure the material is thin enough to avoid muffling higher frequencies while still dissipating direct airflow. For more robust protection, you can layer two fabrics spaced an inch apart to create an adjustable, multi-layered pop filter.
Cable Management Techniques
Cable Ties and Velcro Wraps
Tangled cables not only look messy—they can introduce electrical interference and wear down connectors over time. Cable ties and reusable Velcro wraps help organize and secure XLR, USB, and instrument cables. Color-coded ties allow you to quickly identify different signal paths, while adhesive-backed cable tie mounts keep cables routed along desk edges or walls. Regularly replan your cable layout as you add or remove gear to maintain a clean setup.
Cable Channels and Raceways
For a more permanent solution, install cable channels or raceways under your desk or along studio walls. These plastic or metal conduits conceal cables out of sight, preventing accidental trips and protecting cables from wear. Choose raceways with hinged lids or snap-on covers for easy cable additions and maintenance. By integrating cable management into your setup, you maintain a professional workspace that reduces signal noise and simplifies troubleshooting.
Monitor Isolation Pads and Stands
Isolation Pads Basics
Monitor isolation pads decouple your studio monitors from the desk or shelf surface, minimizing low-frequency resonance and improving bass clarity. Made from dense foam or rubber, these pads must support the monitor’s weight and angle it towards ear level. When positioned correctly, isolation pads eliminate muddiness and provide a more accurate listening environment. Many pads are wedge-shaped, allowing you to tilt your monitors slightly downward for optimal stereo imaging.
Choosing the Right Stands
Dedicated monitor stands offer height adjustability and vibration control through threaded metal spikes or rubber footers. Solid steel stands reduce resonance compared to wooden shelves, while speaker brackets can free up desk space entirely. When selecting stands, ensure they match your monitor’s base dimensions and weight capacity. Pairing stands with isolation pads yields the best acoustic performance for mixing and mastering at home. You can also explore space-saving gear solutions to optimize your footprint.
Reflection Filters
What They Do
Reflection filters are curved panels that wrap around your microphone, absorbing early reflections and reducing room ambience. Ideal for untreated rooms, they help capture a cleaner direct signal without investing in full-scale acoustic treatment. High-density foam layers absorb mid and high frequencies, while the curved design prevents sound waves from bouncing back into the mic capsule. Reflection filters mount on mic stands behind the microphone and can be adjusted to enclose varying degrees of room space.
Installation Tips
To maximize effectiveness, position the reflection filter about 2–4 inches behind the microphone. Angle the filter so that its curvature aligns with your mouth or instrument source. For extra stability, tighten all mounting knobs securely and check for rattles during playback. Combine reflection filters with rack gear solutions to streamline your signal chain and keep your workspace tidy.
Acoustic Treatment Accessories
Foam Panels and Diffusers
Acoustic foam panels and diffusers complement your microphone accessories by improving overall room sound. Panels absorb standing waves and flutter echoes, while diffusers scatter sound energy to create a balanced listening environment. Acoustic cubes, wedge tiles, and pyramid foams are popular for walls and portable racks. Placing panels at first reflection points on sidewalls and the ceiling above your listening position delivers the greatest benefit.
DIY Acoustic Options
If you’re on a tight budget, consider DIY acoustic treatment using rock wool insulation boards and breathable fabric covers. Cut 2″–4″ boards to fit standard grid frames or build simple wooden frames. Wrap boards in fabric that allows sound to pass through without restricting airflow. Mount panels with picture-hanger hooks or adhesive strips. For a quick foam solution, reuse thick mattress toppers cut to size. Learn more advanced room treatment and soundproofing methods in our DIY Soundproofing Home Workshop.
Essential Cables and Connectors
Balanced vs Unbalanced Cables
Cables play a critical role in preserving audio clarity. Balanced XLR and TRS cables carry two inverse polarity signals plus a ground, effectively canceling out electromagnetic interference. Unbalanced cables, like instrument TS leads, are more susceptible to noise but remain common for guitars and keyboards. Always choose the shortest cable length practical to reduce capacitance and high-frequency roll-off.
Common Connector Types
XLR, 1/4″ TRS, 1/8″ TRS, and USB are the backbone of home recording gear connectivity. Keep spare connectors and gender adapters on hand for unexpected compatibility issues. Gold-plated connectors resist corrosion, while molded strain relief prevents breakage at solder joints. Properly labeled cables and color-coded connectors streamline session setup and reduce downtime.
Conclusion
Upgrading your home recording gear with the right accessories significantly improves audio quality and workflow efficiency. From vibration-isolating shock mounts to high-performance pop filters, each add-on plays a specific role in capturing clean, professional recordings. Combine these accessories with proper cable management, monitor isolation pads, and acoustic treatment for a complete, project-ready home studio. Ready to refine your setup? Start by adding a quality pop filter and shock mount, then explore isolation pads and reflection filters to tackle room acoustics. A few strategic investments in microphone accessories will unlock the full potential of your home recording gear. Don’t forget to check out the latest desk isolation pads to complete your studio upgrade!
