Setting up a home studio can be a thrilling journey, but without proper rack gear, you risk cluttered cables, overheating equipment, and inefficient workflows. To achieve consistent, professional results, you need a centralized system to mount, power, cool, and manage your audio interfaces, preamps, effects processors, and power conditioners. By integrating essential rack gear for home studio setups, you’ll unlock seamless organization, reduce noise interference, and safeguard your devices over the long term. Consider adding studio rack gear accessories in the earliest stages of your build to avoid costly retrofits later on.
In this comprehensive guide, we’ll explore the key components of rack gear—from rails and shelves to power distribution units and cooling solutions—helping you select the best options for your budget and space. Whether you’re running a compact desktop rig or a full-sized 19-inch enclosure, these recommendations and tips will streamline your workflow, improve equipment longevity, and create a clutter-free environment that fosters creativity.
What Is Rack Gear and Why You Need It
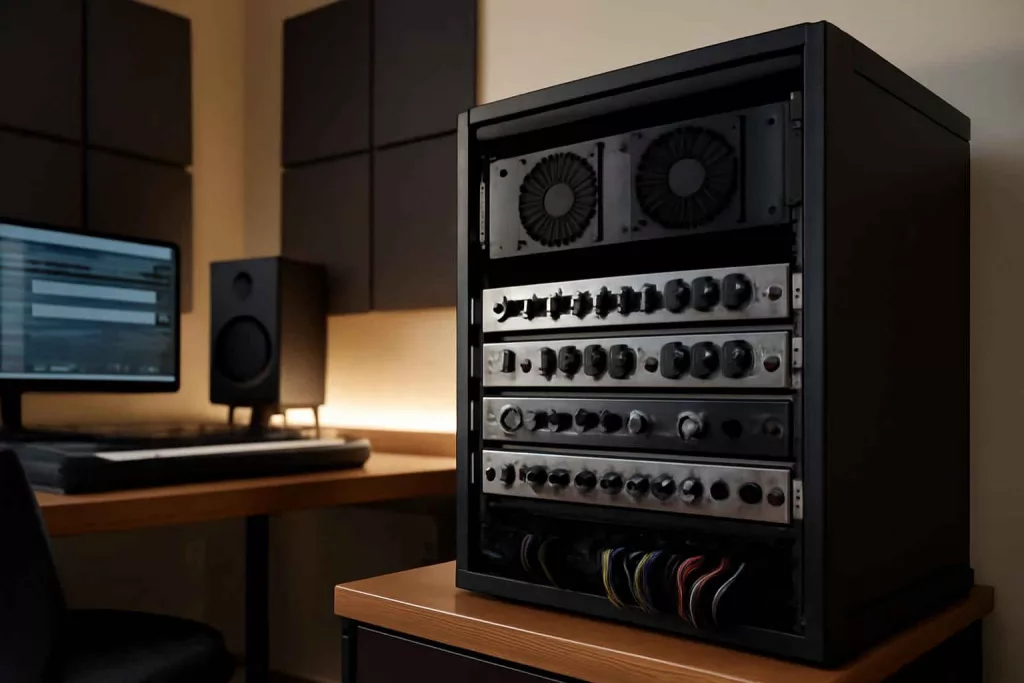
Rack gear refers to a standardized system of mounting hardware—typically 19-inch wide rails and panels—designed to house professional audio, video, and IT equipment. In a home studio context, rack gear provides a stable, organized platform for integrating multiple signal processors, interfaces, and power components. Without a proper rack, you may encounter tangled cables, difficulty accessing controls, amplifier overheating, and suboptimal noise performance.
Key advantages include:
- Centralized Power Management: With a dedicated power distribution unit (PDU), you safeguard sensitive electronics from voltage spikes and maintain consistent voltage across all devices.
- Improved Cable Organization: Cable management panels and trays keep your audio and power lines neat, reducing hum, crosstalk, and the risk of accidental disconnections.
- Enhanced Ventilation: Proper airflow prevents heat buildup that can degrade converters, preamps, and digital processors.
- Scalability: A modular rack system allows you to add or relocate equipment as your studio grows.
Whether you’re tracking vocals, mixing down a podcast, or producing electronic music, essential rack gear for home studio setups ensures reliability and a clean aesthetic so you can focus on creativity rather than cable spaghetti and overheating noise.
Key Components of Rack Gear for Home Studio
A well-equipped rack system consists of several components working in harmony. Below we break down the most important elements:
Rack Rails and Shelves
Rack rails are the backbone of any rack enclosure, providing mounting points for 19-inch wide standard units. Rails come in various depths—typically ranging from 12 to 30 inches—to accommodate different device sizes. If you have a mix of shallow desktop interfaces and deeper power amplifiers, consider adjustable rails or universal shelf kits that bolt directly to the rail spacing.
Open-frame racks are cost-effective for desktop setups, whereas sealed enclosures offer dust protection and noise isolation. Some budget-friendly shelf options include vented metal trays that let heat escape, ensuring devices like tube preamps don’t overheat.
Cable Management Panels
Efficient cable routing is critical for troubleshooting and maintaining signal integrity. Cable management panels provide horizontal or vertical channels where you can clip audio snakes, power cords, and network cables. They prevent cables from draping over vents or accidental unplugging.
For DIY enthusiasts looking to customize, steel pegboard kits can be repurposed in a rack frame to create a flexible grid for cable hooks, zip tie mounts, and accessory shelves. This approach offers unparalleled adaptability, letting you rearrange connections as your gear evolves.
Ventilation and Cooling Accessories
Excess heat is a silent killer of audio gear, causing thermal noise, component stress, and reduced lifespan. To combat this, use rack-mounted fans, ventilated panels, or honeycomb grills to facilitate passive airflow. Fan strips with integrated thermostats automatically ramp up cooling when internal temperatures rise, preserving quiet operation during recording sessions.
In quieter environments, choose low-noise squirrel-cage fans or insulated ducting to minimize fan noise in the live room. Balanced acoustic performance and cooling efficiency keep your gear running optimally without masking low-level details in your mixes.
Power Distribution Units (PDUs)
PDUs deliver centralized surge protection and noise filtering for all rack devices. High-quality units include isolated outlets for digital and analog equipment, ensuring that power-hungry devices like compressors don’t introduce interference into microphone preamps and converters.
Look for PDUs with built-in left/right channel isolation or quad filtered banks to maintain audio fidelity. Some even offer remote monitoring of voltage, current draw, and total power consumption, helping you avoid circuit overloads in home environments where power capacity may be limited.
Top Rack Gear Solutions for Different Studio Setups
Whether you’re working with a compact desktop rig or a dedicated studio room, there’s a rack solution tailored to your needs. We’ve highlighted two popular form factors below:
Compact Desktop Racks
Desktop racks favor portability and small footprints, ideal for apartment studios or mobile setups. Typically 6 to 8 rack units (RU) tall, these racks can accommodate essential items like an audio interface, headphone amplifier, and small PDU.
Advantages include:
- Lightweight for transport
- Fits on recording desks or stands
- Lower cost
However, airflow can be limited in shallow designs. Offset this by selecting open-frame rails and integrating a small compact rack fan unit on top.
Full-Size 19-Inch Racks
For serious home studios with multiple outboard processors, full-height (12U to 24U) racks offer ample space and professional-grade stability. These racks often include locking front and rear doors, adjustable rails, and casters for mobility.
Key benefits include:
- Enhanced security and dust control
- Better cable and airflow management
- Scalable for future expansions
Look for racks with integrated vented side panels or optional quiet fan units that blend performance with acoustics. Many manufacturers provide pre-punched holes for cable glands, simplifying bulkhead pass-throughs for balanced and speaker cables.
Choosing the Right Rack Gear on a Budget
Even with a tight budget, you can assemble a reliable rack system by prioritizing components based on your workflow. Follow these steps:
- List Your Devices: Calculate total rack units needed and note any depth variations.
- Prioritize Power and Cooling: Invest in a PDU with surge protection and at least one fan strip for critical heat-generating equipment.
- Optimize Cable Management: Use affordable cable trays or repurposed magnetic tool holder strips to keep cords organized without expensive panels.
- Buy Modular Pieces: Choose rails and shelves that can be reconfigured or relocated as you acquire new gear.
- Check for Used Gear: High-quality racks and PDUs often show up on classifieds sites when professionals upgrade.
By focusing on power stability and airflow first, then tackling cable routing, you ensure your most vital equipment remains protected even if budget constraints delay other upgrades.
Installation Tips and Best Practices
Correct installation ensures safety and peak performance. Below are essential guidelines:
Positioning and Ergonomics
Mount racks at a height where frequently adjusted gear—like preamps and interface knobs—falls at eye or chest level. Place static components that need less frequent access, such as amplifiers or backup devices, on lower shelves. Keep heavier gear toward the bottom to maintain stability and reduce tipping risks.
Ventilation and Temperature Control
Avoid enclosing racks in tight closets or cabinets unless you add dedicated ventilation. Maintain at least two inches of clearance on all sides, and never stack heat-generating equalizers or compressors without a rack fan in between. For extreme cases, consider installing soundproofing your home studio with acoustic foam panels, which can also help maintain consistent ambient temperatures by reducing external drafts.
Maintenance and Upgrading Your Rack Gear
Routine maintenance preserves both rack integrity and gear performance. Every six months:
- Check rack bolts and tighten mounting screws.
- Inspect cables for wear and replace any frayed or cracked jackets.
- Clean dust filters, vents, and fan grills—dust accumulation increases noise and hampers cooling.
- Test surge protector functionality and replace PDUs older than five years.
When adding new devices, plan for extra RU space and consider front and rear blanking panels to maintain optimal airflow. Blanking panels also give your rack a finished, professional look while directing airflow through populated areas only.
Resources and Next Steps
Having the right rack gear sets the foundation for a smooth, inspiring home studio experience. Start by listing all your devices, measuring rack unit requirements, and establishing a power and cooling plan. Then, mix affordable and modular options to build a system that grows with your creativity.
For further reading on optimizing your home workshop and studio environment, explore our guides on pegboard organization and DIY projects that can enhance your setup. With proper rack gear in place, you’ll enjoy a tidy workspace, protected equipment, and a boost in productivity.
Ready to upgrade? Browse the latest rack accessories on Amazon cable management panels and power distribution units today.