Keeping your chainsaw chain sharp is essential for safe, efficient cutting and prolonging the life of your equipment. A dull chain increases kickback risk and forces your saw to work harder, leading to wear and tear. Fortunately, you don’t need to visit a professional shop or buy an expensive sharpening system. With basic tools and knowledge, you can master chainsaw chain sharpening in your own garage.
Before you begin, gather the necessary sharpening tools. A high-quality round file set will make the job faster and more accurate; you can find one on Amazon at this link: chainsaw round file set. You’ll also need a file guide and a depth gauge tool; consider adding a specialized file guide from Amazon here: chainsaw file guide. With these in hand, you’re ready to restore your chain’s cutting performance.
Why Chainsaw Chain Sharpening Matters
Chainsaw chain sharpening is more than just a maintenance chore: it directly impacts your safety, cutting speed, and fuel efficiency. A dull chain pulls itself through the wood instead of slicing cleanly, causing excessive vibration, operator fatigue, and a greater chance of binding or kickback. Regular sharpening keeps the teeth biting effectively, reducing strain on the engine and helping you finish jobs faster.
Neglecting chain sharpening can lead to premature chain wear and damage to the guide bar. You’ll notice chipped cutters, uneven wear patterns, and a rounded profile on the teeth if you let sharpening intervals lapse. By sharpening on your own schedule—typically after every 2–3 full tanks of fuel—you maintain optimal cutting angles and tooth geometry. This proactive approach saves money on replacement chains and reduces downtime.
Investing a little time in mastering chainsaw chain sharpening also empowers you to handle emergency repairs in the field. If your chain dulls unexpectedly while working far from your home shop, you’ll be capable of restoring sharpness quickly and safely with minimal tools.
Signs You Need to Sharpen Your Chainsaw Chain
Identifying when your chain needs sharpening is as important as the process itself. Watch for these telltale signs:
- Slow or Uneven Cutting: If the saw stops frequently or the cut drifts to one side, the teeth are likely dull.
- Wood Chips Instead of Shavings: A sharp chain produces fine, consistent wood shavings. Coarse chips indicate dull cutters.
- Excessive Smoke or Hearing Strain: A dull chain increases friction, causing smoke and forcing the engine to labor.
- Increased Kickback: Sharp chains bite cleanly. As they dull, the chance of sudden kickback rises.
Regularly inspect your chain after cutting dense or abrasive materials like dirty wood or branches with embedded grit. If you notice any of these symptoms, it’s time to sharpen rather than continue forcing the saw.
Another quick test: engage the throttle and let the chain coast. If the chain remains embedded in the wood, it’s too dull. A properly sharpened chain will pull itself into the cut. Performing this simple check before each cutting session helps maintain consistent performance and prolongs chain life.
Essential Tools for Chainsaw Chain Sharpening
Proper tools ensure accurate angles and consistent tooth profiles. Gather the following items before you start:
- Round File Set: Match the file diameter to your chain’s pitch (commonly 5/32″, 3/16″, or 7/32″).
- File Guide: Holds the round file at the correct 30° cutting angle and ensures uniform filing.
- Depth Gauge Tool: Measures and adjusts the depth gauges (rakers) to maintain consistent chipper height.
- Flat File: Helps reset the depth gauges after filing cutters.
- Protective Gear: Leather gloves, safety glasses, and hearing protection reduce risk during sharpening.
- Workbench Vise: Secures the chainsaw bar for stable sharpening. If you don’t have a vise, check out our DIY rolling tool chest guide to build a mobile work station.
- Cleaning Brush: Removes sawdust and metal filings before and after sharpening.
Keeping these tools organized improves workflow and reduces sharpening errors. For storage solutions, consider using magnetic tool holders for garage workshops to keep files and gauges within easy reach.
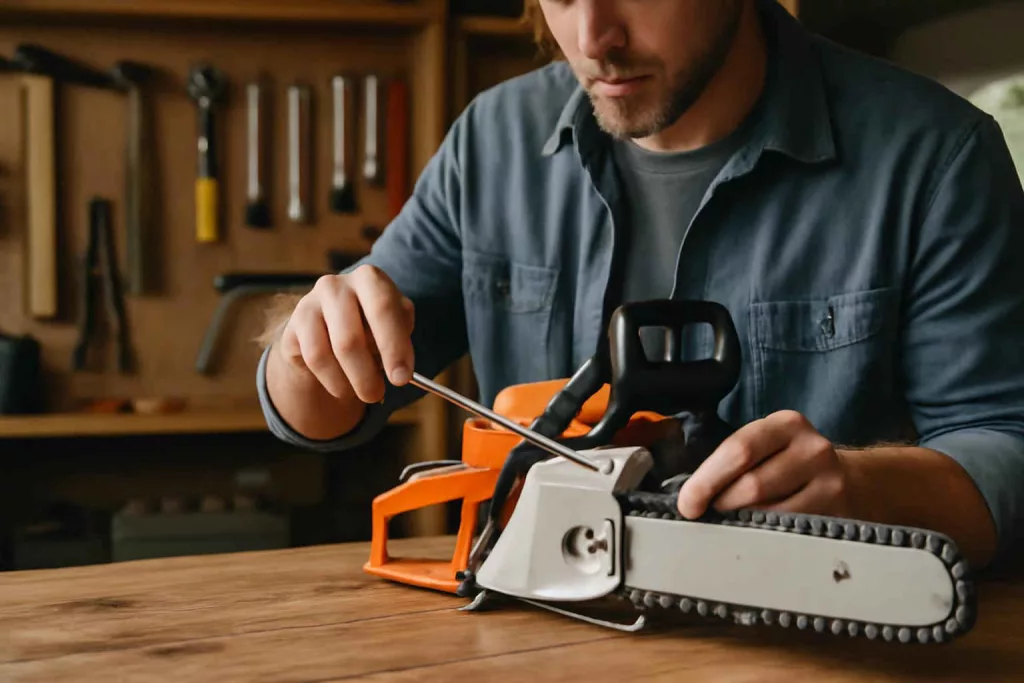
Step-by-Step Chainsaw Chain Sharpening Process
Follow these steps for consistent, professional-grade results:
- Secure the Bar: Clamp the chainsaw bar in a vise, leaving enough chain exposed to access the cutters safely.
- Clean the Chain: Remove debris with a stiff brush to expose the cutters and depth gauges clearly.
- Count and Mark Cutters: Begin at the sprocket end and mark the first cutter to ensure you complete a full cycle.
- File the Cutters:
- Insert the round file into the file guide.
- Align at the manufacturer’s recommended angle (usually 30° on top plate).
- Push the file through the cutter in one smooth motion—five to six strokes per cutter is standard.
- Rotate the Chain: Turn the chain to the next tooth and repeat filing on every other cutter (one side of the chain).
- Switch Sides: After completing one side, reposition the saw or yourself to maintain a consistent filing angle and repeat on the opposite cutters.
- Check Cutter Height: Compare filed cutters. Uniform height prevents vibration and uneven cuts.
Maintaining a smooth, steady filing motion ensures each cutter receives the same number of strokes and the chain’s cutting profile stays even. Avoid back-and-forth sawing motions, which can round off the cutter edges.
Adjusting Depth Gauges for Optimal Performance
After filing the cutters, reset the depth gauges (or rakers) to maintain the correct chip load. If the depth gauges sit too high or too low, your chainsaw will either bite too aggressively or barely cut.
Use the depth gauge tool to measure each raker. The tool rides on the raker surface, showing you how much material to remove. Place the tool over the depth gauge and file the protruding metal with a flat file until flush with the tool guide. Move methodically down the chain, ensuring every depth gauge is identical.
For a precise approach, consider this chainsaw depth gauge tool from Amazon. Accurate depth adjustments improve cutting efficiency and reduce motor strain, extending both chain and engine life.
Post-Sharpen Maintenance and Best Practices
Sharpening is only part of proper chain care. After you finish filing and depth gauge adjustments, clean off metal filings with a brush and apply a light coat of bar oil. This lubrication minimizes friction and prevents rust between uses.
Inspect the chain tension next. A properly tensioned chain should snap back into place when pulled and released. Too loose increases derailment risk; too tight accelerates wear on bearings. Refer to your chainsaw manual for the correct tension specification.
Store your chains and tools in a dry environment. Use protective covers or case inserts to shield teeth from accidental dulling. For workshop organization, magnetic holders or a designated storage rack keeps everything organized and ready for your next sharpening session.
Safety Tips for Chainsaw Sharpening
Working with chainsaws demands attention to safety. Always wear leather gloves and safety glasses when handling a sharp chain. Keep your work area well-lit and free of clutter. Never file a chain while it’s still mounted and powered on—always shut off the engine and disconnect the spark plug.
Maintain a stable posture and secure footing when filing. Avoid distractions or attempts to multitask. If you feel fatigued, take breaks to prevent mistakes. Consistency in filing angles and strokes comes more easily when you’re focused and comfortable.
Finally, inspect your sharpening tools regularly. A worn or bent file can damage cutters instead of sharpening them. Replace files and gauges at the manufacturer’s recommended intervals or sooner if you notice irregularities in your filing results.
Conclusion
Mastering chainsaw chain sharpening at home saves time and money while keeping your saw performing at its best. By following our step-by-step guide and using the right tools—like a quality round file set and depth gauge—you’ll achieve crisp, efficient cuts and extend the life of both your chain and your chainsaw. Remember to practice safe sharpening techniques, adjust tension properly, and perform regular maintenance to ensure peak performance on every job.
Ready to start sharpening? Gather your tools, set up a stable workspace, and keep your chain biting into the wood with ease. Your chainsaw—and every cutting task—will thank you.