Sharp wood chisels are essential for precise cuts, smooth finishes, and safer woodworking. In this guide, you’ll discover how to sharpen wood chisels with a sharpening jig, transforming dull blades into razor-sharp tools. We’ll explore equipment selection, step-by-step techniques, troubleshooting common issues, and best practices for maintaining your chisels. To get started, consider investing in a quality sharpening jig for chisels and waterstones to achieve consistent bevel angles and optimal edge retention.
Why Sharpening Wood Chisels Matters
Wood chisels perform a variety of tasks, from paring thin shavings to mortising. When chisels are sharp, they slice cleanly through wood fibers, reducing tear-out and delivering crisp results. A dull chisel, by contrast, requires more force, leading to unpredictable cuts, frustrating tear-out, and potential accidents as the blade skips off the surface.
Maintaining sharp edges also extends the life of your chisels. When you allow blades to become excessively dull, you end up grinding away more metal during sharpening, which gradually shortens the tool. Routine honing with a jig preserves steel, ensuring longevity. Moreover, sharp chisels demand less physical effort, reducing hand fatigue and the risk of slips that could injure you or damage the project.
This guide targets woodworkers who already own chisels but struggle with maintenance. We’ll help you master the sharpening process with a jig, ensuring consistent bevel angles, fine polishing, and safe handling. Whether you’re a hobbyist or professional, these techniques will refine your skills and enhance your woodworking outcomes.
Understanding Sharpening Jigs and Equipment
Types of Sharpening Jigs
A sharpening jig is a guide that holds your chisel at a set angle against sharpening stones. Common jigs include bench-mounted honing guides, angle-setting clamps, and roller guides for freehand sharpening. Bench-mounted guides clamp the chisel’s tang or sides, maintaining a secure position on flat stones. Roller guides use wheels or rollers to glide a chisel back and forth.
When choosing a jig, look for one that accommodates various chisel widths and offers adjustable angle stops. For most woodworking chisels, sharpening angles of 25° to 30° work well. A jig with clear angle markings simplifies repeatable sharpening sessions.
Choosing the Right Sharpening Stones
Sharpening stones come in waterstone, oilstone, and diamond varieties. Waterstones, favored by many woodworkers, cut quickly and allow you to progress through grits efficiently. Start with a coarse 1000- to 400-grit stone to re-establish the bevel, then move to a 3000- to 6000-grit stone for honing, and finish on an 8000- to 10000-grit surface for polishing. You can find high-quality chisel sharpening stones in waterstone sets.
Diamond plates are a low-maintenance alternative that never require flattening. Oilstones, such as Arkansas stones, offer a balance between cutting speed and polishing capability. Whichever stone type you choose, ensure it remains flat by periodically flattening with a lapping plate or flattening stone.
Additional Accessories
Beyond stones and a jig, add a leather strop and honing compound to your toolkit. After honing, stropping at a shallow angle refines and aligns the edge, crucial for the ultimate sharpness needed in fine paring. A quality leather strop charged with green or white honing compound removes microscopic burrs and polishes the bevel.
Other useful accessories include angle wheels (for quick angle adjustments), a small brush for cleaning stone surfaces, and a splash guard to contain water from your waterstones. Organizing these tools near your bench improves workflow—consider a modular tool drawer insert for easy access.
Step-by-Step Sharpening Process with a Jig
Preparing Your Workstation
Set up a stable workbench with a non-slip surface. Place your sharpening stones on a flat base, such as a rubber mat or wooden cradle, to prevent sliding. Ensure good lighting so you can see the bevel clearly. Keep clean water nearby for waterstones, a towel for quick drying, and your jig and chisel within arm’s reach.
Setting Up the Jig
Adjust your jig to the desired bevel angle, typically 25°. Clamp the chisel blade in the jig, ensuring the blade’s primary bevel is exposed evenly. The jig should hold the chisel securely without wobbling. Always tighten knobs progressively, checking alignment before proceeding to sharpen.
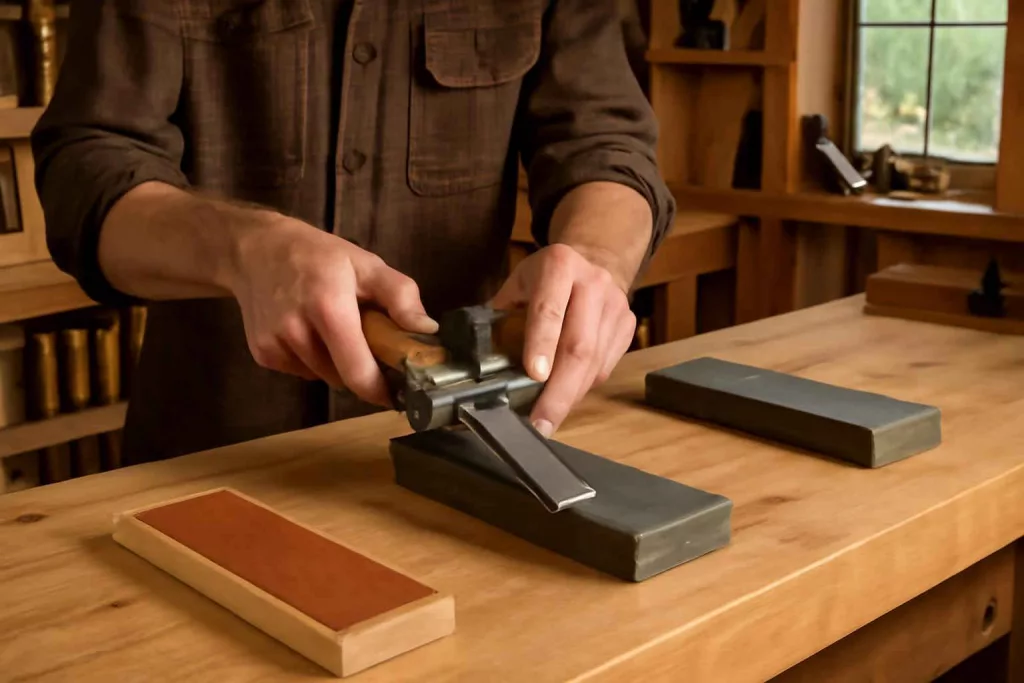
Grinding the Bevel
Begin on the coarsest grit stone. With moderate pressure, push the jig and chisel forward, keeping contact with the stone’s surface. Lift the chisel only on the return stroke to avoid rounding the bevel. Maintain a consistent rhythm, counting strokes or using a timer to ensure uniform material removal on each side of the blade. Continue until a new bevel forms, indicated by a shiny bevel surface and a burr on the opposite side.
Honing the Chisel
Move to a medium grit (3000–4000). Repeat the same strokes, applying lighter pressure. The goal is to remove scratches from the coarse grit and refine the bevel. You’ll notice the burr become finer. After approximately 20–30 strokes per side, move to a fine grit (8000–10000) for polishing.
Stropping for Final Polishing
After honing, place your leather strop on a flat surface. Secure it if possible. Hold the chisel at the bevel angle and stroke the blade away from the edge on the strop. Perform around 10–15 passes on the bevel side, then 5–10 passes on the flat side to remove any remaining burr. The result should be a mirror-like finish on the bevel edge.
Troubleshooting Common Sharpening Issues
Even with care, you may encounter problems. If the bevel edge is uneven, ensure your jig clamps are square and that the blade aligns with the stone. Rounding of the bevel indicates lifting on the return stroke; focus on lifting only after the stroke completes. Persistent burrs suggest insufficient progression through grits—spend more time on each grit to refine scratches.
Grinding chatter—visible vibrations or galling on the bevel—can occur if the stone surface is uneven or worn. Flatten your stones regularly and ensure a stable base. If you experience a slow cutting rate on diamond stones, clean the surface with an abrasive pad or rinse to remove metal particles.
Maintaining Sharp Chisels and Storage Tips
Regular maintenance between full sharpening sessions helps preserve the edge. After each use, hone the chisel on a fine stone or strop to realign the edge. Wipe the blade clean and apply a thin coat of light machine oil to prevent rust.
Proper storage prevents damage. Store chisels with edge guards in a modular wall-mounted tool organizer or dedicated drawer inserts to avoid contact with other tools. A small magnet strip can also secure chisels safely, preventing accidental drops and preserving the cutting edge.
Frequently Asked Questions
How often should I sharpen my chisels?
Frequency depends on use. For daily shop work, a quick hone on a fine stone or strop before each session suffices. Perform a full sharpening with a jig every few months or when the chisel no longer cuts cleanly.
Can I sharpen chisels freehand without a jig?
Experienced woodworkers sometimes freehand sharpen using raised platforms on waterstones. However, jigs provide consistent bevel angles, which is especially helpful for beginners and ensures repeatable results.
What angle is best for sharpening chisels?
Common bevel angles range from 25° to 30°. A 25° angle balances sharpness and durability for general woodworking. For heavy or mortising chisels, you can increase to 30° for added edge strength.
Do I need to flatten my stones?
Yes. Stones wear unevenly with use, creating hollows that prevent even sharpening. Flatten waterstones with a flattening plate every few months or when you notice chatter or inconsistent bevel surfaces.
Conclusion
Mastering how to sharpen wood chisels with a sharpening jig elevates your woodworking precision, safety, and tool longevity. By investing in the right jig, stones, and accessories, and following a structured sharpening process, you’ll achieve razor-sharp edges that make every pare and cut a success. Remember to maintain your chisels with regular honing, proper storage, and periodic stone flattening. Ready to upgrade your sharpening setup? Explore quality sharpening jigs and waterstone sets to take your chisels from dull to perfect.