Every year, lawn mower owners wrestle with engines that stall, surge, or refuse to start at all—symptoms often traced back to a clogged or malfunctioning carburetor. Learning how to rebuild a lawn mower carburetor can save you money on repairs, extend your equipment’s life, and restore smooth cutting performance. By investing in a quality lawn mower carburetor rebuild kit and following a proven process, you’ll have your mower back in top condition within hours. Proper organization of your parts and tools is critical during this process—consider using our DIY rolling tool cart guide to keep everything in order and within reach.
Understanding the Lawn Mower Carburetor
The carburetor is the heart of a gas-powered lawn mower’s engine, responsible for mixing air and fuel in the correct proportion before combustion. Even slight imbalances can cause rough idling, loss of power, hard starts, or excessive smoke. Before you begin the rebuild process, it’s essential to understand how the carburetor operates and what parts typically wear out over time.
What Does a Carburetor Do?
A carburetor meters fuel flow and atomizes gasoline into a fine mist that mixes with incoming air. The Venturi effect—created by the narrowing of the carburetor throat—draws fuel from the float bowl and into the airflow. A properly functioning float and needle valve maintain a consistent fuel level, while throttle and choke plates control the volume and mixture of the air–fuel charge delivered to the engine.
Common Carburetor Problems
Over time, varnish and debris from old fuel can clog tiny passages and jets inside the carburetor, disrupting performance. Key symptoms include:
- Hard starting or failure to start
- Engine stalling at idle
- Surging or uneven throttle response
- Excessive black or white smoke
Rubber gaskets, O-rings, and diaphragms also deteriorate, causing air or fuel leaks. Identifying these issues early through visual inspection and performance testing will guide you on which components to clean or replace during your rebuild.
Tools and Parts Needed for Carburetor Rebuild
Gathering the right tools and parts before you start prevents interruptions and ensures a smooth workflow. A comprehensive rebuild kit contains gaskets, O-rings, needle valves, seats, and other replacement components designed for your specific carburetor model.
Essential Tools
- Screwdriver set (flathead and Phillips)
- Socket and nut driver set
- Needle-nose pliers
- Wire brush or brass bristle brush
- Compressed air source (can of compressed air or air compressor)
- Small picks or carburetor cleaning picks
- Ultrasonic cleaner (optional but highly effective)
- Clean rags and a parts tray to keep hardware organized
Using an ultrasonic cleaner speeds up the removal of varnish and gum but isn’t mandatory. If you don’t have one, aerosol carburetor cleaner spray and compressed air can do the job effectively.
Choosing the Right Carburetor Rebuild Kit
Selecting a rebuild kit tailored to your mower’s make and model is crucial. Kits vary by manufacturer and carburetor type—float bowl, diaphragm, venturi size, and jet configurations differ. To find the correct kit, look up your engine’s part number, typically located on the blower housing or engine block. Most reliable lawn mower carburetor rebuild kits include:
- Float needle and seat
- Primary and secondary jets
- Gaskets and O-rings for all mating surfaces
- Diaphragms (if applicable)
- Primer bulb (for diaphragm models)
Verify that the kit’s part numbers match your carburetor to avoid wasted effort and ensure a leak-free rebuild.
Step-by-Step Guide to Cleaning a Carburetor
Thorough cleaning is the first step in any rebuild process. It removes varnish, gum, and debris that can clog critical passages. Follow these steps carefully and keep parts organized to simplify reassembly.
1. Removing the Carburetor
Begin by disconnecting the spark plug wire to prevent accidental starts. Turn off the fuel valve, if equipped, and drain any remaining fuel from the bowl. Use your socket set and screwdrivers to remove the mounting bolts. Label hoses and throttle linkages with tape or marker so you can reconnect them correctly. Once off the mower, place the carburetor on a clean workbench.
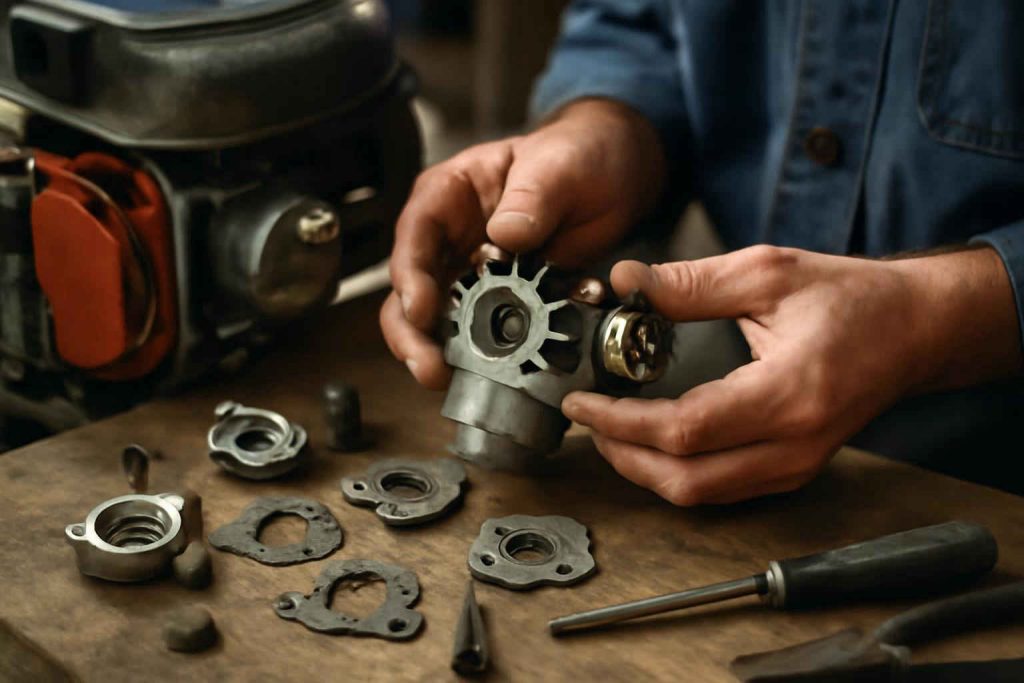
2. Disassembly and Inspection
Separate the float bowl by unscrewing the bowl nut at the bottom. Remove the float, float pin, needle valve, and seats. Keep small parts in your parts tray. Inspect each component: look for cracks in the float, hardened needle tips, and damaged gaskets. Document the order of disassembly with photos or sketches.
3. Ultrasonic or Manual Cleaning
If you have an ultrasonic cleaner, submerge the body, float bowl, jets, and small parts in a cleaning solution for 5–10 minutes. Without an ultrasonic cleaner, spray all parts thoroughly with a quality carburetor cleaner, letting it soak for several minutes. Use a brass brush and cleaning picks to break down stubborn deposits. Blow out every passage, jet opening, and orifice with compressed air until it comes out clear. Wear eye protection when using compressed air.
4. Reassembly of Cleaned Parts
Once fully dry, replace all gaskets, O-rings, and the float needle with new components from your rebuild kit. Lubricate O-rings lightly with clean engine oil. Reassemble in the reverse order of disassembly, referencing your photos or notes to restore the correct orientation of jets and linkage arms. Ensure the float moves freely without binding.
Advanced Rebuild: Replacing Carburetor Components
For deeper rebuild needs or performance upgrades, you may need to replace or upgrade individual carburetor parts beyond the standard kit items.
Float and Needle Valve Replacement
Floats regulate fuel level in the bowl. A swollen or leaking float compromises fuel metering and causes flooding or starvation. Replace the float if it shows any sign of wear. Fit the new needle valve and seat carefully; minor misalignment can lead to fuel leaks or starvation. Test float height against manufacturer specs, using feeler gauges if necessary.
Gaskets, Diaphragms, and Seals
Age and ethanol in modern fuels accelerate gasket and diaphragm deterioration. Diaphragm-type carburetors, common on small engines, rely on a flexible diaphragm to pump fuel—any crack or stiffening will cause erratic idling. Always use OEM-grade diaphragms and gaskets. Avoid cheap aftermarket kits that may not seal properly or fit accurately.
Upgrading Jets and Orifices
Advanced users may jet their carburetor to match specific operating conditions—high altitude, cold climates, or heavy loads. Installing slightly larger or smaller jets adjusts the air–fuel ratio. Consult altitude adjustment charts or engine tuning guides before modifying jet sizes, and test thoroughly to confirm performance improvements without risking lean conditions that could damage the engine.
Reinstalling and Testing the Carburetor
After rebuilding, reinstalling the carburetor correctly is as important as cleaning it. Misaligned linkages or loose connections can mimic bad carburetor symptoms.
Mounting and Connecting
Align the carburetor flange with the intake manifold and tighten mounting bolts to manufacturer torque specifications. Reattach fuel lines, making sure clamps hold firm without pinching hoses. Connect throttle and choke linkages; the throttle plate should open and close smoothly when you pull the throttle cable.
Adjusting Idle and Mixture Screws
Most carburetors have two adjustment screws: idle speed (throttle stop) and idle mixture. With the engine warm and the mower on a level surface, turn each screw in until it seats lightly, then back out to the baseline settings recommended by the engine maker (often 1¼ turns out). Fine-tune by listening to engine behavior: a smooth, stable idle with quick throttle response indicates a correct setting.
Test Run and Troubleshooting
Reconnect the spark plug wire and start the engine. Watch for steady idling, quick response to throttle changes, and absence of smoke or sputter. If the engine floods or starves, revisit float height, fuel valve position, and screw adjustments. A few minor tweaks usually perfect the rebuild.
Maintenance Tips to Extend Carburetor Life
Once your carburetor is rebuilt, proper maintenance will keep it functioning for years.
Use Fresh, High-Quality Fuel
Stale gasoline is the leading cause of carburetor varnish and gum. Always fill your mower with fresh fuel containing no more than 10% ethanol, use a fuel stabilizer if the mower sits idle over winter, and drain the tank before long-term storage.
Regular Cleaning Schedule
Inspect the air filter regularly—clogged filters force dirt into the carburetor. Replace or clean the filter as recommended by the manufacturer, usually every 25 hours of operation. Spray a quick pass of carburetor cleaner spray through external jets every season to remove surface deposits before they harden.
Proper Storage Practices
Before storing your mower for winter, treat the remaining fuel with stabilizer, run the engine to distribute it through the carburetor, then turn off the fuel valve and let the engine die. This prevents fuel from sitting in the bowl and forming deposits.
When to Seek Professional Help
Most rebuilds are straightforward, but some issues require expert attention. Consider a professional overhaul if:
- Your carburetor housing is cracked or warped
- Major internal damage, such as stripped threads or broken diaphragms
- Persistent performance issues after rebuild and adjustment
Engine repair shops have precision tools for deep diagnostics and access to OEM parts not always available in aftermarket kits.
Conclusion
Rebuilding your lawn mower carburetor is a cost-effective way to restore engine performance and extend equipment life. By understanding carburetor function, gathering the right tools and rebuild kit, and following a methodical cleaning and reassembly process, you can master even the most stubborn carburetor issues. Remember to maintain fresh fuel, keep your air filters clean, and store your mower properly to prevent future problems. For efficient tool organization during your rebuild, check out our DIY rolling tool cart guide. With these tips and techniques, your lawn mower will be ready to tackle any yard work season after season.