You can fix a clogged garbage disposal by safely turning off its power, hitting the reset switch, and manually removing any lodged debris with a hex disposal wrench and tongs. It takes about 20 to 30 minutes and requires only basic tools such as an Allen wrench and a flashlight. Garbage disposal wrench makes this job even easier and can save you the cost of a plumber.
Garbage disposals clog when fibrous food, utensils, or hard materials jam the grinding components. Most kitchen disposals fail to grind effectively once an obstruction blocks the blades or when the motor stalls under strain. Calling a professional can cost over $100, but by following a few straightforward sequence you can troubleshoot and restore normal function yourself.
Before you start, gather these tools and materials: safety gloves, a sturdy flashlight or work light, a 3/8-inch hex disposal wrench, a pair of long-handled tongs, and optionally a basin wrench if you plan to clear the trap under the sink. Having under-sink pull-out organizers installed can make retrieving tools faster and keep your cabinet tidy. With these in hand, you’re ready to tackle the jam and get your disposal back to peak performance.
Safety is the top priority when working on any electrical appliance. Always unplug the disposal at the wall or switch off the dedicated breaker before touching any components. Never reach into the disposal with bare hands, and double-check that the power is off by flipping the switch and verifying no humming occurs. Once you’re confident the unit is de-energized, you can proceed without risk of injury.
In this guide, you’ll find a detailed, step-by-step process to unjam your disposal, clear the trap if necessary, and test the motor. We’ll also cover common mistakes to avoid, share a real-world scenario that illustrates the process in action, and offer tips to keep your disposal running smoothly. By the end, you’ll have the confidence and knowledge to solve most clogs on your own and restore your kitchen to full function.
Step-by-Step Guide
1. Cut Power to the Disposal
Begin by ensuring the disposal cannot switch on accidentally. Locate the dedicated circuit breaker in your panel and flip it off, or unplug the disposal if it has a cord reaching an outlet under the sink. Confirm there is no power by flipping the wall switch; you should hear or feel no motor hum. This step is critical for safe handling of the blades and motor housing.
2. Reset and Test the Unit
Nearly all disposals have a red or black reset button on the underside. After cutting power, wait ten seconds, then press the reset button until it clicks. Restore power briefly and activate the switch for a moment. If you hear humming or grinding noise, power is restored but the disposal may still be jammed. If the reset trips again, deeper debris removal is required.
3. Clear Visible Debris
With power off again, shine your flashlight into the mouth of the disposal. Never insert your hand — use long-handled tongs to grab any obstructions like bone fragments, fruit pits, or fibrous skins. Carefully set the debris aside to dispose of it in the trash. Removing blockages near the blades often allows the unit to spin freely.
4. Use the Disposal Wrench
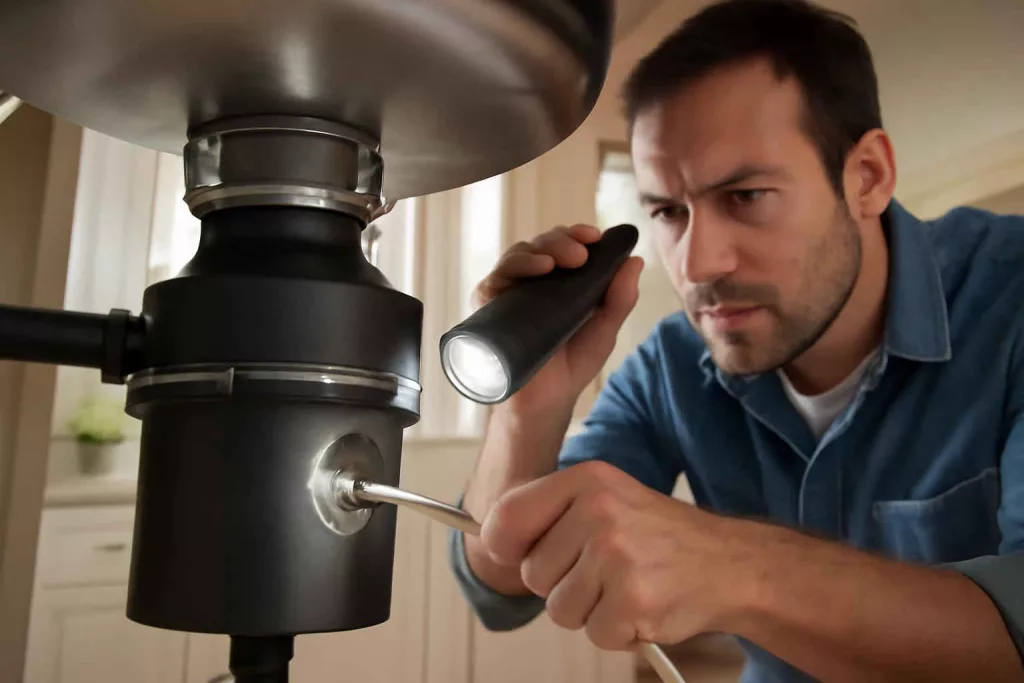
Most disposals include a hex socket at the bottom center. Insert your 3/8-inch hex wrench (often called a garbage disposal wrench) and apply firm back-and-forth pressure to rotate the grinding plate. For stubborn jams, turn the wrench a quarter-turn, then switch direction. Continue until you feel the plate spin freely. This process clears internal debris that tongs can’t reach. Once satisfied, remove the wrench.
5. Remove and Clean the Trap (Optional)
If your disposal still resists turning, you may need to clear the P-trap under the sink. Place a bucket beneath the U-shaped trap, then use a wrench or gloves to loosen the slip nuts. Dump out trapped water and debris, rinse the trap, and reassemble. A clean trap ensures the drain itself won’t clog even if disposal blades are free.
6. Flush and Test Operation
Restore power, then run cold water at a steady flow while turning on the disposal. Water flushes away lingering particles and helps the motor run smoothly. Listen for unusual sounds or vibrations. A quiet, even grind indicates the jam is resolved.
7. Restore and Monitor Performance
After confirming the disposal works properly, reset any breakers you turned off. Inspect underneath for leaks. Run water through the disposal for another 15 seconds to clear all debris. Monitor the unit over the next few days — if it trips again or sounds off, repeat the process or consider professional service.
Practical Example
Meet Sarah, a busy marketing manager who hosts family dinners every weekend. After cooking a hearty pasta dish, she noticed her disposal humming but not grinding when trying to clear plates. Rather than calling a plumber, Sarah followed these steps:
- She opened the breaker panel and flipped off the breaker labeled “Kitchen Disposal.”
- After waiting five seconds, she pressed the red reset button under the disposal housing.
- Turning the breaker back on, she switched on the disposal to see if it would run. It buzzed but didn’t spin.
- Power off again, Sarah slid under the sink with her flashlight and tongs. She retrieved a large chunk of mozzarella rind and several strands of spaghetti wrapped around the blades.
- Next, she inserted the hex wrench into the socket and worked the grinding plate back and forth until it moved freely.
- To ensure no hidden debris remained, Sarah removed the P-trap, cleared a small piece of eggshell stuck inside, and reassembled the pipes.
- Finally, she restored power, ran cold water, and heard the disposal grind smoothly. To keep her cabinet organized and tools within reach, she later installed under-cabinet paper towel holder dispensers and a utensil rack.
Thanks to a few simple tools and steps, Sarah fixed the jam in under 25 minutes, saved over $100 in labor costs, and learned a process she can repeat any time her disposal balks.
Common Mistakes
- Skipping the Power Cut: Attempting to clear debris without shutting off power can cause serious injury. Always confirm the disposal is de-energized.
- Reaching with Bare Hands: Never stick your fingers into the disposal. Sharp blades can cause cuts. Use long-handled tongs or pliers.
- Overusing Force on the Wrench: Applying excessive torque risks damaging the grinding plate or motor. Apply steady, controlled pressure.
- Ignoring the Trap: Clearing only the grinder may not fix blockages in the drain assembly. Inspect and clean the P-trap if needed.
- Not Flushing Properly: Failing to run cold water during and after operation can leave food particles behind, leading to odor or repeat clogs.
- Using Hot Water: Hot water can melt grease, which then solidifies further down the line. Always use cold water when running your disposal.
- Neglecting Routine Maintenance: Skipping occasional cleaning and sharpening of blades shortens disposal lifespan. Grind ice cubes and citrus peels monthly.
Tips to Improve
1. Grind Ice Cubes Monthly: Ice helps remove buildup and sharpens blades by knocking off residue. Follow with cold water to flush.
2. Use Citrus Peels: Lemon or orange peels freshen odors and clean the interior walls. Drop a few small pieces and run for 30 seconds.
3. Avoid Fibrous Foods: Do not put celery stalks, onion skins, or corn husks down the disposal. These can wrap around blades and cause jams.
4. Install a Surge Protector: Protect the disposal motor from voltage spikes by plugging the unit into a dedicated surge protector.
5. Clean with Baking Soda and Vinegar: Pour half a cup of baking soda, followed by a cup of white vinegar. Let it fizz for a few minutes, then rinse with cold water.
6. Check for Leaks Regularly: Inspect the disposal flange and drain connections under the sink for moisture. Tighten slip nuts if you spot drips.
7. Keep Tools Handy: Stash the disposal wrench and tongs in a designated organizer. A tidy under-sink area speeds up jam clearance.
8. Schedule Annual Checks: Have a plumber inspect your disposal mounting and seals yearly to catch wear before it leads to leaks or motor failure.
Conclusion
Fixing a clogged garbage disposal is a straightforward process that most homeowners can complete in under 30 minutes with minimal tools. By cutting power, resetting the unit, clearing debris, and using a hex wrench, you can unblock jams without costly service calls. Remember to flush with cold water, avoid fibrous scraps, and perform simple monthly maintenance like ice cube and citrus cleans to keep your disposal running smoothly.
Armed with this guide, you’ll save time and money the next time your disposal clogs. For the best results, keep a quality disposal wrench and tongs on hand — they’re inexpensive tools that deliver a big return on safety and convenience.