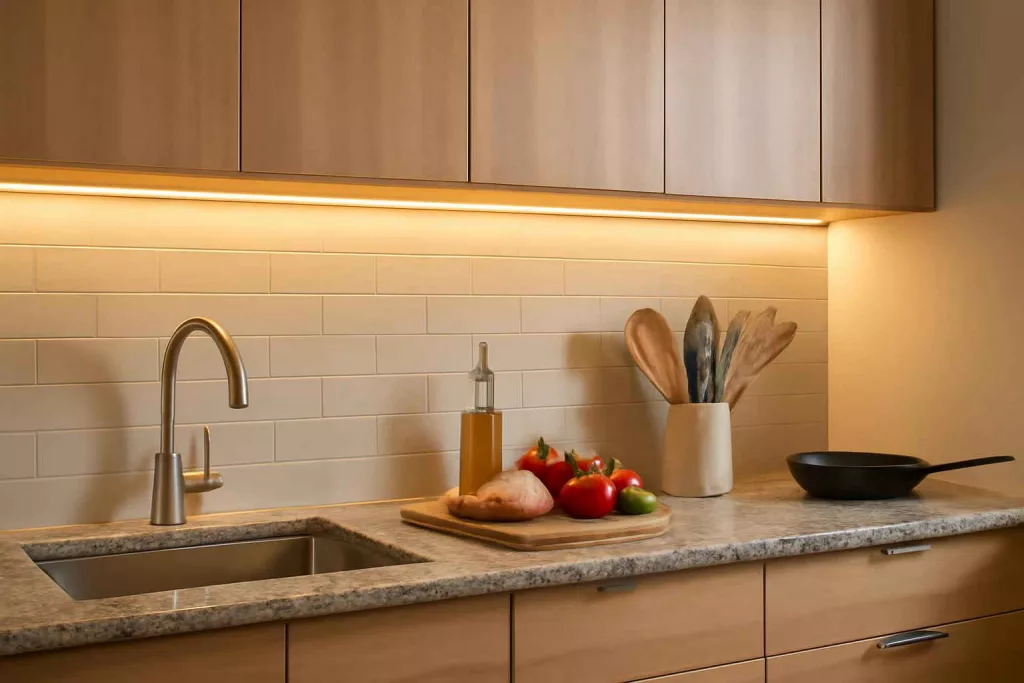
The best under-cabinet lighting for kitchen is energy-efficient LED strip lighting with dimmable warm-white output and sleek low-profile design, delivering bright, even illumination across countertops. Installing these lights enhances workspace safety and ambiance while reducing energy costs. Shop under cabinet LED lights on Amazon to get started immediately.
Top 5 Under-Cabinet Lighting Solutions
1. Dimmable Warm White LED Strip Light Kit
This kit combines flexible 16.4-foot LED strips with a wireless dimmer remote for seamless control. With a 3000K color temperature, it provides warm, inviting lighting ideal for meal prep. The self-adhesive backing speeds installation, and the low-profile design hides easily under most cabinets.
2. Hardwired Slim LED Puck Lights
If you prefer a hardwired installation, these slim puck lights mount flush beneath cabinets and link together via low-voltage wire. Each puck delivers bright, focused light, perfect for illuminating corners or sinks where strip lights might not reach. They’re UL-listed for kitchen use and come with a dimmer switch.
3. Motion-Sensor Rechargeable LED Bars
Rechargeable LED bars with built-in motion sensors offer a tool-free installation—just mount with included magnets or screws, and recharge via USB when the battery runs low. Their sensor ensures lights turn on only when needed, cutting down on wasted energy between cooking tasks.
4. Plug-In LED Light Bars with Touch Control
These plug-and-play bars plug into any outlet and are operated via touch-sensitive zones on the bar itself. They deliver cool white light (4000K) for crisp, daylight-like clarity—helpful when reading recipes. The slim housing blends under cabinets, and multiple bars can be daisy-chained for continuous coverage.
5. Smart Wi-Fi LED Under-Cabinet Strips
For home automation enthusiasts, these smart strips connect to your Wi-Fi network and integrate with popular smart home platforms. Adjust brightness and color temperature via app or voice control, set schedules, and sync with other smart devices. Use a smart plug with energy monitoring to track power usage and automate lighting scenes.
Step-by-Step Guide to Installing Your Under-Cabinet Lights
Step 1: Measure and Plan Your Layout
Begin by measuring the length of cabinets where lights will go. Note outlets and power source locations. If you choose plug-in lights, ensure outlets are accessible or plan to install a power relocation kit. For hardwired or smart options, map out an in-wall or surface-mount path to your switch or junction box.
Step 2: Gather Tools and Materials
Essential tools include a tape measure, pencil, drill with bits, screwdriver, level, wire connectors (for hardwired kits), and cable clips. For smart installations, you’ll need a Wi-Fi signal booster if your kitchen’s signal is weak. Keep extra wire and mounting hardware on hand in case your cabinet underside has contours.
Step 3: Prepare the Cabinet Undersides
Clean the surface where lights will adhere, removing dust or grease with mild detergent. If mounting is uneven, use thin spacer blocks for stability. For recessed puck lights, drill holes to required diameter and chamfer edges for a snug fit. Test-fit each unit before final mounting.
Step 4: Mount the Lighting Fixtures
For strip lights, peel the adhesive backing and press firmly along the cabinet’s underside, following the planned layout. Use mounting clips every foot for added support. For pucks or bars, screw in the provided brackets or use magnetic mounts for rechargeable options.
Step 5: Connect Power and Controls
Plug in plug-in models and hide cords with cable clips or conduit. Hardwired kits require turning off circuit breakers and connecting wires at the junction box—match wire colors and secure with connectors. Smart kits often include a driver module; follow manufacturer wiring diagrams and pair with the app once power is restored.
Step 6: Test, Dim, and Adjust
Turn on the lights and verify even coverage without hotspots. Adjust strip positions or puck angles as needed. Set dimmer levels or program smart routines. Confirm that motion sensors (if used) detect activity reliably without false triggers.
Practical Example
Sarah, a home baker in Denver, was tired of working in dim counter corners when measuring ingredients. She installed a warm-white LED strip light kit under her upper cabinets across a 10-foot span. She plugged the kit into an outlet under the sink and hid the cord behind baseboards. Within 30 minutes, her workspace was uniformly lit. She paired it with a smart plug to automatically turn lights on when she started her mixer—no fumbling for switches.
Common Mistakes
- Ignoring cabinet depth: Lights installed too far back won’t illuminate the countertop fully.
- Skipping a test fit: Adhesive backing can pull paint or finish if repositioned repeatedly.
- Overlooking power access: Without planning, cords may stretch visibly across walls or counters.
- Choosing incorrect color temperature: Cool white can look harsh, while overly warm tones distort food colors.
- Neglecting smart integration: Hardwiring a smart kit without ensuring solid Wi-Fi can lead to connectivity issues.
Tips to Improve Your Under-Cabinet Lighting Setup
1. Use a combination of puck lights and strips: Pucks excel at task zones like sinks; strips deliver even wash along longer runs.
2. Layer with backsplash lighting: Add toe-kick or above-cabinet LED strips for a multi-dimensional effect.
3. Install a dedicated switch: A single wall switch or remote helps isolate under-cabinet lighting from main overhead fixtures.
4. Maintain clean fixtures: Wipe dust off LEDs monthly to preserve brightness. Refer to our shop vacuum maintenance guide for tips on keeping cleaning tools—and counters—dust-free.
5. Experiment with smart scenes: Create cooking, entertaining, and cleanup modes in your smart home app for hands-free control.
Conclusion
Upgrading to the best under-cabinet lighting for kitchen not only elevates your workspace visibility but also enhances the room’s ambiance and energy efficiency. Whether you choose plug-in LED bars or a smart Wi-Fi strip setup, follow the planning and installation steps above to achieve a professional look. For hands-free convenience, pair your lights with a smart plug or home automation system. Brighten your kitchen countertop today and enjoy a safer, more inviting cooking environment.