Building a wall-mounted garden tool rack is the most efficient way to organize your outdoor tools and free up ground space. By using basic lumber and common hardware, you can custom-build a sturdy rack that fits your storage needs and complements your shed or garage.
When planning your project, you can find a garden tool rack kit online to simplify assembly, though building from scratch offers more flexibility, cost savings, and a personalized layout that commercial products often lack.
Uncontrolled piles of rakes, shovels, hoes, and brooms not only create tripping hazards but also shorten tool life by encouraging moisture buildup and blade dulling. A wall-mounted rack keeps handles off the floor, prevents head-to-head collisions, and makes it easy to grab the tool you need without digging through a heap.
Beyond safety and preservation, a well-crafted tool rack elevates the look of your workspace—whether it’s a backyard shed, garage corner, or covered patio. You’ll spend less time searching and more time gardening, while also signaling to neighbors or visitors that you value organization and craftsmanship.
This guide walks you through every stage—from designing your layout and gathering materials to cutting, assembling, and mounting the rack on any wall surface. You’ll finish with a customized storage solution tailored to your tool collection, with options for hooks, holders, and magnetic strips that expand capacity.
No advanced carpentry skills are required; just basic measuring, drilling, and finishing. By the end, you’ll understand how to adapt the steps for different wall types—wood studs, brick, or concrete—and how to integrate additional magnetic tool holders for small accessories like trowels and pruners.
Materials and Tools Needed
Gathering the right materials and tools ensures a smooth build process and a durable end result. Below is a checklist of essentials, along with notes on selecting quality items for long-lasting performance.
- Two 2×4 lumber pieces (8-foot length) – for the horizontal support rails
- One 1×4 lumber piece (8-foot length) – for spacing slats or decorative trim
- 10–12 heavy-duty tool hangers or hooks – rated for at least 20 pounds each
- Coarse and fine-grit sandpaper – for smoothing cut edges
- Exterior-grade wood screws (2″ and 3″) – match to stud depth and wall substrate
- Wall anchors or masonry screws – if mounting on concrete or brick
- Primer and exterior paint or clear sealer – to protect against moisture
- Measuring tape, level, pencil – for layout and alignment
- Power drill with driver bits and masonry bit – for pilot holes and anchors
- Saw (circular or miter saw) – for cutting lumber to size
- Stud finder – to locate wall studs accurately
If you prefer a faster route, explore a garden tool rack hardware bundle that bundles hooks, screws, and anchors. However, choosing individual components gives you control over spacing and weight capacity.
Step-by-Step Guide
1. Plan Your Layout
Start by measuring the width and height of the wall section you’ll use. Note locations of studs—standard spacing is 16 inches on center in most American homes. Sketch a diagram with your tool silhouettes, grouping similar handles together (e.g., rakes and hoes) for consistent spacing.
Decide how many support rails (horizontal boards) you need. Two rails, one near shoulder height and one lower at waist level, handle most shovels, rakes, and leaf blowers. Use your diagram to mark where each hook or hanger will go.
2. Cut and Prep the Lumber
Using a circular saw or miter saw, cut the 2×4 supports to match the measured width. If you prefer a decorative look, miter-cut the ends at a 45-degree angle. Sand all cut edges with coarse, then fine-grit sandpaper to remove splinters and create a smooth finish.
Apply a coat of primer to damp-resistant wood, then paint or seal. This step prevents rot and insects from damaging the rack over time—especially important if your shed lacks climate control.
3. Mark and Drill Pilot Holes
Hold the support rail against the wall at your marked stud locations. Use a level to ensure horizontal alignment. Mark the screw points through the board onto the wall. Remove the rail and drill pilot holes through the wood, then into the wall studs or masonry.
Drilling pilot holes reduces splitting and makes driving screws easier. If attaching to brick or concrete, drill with a masonry bit and insert appropriate anchors before securing the rail.
4. Attach the Support Rails
Position the rail back on the wall, aligning pilot holes. Drive 3″ exterior-grade screws through the board into each stud or anchor point. Tighten until the board sits flush but avoid overdriving, which can strip the wood or sheer the screw head.
Repeat for the lower rail, checking each time with a level. Once both rails are solidly in place, they’ll bear the weight of tools without sagging.
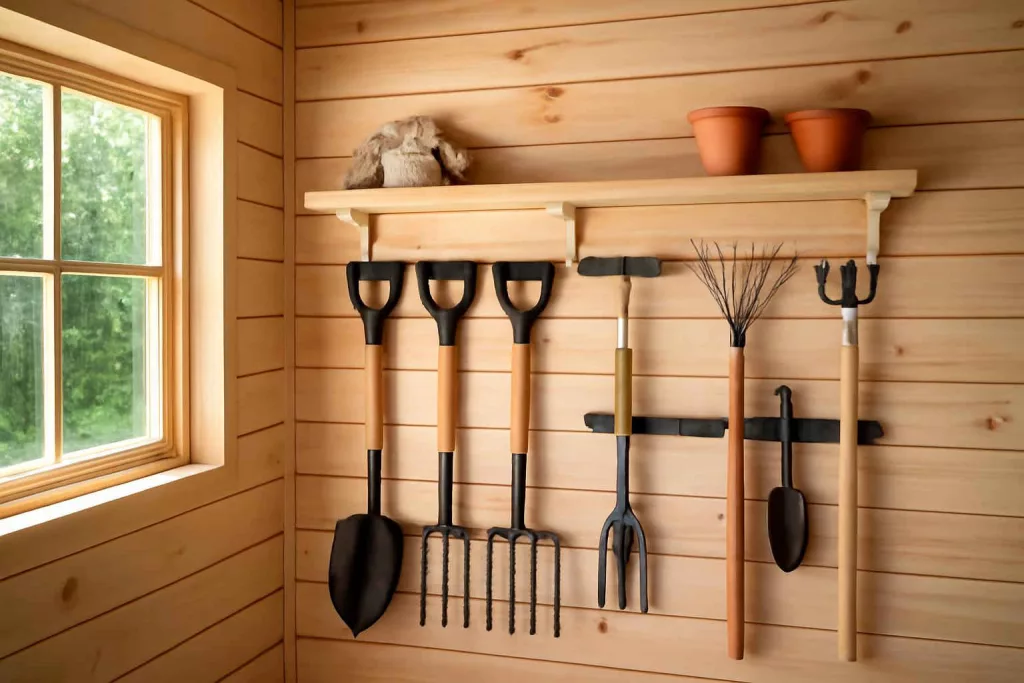
5. Install Hooks, Hangers, and Magnetic Strips
Space hooks according to your initial layout. Drive hooks directly into the wooden rails using a drill or screwdriver. For accessories like pruners, attach small wall-mounted storage solutions such as magnetic strips or custom brackets.
Heavier tools (shovels, rakes) fit best on J-hooks with a closed loop to prevent slipping. For lightweight hand tools, magnetic bars keep metal surfaces accessible and off flat shelves.
6. Final Touches and Load Testing
Give the assembled rack a gentle pull test—grab each tool slot and apply pressure to ensure nothing loosens. Touch up any exposed screw heads with matching paint. Hang your tools and step back to confirm spacing and readability of handles.
If you find crowded areas, simply reposition hooks or add an extra lower rail. The modular nature of a wall-mounted rack means you can expand storage as your collection grows.
Customizing Your Rack
Beyond standard hooks, customizing your rack allows you to optimize space and create a look that matches your outdoor style. Consider decorative pegboard panels between rails for hanging small items like trowels and seed trays. You can order a lightweight perforated panel and cut it to fit, securing it with the same screws used for the 2×4 rails.
Add small wooden shelves above or below the rails for seed packets, plant tags, and gloves. A simple 1×4 cut into 8–10″ lengths and attached with L-brackets provides storage for these items without taking up floor or counter space.
Paint the rack in a contrasting color or apply a wood stain that complements your shed door. If you’re concerned about moisture, apply a clear water-repellent finish after painting. For quick access to frequently used items, install a small shelf or basket below the lower rail to keep gloves and kneepads handy.
Finally, integrate your must-have tools and equipment by carving out dedicated slots for battery chargers if you also store cordless hedge trimmers or blowers. This hybrid design bridges your workshop and garden needs in one eye-catching display.
Practical Example
Imagine Sarah, who lives in suburban Ohio with limited shed space. Her collection included two shovels, three rakes, a garden fork, and a battery-powered leaf blower. Previously, tools lay in a jumbled pile, damaged by moisture and making her slip on wet handles during winter cleanup.
Following this guide, she measured an 8-foot wall section in her shed, located studs at 16-inch intervals, and sketched the tool layout. After cutting two 2×4 rails to 6 feet, she primed and painted them in forest green to match her shed door. Using masonry anchors for her concrete floor foundation wall, she installed the rails at 6-foot and 3-foot heights.
Sarah mounted J-hooks for heavy tools and a 12-inch magnetic strip between them for shears and garden scissors. She then added a small shelf using leftover 1×4 scraps to hold gloves and small pots. The final setup kept all seven tools visible and accessible, and freed up a 3-square-foot section of floor space.
During her next cleanup, she no longer dug through clutter—every tool popped into place by its handle. When guests visited, they commented on her organized shed, and she pointed them to this same DIY approach for their own spaces.
Common Mistakes
- Ignoring Stud Locations: Failing to anchor rails into studs or using improper anchors can cause the rack to pull away under load.
- Overcrowding Hooks: Placing hooks too close together makes it hard to insert and remove tools without entangling handles.
- Skipping Pilot Holes: Driving screws into hard wood without pilot holes often splits the lumber, weakening the structure.
- Neglecting Surface Prep: Unpainted or unsealed wood absorbs moisture, leading to rot and warped boards over time.
- Improper Spacing: Without a clear layout, heavy tools may align at awkward angles, creating balance issues on the rack.
- Forgetting Load Testing: Not testing the weight capacity before full use can result in dropped tools and damaged walls.
Tips to Improve
- Use Adjustable Hooks: Install sliding hook tracks or rail-mounted systems that let you shift hooks without additional drilling.
- Label Tool Slots: Apply small adhesive labels under each hook to assign a spot to each tool, reinforcing organization.
- Expand with Magnetic Strips: Add strong magnetic bars for metal-handled tools or accessories—this increases capacity without bulk.
- Install LED Strip Lights: Under-rail LED lights improve visibility in dim sheds or garages, making tool selection faster.
- Add a Tool Cleaning Station: Mount a small brush and cleaning cloth holder next to your rack to wipe mud and debris before hanging tools.
- Include a Folding Shelf: Attach a fold-down shelf beneath the lower rail for potting seedlings or holding screwdrivers and small parts.
Conclusion
Building a DIY wall-mounted garden tool rack transforms crowded, unsafe piles into a clean, accessible storage solution that protects your equipment and optimizes space. With careful planning, the right materials, and basic carpentry steps—measuring, cutting, drilling, and painting—you’ll create a custom rack that fits any shed or garage wall.
Remember to anchor rails securely, space hooks according to handle thickness, and finish wood surfaces for weather resistance. Whether you use pre-packaged rack kits or source individual hardware, this project pays for itself through improved tool longevity and a safer workspace. Start today by measuring your wall, gathering lumber, and sketching your layout—your garden tools and back will thank you.