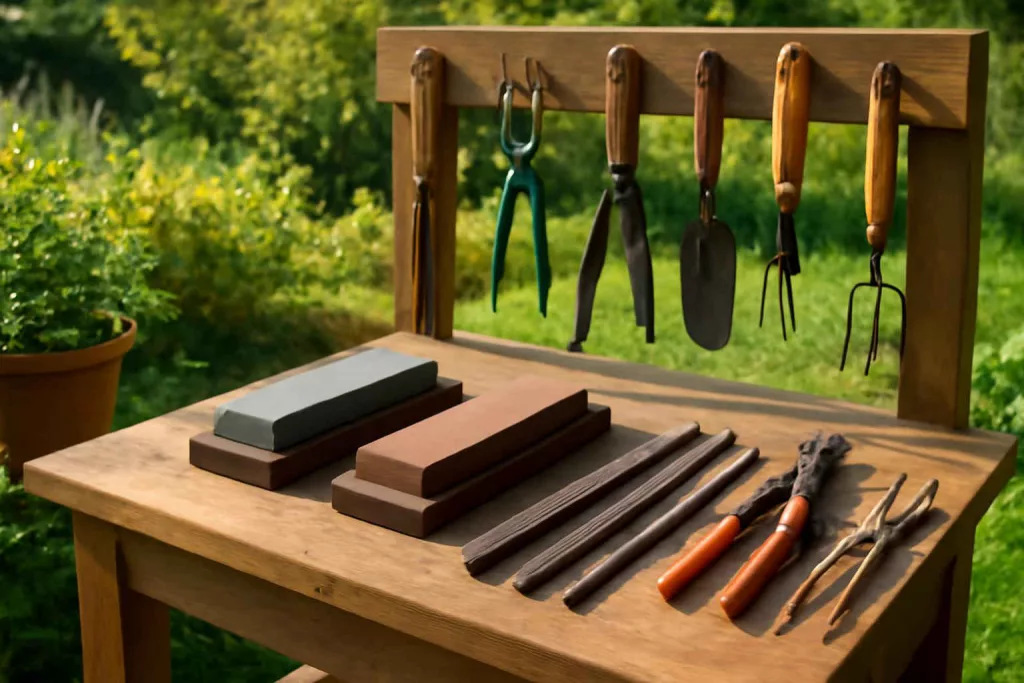
Building your own DIY garden tool sharpening station takes less than a day and gives you a dedicated spot to keep hoes, pruners, and shears razor-sharp. With a few basic materials and tools, you’ll assemble a sturdy bench-mounted system that holds sharpening stones, files, and clamps within easy reach for quick maintenance.
Whether you’re tackling a messy flower bed or trimming hedges, a sharp tool makes every cut smoother and safer. You can find a reliable garden tool sharpening kit online, but having your custom-built station means no more laying stones on uneven surfaces or searching for clamps. This project combines woodworking and basic metalworking to keep everything organized in one outdoor workspace.
If you’ve sharpened tools using guides like How to Clean and Sharpen Garden Pruning Shears, you already know the value of polished edges. This station builds on that knowledge by giving every grit, file, and clamp its own slot. Ready to get started? Follow the steps below to craft a sharpening station built for years of garden work.
Step-by-Step Guide
1. Gather Materials and Tools
Start by collecting a 2-foot by 3-foot pressure-treated plywood sheet and two 2×4 lumber boards—these form your bench top and legs. You’ll also need a pair of pipe clamps, metal sharpening stones (coarse and fine), a spark-resistant steel file, and a small vise or C-clamp. Additional hardware includes screws, corner braces, and wood glue. Finally, a cordless drill, jigsaw, measuring tape, and safety gear (gloves, goggles) round out your toolkit.
2. Cut and Assemble the Bench Frame
Measure and cut the 2×4 boards into four equal legs (18 inches each) and two long supports (36 inches). Attach the supports between pairs of legs using screws and wood glue at right angles to form two A-shaped end frames. Connect these with cross braces running lengthwise 2 feet apart. This open-frame design provides stability for mounting sharpening devices and leaves room for storage underneath.
3. Attach the Plywood Top
Place the plywood sheet on top of the assembled frame and fasten it with 2-inch exterior screws through the supports. Ensure the top is flush on all sides. Sand any rough edges to prevent splinters. This surface will serve as a mounting point for stones and hold small items like wrenches, so a smooth finish is worth the extra time.
4. Install Clamps and Vise
Secure your pipe clamps along the front edge of the bench top, spacing them about 8 inches apart. These clamps hold tool blades steady during sharpening. Mount a small bench vise or heavy-duty C-clamp toward one corner for sharpening larger items like shovel blades. Make sure each clamp can be adjusted easily by hand without tools.
5. Mount Sharpening Stones and Files
Attach a wooden block beneath each sharpening stone with screws, then fix the blocks to the bench top with bolts and wing nuts. This quick-release mounting system lets you swap stones mid-session. Set coarse grit on one side and fine grit on the other. Organize metal files in a slotted wooden holder on the side rail to keep them upright and visible.
6. Add Storage Bins and Hooks
Under the bench, screw in plastic storage bins or metal baskets to hold replacement stones, sandpaper, and lubricants like honing oil. Along the back edge, add a row of hooks for easy-hanging tools such as trowels and weeders. This ensures every sharpening accessory lives within arm’s reach without cluttering the surface.
7. Sand, Seal, and Finish
Give the entire station one last sand over rough spots and wipe it clean. Apply a coat of exterior wood sealant or marine varnish to protect against moisture and sun damage. For a personalized touch, paint the legs in a weatherproof color or stencil your initials on the side. Let it cure fully before outdoor use.
Practical Example
Meet Sarah, a weekend gardener in Oregon who grows tomatoes, herbs, and roses. Before building her station, she sharpened shears on the edge of her workbench, often slipping and rounding edges. After installing her DIY garden tool sharpening station, she clamps pruners in seconds, works through coarse to fine stones without moving tools around, and stores replacement stones below.
On a sunny Saturday, Sarah brought out her pruning kit and placed her dull hedge shears in the vise. In under five minutes, she moved from a 120-grit oil stone to a 400-grit stone, achieving a paper-thin edge before oiled them and hung them on a hook. Later she sharpened a hoe head by securing it in a pipe clamp. Her sharpening tasks that once took 30 minutes now finish in 10, leaving more time for planting and weeding.
Since adding extra bins, Sarah no longer loses lubricant bottles or small files under her potting bench. For similar storage ideas, check out our guide on DIY Wall-Mounted Garden Tool Rack. And when the season shifts, she follows tips to organize and store seasonal outdoor power tools, ensuring everything stays protected in winter.
Common Mistakes
- Failing to secure stones: Loose stones lead to uneven sharpening and potential tool damage.
- Using the wrong grit first: Skipping coarse grit doubles the time needed to restore a dull edge.
- Over-tightening clamps: Extremely tight pressure can distort tool edges or crack blades.
- Neglecting safety gear: Sharpening without goggles and gloves risks metal shards and oil splashes.
- Ignoring leveling: An unlevel bench warps blades or causes inconsistent angles during sharpening.
- Poor lighting: Working in shadows leads to missed nicks and uneven bevels.
- No lubrication: Dry sharpening stones wear out faster and generate more heat, dulling tools.
- Cluttering the workspace: Too many accessories on the bench top slow down the process.
- Skipping maintenance: Failing to clean or seal the wood invites rot and shortens the station’s life.
- Inadequate storage: Leaving stones and files exposed outdoors causes rust and grit contamination.
Tips to Improve Your Station
- Install LED strip lighting above your station to spot nicks and maintain consistent angles.
- Add a small magnetic tool holder on the side for quick-grab files and screwdrivers.
- Label storage bins with grit sizes or oil types to speed up selection during tasks.
- Mount a mirror or smartphone holder for video tutorials and angle checks while sharpening.
- Consider a fold-down bench extension if you need extra working area for longer tools.
- Use rubber anti-fatigue mats underfoot to reduce strain during longer sharpening sessions.
- Attach a small drawer for hobby items like woodworking chisels or garden markers.
- Periodically apply a clear protective wax to the surface to repel dirt and water.
- Include a small trash tray to catch metal filings and wood shavings for easy cleanup.
- Store a backup diamond honing stone in a dedicated bin to maintain your fine-grit stone’s surface.
Conclusion
Creating a DIY garden tool sharpening station transforms routine maintenance into a safe, organized, and efficient process. With simple materials, you’ll build a dedicated area where every stone, file, and clamp has its place. This setup not only prolongs tool life but also boosts your productivity during busy planting or pruning seasons.
Take advantage of your new station by sharpening tools at the first sign of dullness and following proper maintenance routines. Your garden will thank you through cleaner cuts, healthier plants, and fewer frustrations. Gather your materials, set aside a weekend afternoon, and bring your garden tools back to peak performance!