Regular maintenance is the cornerstone of reliable and efficient home air compressor operation. Whether you’re powering nail guns, spray painting walls, or inflating tires, a well-maintained compressor saves time, reduces repair costs, and extends the life of your equipment. In this guide, we’ll cover every essential step—from draining moisture to inspecting hoses—so you can keep your compressor in peak condition. Looking for the right tools? Consider adding a home air compressor maintenance kit to your workshop arsenal.
Why Regular Air Compressor Maintenance is Crucial
Home air compressors endure frequent pressure cycles, moisture buildup, and wear on internal components. Neglecting maintenance can lead to decreased efficiency, costly downtime, and premature failure. Moisture accumulation inside the tank fosters rust and corrosion, compromising structural integrity. Dirty filters and low oil levels increase friction and overheating, reducing performance and escalating energy consumption.
By adopting a scheduled maintenance routine—routine checks each week, monthly oil changes, and quarterly filter replacements—you can avoid emergency repairs and keep your compressor running smoothly. A well-kept compressor not only delivers consistent air pressure but also operates quietly, making your workshop a safer and more pleasant workspace. If you’re still selecting a compressor model, compare features in our Best Portable Air Compressors for Home Workshops guide to find a unit that’s reliable and maintenance-friendly.
Safety Precautions Before Servicing
Before diving into maintenance tasks, always prioritize safety. Follow these steps to protect yourself and prevent damage:
- Power Off and Unplug: Ensure the compressor is fully shut down and disconnected from the power source.
- Release Pressure: Open the drain valve or pressure relief valve to release trapped air in the tank. Wait until pressure gauges read zero.
- Cool Down: Allow hot components—pump housing, motor, and hoses—to cool for at least 15–20 minutes to avoid burns.
- Wear Protective Gear: Use safety goggles, gloves, and hearing protection, especially when draining or cleaning components.
- Work in a Ventilated Area: Ensure adequate airflow to disperse oil mist and chemical fumes.
Failure to follow safety protocols can lead to serious injury or equipment damage. Once you’re equipped and safe, let’s explore each maintenance step in detail.
Step-by-Step Maintenance Procedures
Systematic maintenance ensures you never overlook a crucial task. Below are the core procedures for keeping your home air compressor in top shape.
Draining Moisture from the Tank
Moisture buildup is the enemy of any air compressor’s longevity. Water condenses inside the tank every time compressed air cools. To drain moisture:
- Turn off power and release pressure.
- Place a drain pan beneath the tank’s drain valve.
- Loosen the drain valve and allow moisture to flow out until only clean air escapes.
- Tighten the valve securely to prevent leaks.
Perform this step after each use or at least daily if you operate the compressor frequently. Consistent moisture removal prevents rust formation and maintains air purity.
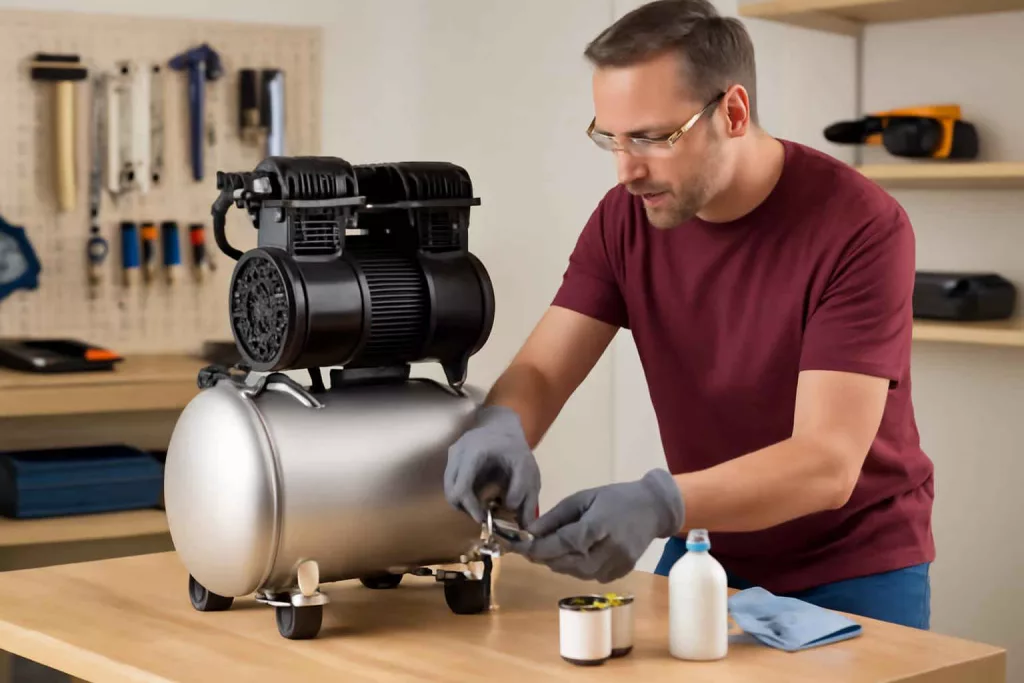
Changing Compressor Oil
Oil-lubricated compressors rely on high-quality compressor oil to reduce friction and dissipate heat. Follow these steps for oil changes:
- Consult your owner’s manual for recommended oil type and capacity.
- With the compressor cool and depressurized, position an oil drain pan beneath the oil drain plug.
- Remove the drain plug and allow the oil to flow out completely.
- Replace the drain plug, refill with fresh oil through the fill port, and check the level with a dipstick.
- Run the compressor for a few minutes, shut it off, and recheck the oil level.
Regular oil changes—typically every 500 hours of operation or annually—ensure optimal lubrication and extend pump life.
Cleaning or Replacing Air Filters
Air filters trap dust, debris, and contaminants that can damage internal components. A clogged filter restricts airflow and forces your compressor to work harder. To maintain filters:
- Locate the filter housing near the compressor intake.
- Remove the cover, extract the filter, and inspect for dirt and damage.
- Gently tap or blow out loose debris with compressed air. For reusable filters, wash with mild detergent, rinse, and air dry.
- If the filter is torn, heavily soiled, or compressed, replace it with a manufacturer-approved replacement.
- Reinstall the filter and secure the housing cover.
Inspect filters monthly. Replacement schedules vary, but a fresh filter every six months improves efficiency and air quality.
Inspecting Belts and Hoses
Belts drive the compressor pump, and hoses channel compressed air to tools. Worn belts can slip or break, while cracked hoses pose safety hazards. To inspect:
- Visually examine belts for fraying, glazing, or cracks. Adjust tension per manual or replace if damaged.
- Flex hoses to reveal hairline cracks or brittleness. Replace suspect hoses immediately to avoid leaks.
- Check couplings, clamps, and fittings for tightness and signs of wear.
Proper belt tension and robust hoses maintain consistent pressure and improve tool performance. If you need tips on tool workspace setup, refer to our Shop Vacuum Maintenance Guide as a reference for inspecting attachments.
Checking and Tightening Fasteners
Vibration from operation can loosen bolts, screws, and fittings. Conduct a full fastener check every quarter:
- Use the correct-size wrench or socket to inspect mounting bolts on the motor, pump, and tank straps.
- Tighten any loose nuts and replace any rounded or stripped hardware.
- Examine safety valve settings and ensure the relief valve operates freely.
Maintaining proper torque on fasteners prevents leaks, misalignment, and undue wear on components.
Advanced Maintenance Tips for Longevity
For enthusiasts seeking maximum lifespan out of their compressor, consider these advanced practices:
- Install a pre-filter or aftercooler to remove oil aerosols and moisture.
- Use synthetic compressor oil designed for extreme temperatures and extended drain intervals.
- Monitor compressor temperature and vibration over time with portable diagnostic tools or connect a thermal imaging camera to spot hot spots.
- Upgrade to a corrosion-resistant tank or add an internal rust inhibitor for coastal climates.
Implementing these measures adds upfront cost but can double the service life of your investment. For detailed tool diagnostics, check our Power Tool Battery Maintenance Guide to see how proactive checks protect your gear.
Troubleshooting Common Air Compressor Issues
No maintenance guide is complete without a troubleshooting section. Here are solutions to frequent problems:
- Compressor Won’t Start: Check power supply, reset thermal switch, inspect pressure switch connections.
- Low or Fluctuating Pressure: Clean filters, drain moisture, inspect for air leaks at fittings and hoses.
- Excessive Noise or Vibration: Tighten loose fasteners, replace worn belts, ensure compressor is on a stable, level surface.
- Oil Leaks: Replace damaged seals or gaskets, tighten oil fill and drain plugs.
- Overheating: Improve ventilation around the motor, clean cooling fins, verify oil levels.
Understanding these symptoms and fixes lets you address issues before they escalate into major repairs.
Recommended Accessories and Replacement Parts
Maintaining your compressor is easier with the right accessories. Consider stocking:
- Extra oil filters and intake filters for timely replacements.
- Replacement belts matched to your pump’s specifications.
- An oil drain kit with quick-release fittings for effortless oil changes.
- A water-separator inline filter to prevent moisture downstream.
- Moisture trap attachments for pneumatic tools to extend their service life.
To quickly find suitable replacement parts, browse online marketplaces by searching air compressor replacement filter. Keeping spares on hand reduces downtime when it’s time for component swaps.
DIY vs Professional Servicing: Making the Right Choice
While many routine tasks are DIY-friendly, professional servicing every 2–3 years can uncover issues hidden inside pumps and motors. Consider professional help when you encounter:
- Internal pump damage or worn cylinder rings.
- Persistent leaks despite new seals and gaskets.
- Vibration-related bearing wear or misalignment.
- Complex electrical or pressure switch malfunctions.
Routine DIY checks save money and time, but a trained technician’s annual inspection offers peace of mind and ensures compliance with any warranty requirements.
Conclusion
Effective home air compressor maintenance combines regular inspections, timely oil changes, filter care, and safety checks. By following this comprehensive guide and incorporating advanced tips, you’ll ensure your compressor runs efficiently, safely, and reliably for years. Remember to stock essential accessories, troubleshoot issues promptly, and enlist professional service when needed. With proper upkeep, your air compressor will be a dependable workhorse in every DIY and home improvement project.
Ready to get started? Grab your maintenance kit and tools, and give your compressor the care it deserves today!