The fastest way to keep your seasonal outdoor power tools in top shape is to clean, inspect, and stash them in purpose-built racks and bins that maximize space and protect against the elements. With a clear process for maintenance, grouping, and proper storage, you’ll find your tools ready to go when spring returns.
Step-by-Step Guide
1. Clean and Maintain Before Storage
Start by removing dirt, debris, and any residue from engines, blades, and housings. For electric and battery-powered tools, wipe down casings with a damp cloth and mild detergent. Remove batteries and let them air-dry separately to prevent corrosion. Gas-powered equipment like leaf blowers or string trimmers needs a fuel stabilizer added to a near-empty tank before a quick run to burn leftover fuel, preventing gummy deposits in the carburetor.
2. Inspect and Repair Minor Issues
Check cords, hoses, filters, and spark plugs for wear. Replace frayed power cables on electric tools and clean or swap out air filters on gas-powered units. Tighten loose screws or clamps, sharpen blades, and lubricate moving parts with a silicone spray or recommended lubricant. A few minutes of upkeep now prevents major repairs in spring. For guidance on basic upkeep, consult our Home Workshop Setup Checklist.
3. Group Tools by Type and Frequency
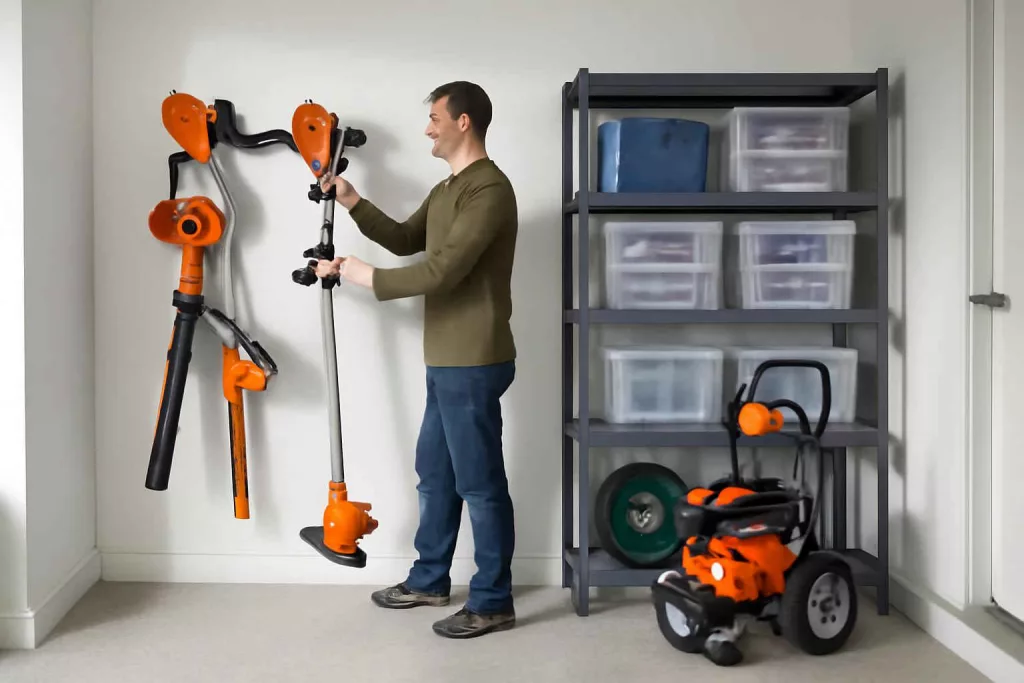
Separate tools into categories: battery-powered, gas-powered, corded electric, and hand tools. Store seasonal favorites like a cordless string trimmer together and less-used items—like high-pressure washers—on higher shelves. This grouping shortens retrieval time and helps you monitor maintenance schedules. Use clear plastic bins labeled with permanent markers to keep smaller items like trimmer line, spark plugs, and nozzles sorted.
4. Choose the Right Storage Solutions
Wall-mounted racks, cabinets, and carts help you reclaim floor space. A heavy-duty wall rack system can support bulky items like a chainsaw and leaf blower. For medium-sized tools, consider a compact outdoor power tool storage rack. Magnetic holders are perfect for storing metal hand tools, while a rolling cart serves as a mobile work surface and storage. Check out our guide to Best Magnetic Tool Holders for Workshop Walls and Best Rolling Tool Carts for Home Workshops to pick the ideal solution.
5. Label, Inventory, and Calendar Reminders
After placing tools in racks, bins, or cabinets, label each location. Maintain a simple spreadsheet or note on your phone listing tool condition and next maintenance date. Set a calendar reminder for midseason inspections to check for rust or battery performance. This proactive approach keeps tools in peak shape and avoids surprises when you need them most.
Storage Solutions Overview
Selecting the best storage solutions depends on your garage or shed layout and budget. Here are top options to consider:
- Wall-Mounted Shelving Systems: Adjustable shelving brackets and heavy-duty boards can store bins of filters, oil, and attachments. Our Best Wall-Mounted Workshop Shelving Systems guide highlights sturdy, rust-resistant options.
- Pegboard Panels: A classic choice that lets you hang wrenches, screwdrivers, and smaller power tools with floor hooks or holders. Keep cords tidy with cable ties or a self-adhesive cable tray underneath benches.
- Tool Carts and Cabinets: Rolling carts with locking drawers provide secure storage and portability. Cabinets shield tools from dust and can lock to prevent unauthorized access.
- Clear Storage Bins: Durable, transparent plastic bins stack neatly on shelves. Label lids to identify contents quickly—ideal for keeping spare parts like belts, nozzles, and trimmer line at arm’s reach.
- Magnetic Tool Holders: Metal strips or bars mounted on walls for hand tools and metal attachments. This method frees up drawer space and keeps tools visible.
- Overhead Racks: Use ceiling-mounted systems for lightweight or infrequently used tools, like an extra lawn roller or spare engine oil containers.
Measure available wall and floor space before investing. Prioritize solutions that adapt to evolving tool collections to save on repeat purchases.
Practical Example
Imagine Sarah, a weekend gardener in Ohio. After fall cleanup, she must store her cordless leaf blower, string trimmer, and electric pressure washer. Following these steps transformed her cluttered shed into an organized workspace:
- Cleaning & Maintenance: She rinsed the pressure washer pump, replaced its nozzle, wiped down all tool bodies, and ran stabilizer-treated fuel through her trimmer.
- Inspection: A minor crack in the trimmer guard led her to swap it out under warranty. She also replaced worn trimmer line and checked tire pressure on her pressure washer cart.
- Grouping: All battery-powered gear went on a 3-tier shelf labeled “Batteries Off.” The pressure washer landed on a rolling cart, enabling garage-floor cleaning during winter.
- Storage Selection: Sarah installed two magnetic bars from our magnetic tool holder guide for wrenches and screwdrivers and hung the leaf blower on a heavy-duty rack she found in our shelving recommendations. Clear bins held nozzles, connectors, and spare parts.
- Labeling & Scheduling: She used a dry-erase board inside her shed door to track the next battery charge cycle and midwinter inspection.
By spring, Sarah’s tools were in better shape than ever—and she gained five square feet of usable shed floor.
Common Mistakes
- Storing tools with residual fuel or moisture, leading to corrosion and stale gas.
- Scattering chargers and batteries separately, making it hard to locate power packs.
- Using weak shelving or hooks that bend under heavy equipment weight.
- Neglecting to label bins and locations, causing tools to get buried out of sight.
- Forgetting midseason inspections to catch early rust or battery degradation.
Tips to Improve Your Storage Strategy
- Invest in Climate Control: If you live in extreme temperatures, consider a small space heater or dehumidifier in your shed to prevent metal parts from rusting.
- Use Modular Systems: Choose shelving and hook systems that expand with your tool collection—this avoids overcrowding and wasted space.
- Keep Batteries Charged: Store batteries at 40–60% charge in a cool, dry spot. This prolongs battery life and readiness. Rotate between batteries to maintain even wear.
- Protect Delicate Parts: Store filters, spark plugs, and sensitive electronics in padded bins or original packaging to prevent damage.
- Optimize Vertical Space: Mount heavy-duty hooks or racks near the ceiling for low-use items, freeing prime horizontal wall real estate for daily tools.
- Implement Color Coding: Use colored bins or tape to group tools by season or function, speeding identification.
Maintenance and Seasonal Rotation
Rotation keeps storage efficient. As winter ends, move spring tools like hedge trimmers and lawn mowers to the front, swapping winter gear out. Adopt a “first in, first out” system: tools stored longest are used first, preventing items from getting forgotten in the back. Before each rotation:
- Wipe down all gear to check for rust or rodent nests.
- Run electric tools briefly to confirm motor health.
- Charge batteries and replace any that show low capacity.
- Review labels and inventory lists—update any missing items to avoid midseason shopping.
- Recycle or responsibly dispose of any old fuel or chemical containers.
Keeping a binder or digital file with maintenance logs ensures you’ll never overlook a filter change or oil swap. This discipline saves money and downtime when you need tools in peak condition.
Conclusion
Storing seasonal outdoor power tools doesn’t have to be a chore. By cleaning, inspecting, grouping, and utilizing wall-mounted racks, magnetic holders, and rolling carts, you’ll protect your investments and reclaim valuable space. Set labels, maintain a simple inventory, and rotate tools with the seasons to keep everything in ready-to-use condition. Start today and enjoy organized, reliable power tools whenever you head outdoors.
Ready for more workshop organization tips? Explore our cable management guide to tidy up your workbench next.