Use modular workstations, vertical storage, mobile carts, foldable benches, and corner solutions to maximize every inch of your small home workshop. With these five workshop layout ideas, you can increase efficiency and keep tools within arm’s reach without sacrificing space.
Step-by-Step Guide to Planning Your Small Workshop Layout
1. Measure and Map Your Space
Begin by measuring the length, width, and height of your workshop or garage corner. Sketch a scaled floor plan on graph paper or use a free online tool. Mark doors, windows, electrical outlets, and fixed utilities like water pipes. This foundation ensures each layout idea fits without obstructing access.
2. Define Your Workflow Zones
Segment your workshop into functional zones: a prep/cutting area, assembly or workbench area, tool storage zone, finishing station, and cleanup spot. Keeping related tasks close together cuts down on wasted steps. For example, locate your pegboard tool wall system near your main bench to quickly grab hand tools.
3. Prioritize Vertical and Mobile Storage
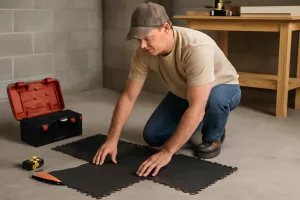
Wall-mounted cabinets and shelving free up floor space. Install adjustable shelving above your bench for paint cans or small parts. Pegboards, magnetic strips, and slatwall panels hold frequently used tools at eye level. Add a mobile tool cart with bins for screws and drill bits—search for mobile tool cart on Amazon for options.
4. Incorporate Foldable or Modular Work Surfaces
When floor area is tight, a wall-mounted folding workbench is a game-changer. Fold up the table when not in use to walk freely. If you need more surface, modular workstations on casters can reconfigure around your current project. For guidance, check the folding workbench tutorial.
5. Optimize Lighting and Power Access
Position LED strip lighting under shelves and above the bench for clear visibility. If outlets are scarce, install a USB charging port module at bench height. Plan cord reels or power strips on the ceiling to keep cables off the floor and prevent trip hazards.
6. Use Corners and Under-Bench Space
Corners often become dead zones. Fit a triangular corner cabinet or a rotating carousel shelf for paint cans and adhesives. Under-bench drawers or roll-out trays hold power tools you only use occasionally. Refer to our workshop setup checklist to ensure you’re not overlooking essential storage solutions.
Practical Example: Transforming an 8×10 Garage Nook
Meet Lisa, an at-home woodworker with just an 8×10 nook in her two-car garage. By applying these layout ideas, she turned an underused corner into a functional mini-shop.
Step 1: Mapping and Zone Definition
Lisa measured her space and noted the garage door’s swing path. She dedicated the left wall to vertical storage, the back wall to her workbench, and the right corner to finishing and cleanup. This three-zone plan kept her workflow linear: prep on the left, build in the center, finish on the right.
Step 2: Leveraging Vertical Storage
She installed a 4×4-foot pegboard panel above a slim rolling tool cart. Frequently used chisels, clamps, and hammers hang neatly within reach. A repurposed metal shelving unit stores bins labeled “sandpaper,” “glue,” and “hardware.”
Step 3: Modular Workbench and Lighting
Instead of a permanent bench, Lisa built a fold-down table with support brackets. When working on smaller projects like picture frames, she folds it down. For larger assemblies, she rolls in a detachable folding trestle and plywood top. Three LED bars under the shelves provide even illumination without shadows.
Step 4: Corner Carousel and Under-Bench Drawers
To use the corner, she installed a lazy Susan-style shelf for finishing supplies. Under her bench, two deep drawers house her jigsaw, sander, and random orbital polisher. She labeled each drawer face for quick identification.
Results
By reallocating walls, corners, and under-bench space, Lisa now enjoys a clutter-free workshop with everything in its place. She reports spending 30% less time hunting tools and more time creating.
Common Mistakes to Avoid
- Neglecting clear floor pathways: Overcrowding leads to tripping hazards and frustration. Always maintain at least a 3-foot-wide walkway.
- Ignoring outlet placement: Improvising power cords across the floor is unsafe. Plan outlets or ceiling-mounted reels at each zone.
- Underestimating ceiling height: Tall cabinets can block ceiling storage or lights. Measure vertical clearance before installing overhead racks.
- Relying solely on static benches: Fixed tables may become obstacles. Incorporate foldable or mobile surfaces for flexibility.
- Overlooking dust control: Without a small dust collector or shop vac hookup near the bench, cleanup becomes chore. Integrate a shop vac attachment early in the design.
- Skipping weight capacity checks: Heavy tool cabinets can damage drywall anchors. Use proper wall studs or masonry anchors for wall-mounted storage.
Tips to Improve Your Layout Further
1. Color-Code Your Zones
Use colored tape on the floor or paint a strip of wall above each zone. This visual cue speeds up cleanup and tool return. For example, green for assembly, blue for finishing.
2. Install a Slim Rolling Cart for Consumables
A cart no wider than 12 inches can slide between bench and wall. Fill it with fasteners, tapes, and finishes. Its mobility means it can double as a side table when needed.
3. Integrate a Small Parts Storage System
Grab a set of modular drawer bins for screws, nails, and fittings. Label drawers clearly. Mount the unit above your bench—this keeps bits off the work surface but within arm’s reach.
4. Use Adjustable Caster Height for Work Surfaces
Casters with leveling feet let you lock benches and carts at a height that matches your posture. Avoid back strain by setting heights specific to sawing, sanding, or assembly tasks.
5. Plan for Expansion
If you acquire larger tools (table saw, dust collector), leave a 12–18 inch buffer next to your bench. This empty bay can accommodate a new cabinet or equipment without disrupting your workflow.
Conclusion
Even in a compact 8×10 or smaller area, strategic planning lets you craft a workshop that feels twice its size. By mapping your workspace, defining workflow zones, using vertical and mobile storage, and avoiding common pitfalls, you’ll spend less time searching and more time building. Start by sketching your layout, install a foldable bench, and equip your walls with a pegboard tool wall system. Within a weekend, you’ll transform chaos into a streamlined, efficient small home workshop.