Yes, you can build a solar-powered charging station for your power tools by combining a compact solar panel, charge controller, deep-cycle battery and inverter into a single mobile unit. This DIY setup lets you charge drills, impact drivers and USB-powered gadgets anywhere—no grid power required.
With increasing interest in off-grid solutions, a solar charging station adds green energy and portability to your workshop. Whether you work outdoors on deck builds or remote remodeling projects, this guide covers everything from sizing your components to safe assembly and maintenance.
Step-by-Step Guide to Building Your Solar Charging Station
Follow these steps to create a reliable solar-powered charger that meets your workshop’s needs. Each section includes detailed tips to ensure efficiency and safety.
1. Calculate Your Power Requirements
Estimate the combined watt-hours (Wh) your tools consume per day. Check each tool’s battery capacity (e.g., a 20V 5.0Ah drill battery is 100Wh) and multiply by how many charges you expect. If you charge four batteries, that’s 4×100Wh = 400Wh daily demand. Add 20% extra for inverter losses and nighttime buffer—roughly 480Wh.
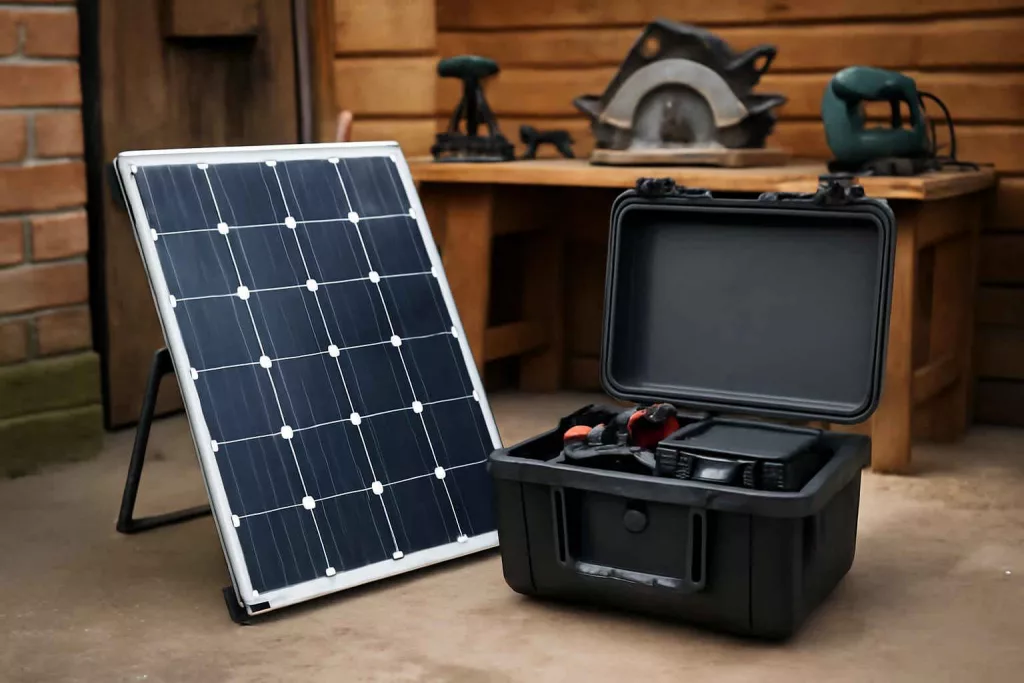
2. Select the Right Solar Panel
Choose a panel rated to generate at least 1.5× your daily Wh. For 480Wh, a 100W panel can produce around 500Wh on six peak sun hours. For cloudy areas, consider a 150W panel. You can find a reliable 100W solar panel on Amazon: 100W solar panel.
3. Pick a Charge Controller
A PWM controller is budget-friendly, but an MPPT controller boosts efficiency by up to 30%. For a single 12V battery and 150W panel, a 20A MPPT controller works well. Ensure it has temperature compensation and an LCD display for voltage readouts.
4. Choose a Deep-Cycle Battery
Opt for a 12V AGM or LiFePO4 deep-cycle battery rated 100Ah or higher to cover your daily needs plus reserve capacity. A 12V 100Ah battery stores 1200Wh, giving you 2–3 days of backup. AGM batteries are maintenance-free and cost-effective; LiFePO4 is lighter and has longer cycle life.
5. Select an Inverter
Match the inverter’s continuous watt output to the peak draw of your devices. A 300–500W pure sine wave inverter handles drill chargers and USB adapters. Make sure it includes an auto-shutdown feature when battery voltage drops.
6. Gather Wiring and Safety Components
- 8 AWG solar cable with MC4 connectors for panel to controller hookup
- 10 AWG battery cable
- 30A inline fuse between panel and controller, and between controller and battery
- Circuit breaker on the inverter’s battery lead
- Ring terminals, heat shrink tubing and zip ties for secure connections
7. Build or Select an Enclosure
Use a weather-resistant plastic or aluminum box sized to fit battery, controller and inverter. Drill ventilation holes and mount a small 80mm computer fan to dissipate heat. Include a transparent lid or cutouts so you can check indicator lights without opening the box.
8. Assembly and Wiring
- Mount the solar panel on your workshop roof or portable frame with a tilt angle matching your latitude.
- Run solar cable from panel to charge controller, installing the inline fuse at the panel end.
- Wire controller’s battery terminals to the deep-cycle battery, observing correct polarity and installing another fuse near the battery.
- Connect the inverter to the battery with ring terminals and bolt-on connections; install the breaker on the positive line.
- Tidy all wires with zip ties and label each terminal (e.g., “Panel+”, “Batt−”).
- Test voltage readings on the controller and confirm the inverter output with a multimeter.
Practical Example: Charging on the Job Site
Imagine you’re sanding a railing on a lakeside deck renovation. There’s no power outlet, but your solar charging station is strapped to a dolly. Under 5 hours of clear sun, the 150W panel replenishes two 20V batteries you used earlier. The built-in USB port also powers your smartphone navigation app.
Back at the workshop, integrate this station with your home workshop setup checklist to ensure you always have a fresh battery ready. For added peace of mind, store extra batteries safely by following our guide on battery storage best practices.
Common Mistakes to Avoid
- Under-sizing the solar panel relative to daily consumption, leading to depleted batteries.
- Skipping fuses or breakers—this risks cable overheating and fire hazards.
- Using undersized wiring, which causes voltage drop and heat build-up.
- Poor ventilation in the enclosure, shortening component lifespan.
- Neglecting panel tilt and orientation, reducing energy harvest dramatically.
Tips to Improve Your Solar Charging Station
- Install a digital meter display on the enclosure for real-time voltage and amp readings.
- Add multiple output sockets: USB-A, USB-C PD and 12V cigarette lighter port for versatile charging.
- Mount a tilting bracket with adjustable legs to optimize panel angle seasonally.
- Incorporate a small LiFePO4 battery pack to reduce weight and increase cycle life.
- Label all cables and ports clearly to prevent reverse connections under low-light conditions.
- Consider an optional Bluetooth-enabled controller for remote monitoring via smartphone.
- Keep a spare inline fuse kit on hand in your workshop tool drawer—our power tool docking station guide can help you organize spares.
Conclusion
Building a solar-powered charging station for your tools is an achievable weekend project that boosts your workshop’s versatility and eco-friendliness. Start by sizing your solar panel and battery to cover daily demand, then follow safe wiring practices. With proper ventilation and fuses in place, you’ll enjoy reliable off-grid power for drills, USB gadgets and more. Ready to get started? Gather your components and transform your workspace with green energy today.