The easiest way to keep your power tool batteries organized and ready is to build a dedicated charging station in your workshop. With a few simple materials, proper planning, and basic electrical setup, you can consolidate all your power tool battery chargers into one neat station that saves time, prevents clutter, and extends battery life.
Whether you’re a weekend DIYer or a seasoned woodworker, a charging station cuts down on searching for misplaced chargers and tangled cords. Follow this step-by-step guide to design, assemble, and maintain a charging hub that fits your workspace needs.
Step-by-Step Guide
1. Plan Your Charging Station Layout
Begin by measuring the wall or workbench area where you want to install your charging station. Identify a space near electrical outlets or plan for additional wiring to avoid running long extension cords across the floor. Sketch a simple layout showing charger positions, power strip location, and cable routing paths. This blueprint will guide the rest of the project.
2. Gather Materials and Tools
You’ll need:
- Plywood or melamine board for mounting shelf or panel
- Electrical power strips or under-bench mounting power strips
- Cable management accessories (cable ties, clips, raceways)
- Screws, anchors, and brackets for mounting
- Drill, level, screwdriver, stud finder
- Optional: power tool battery docking station for fast charging multiple batteries
For a cleaner look, consider a mounted power strip that hides behind the panel and frees up bench space. You can also install USB charging ports alongside to top up phones or tablets.
3. Prepare the Mounting Surface
Secure your board or shelf at eye level for easy access. Use a stud finder to locate wall studs; mount heavy chargers directly to studs with screws or use heavy-duty anchors if studs aren’t available. Confirm the board is perfectly level so chargers sit flush and batteries don’t slide off.
4. Install Power Distribution
Position your main power strip or multiple docking stations along the mounting board. Plug the power strip into a nearby outlet. If you need multiple outlets or a higher amperage rating, consult a qualified electrician about adding a dedicated circuit or additional outlets above the bench.
5. Organize Cable Management
Use cable raceways or adhesive clips to route each charger’s cord neatly in parallel lines. Secure excess cable length behind the mounting board or in a small cable box under the workbench. Label each cord or charger slot with a simple tag (e.g., “Drill,” “Saw,” “Impact Driver”) to avoid confusion.
6. Customize Charger Slots
Measure each charger’s base and cut out small recesses in the board or use pre-cut charger holders from hardware stores. This prevents chargers from shifting and makes battery insertion seamless. For a mobile solution, attach casters to the bottom of a low-profile cabinet and mount chargers inside.
7. Test and Finalize
Insert one battery at a time to ensure all chargers operate correctly and no outlets are overloaded. Verify cable clips hold cords securely without pinching or damage. Adjust clip positions or add extra ties if cords droop or tension on plugs becomes uneven.
Practical Example
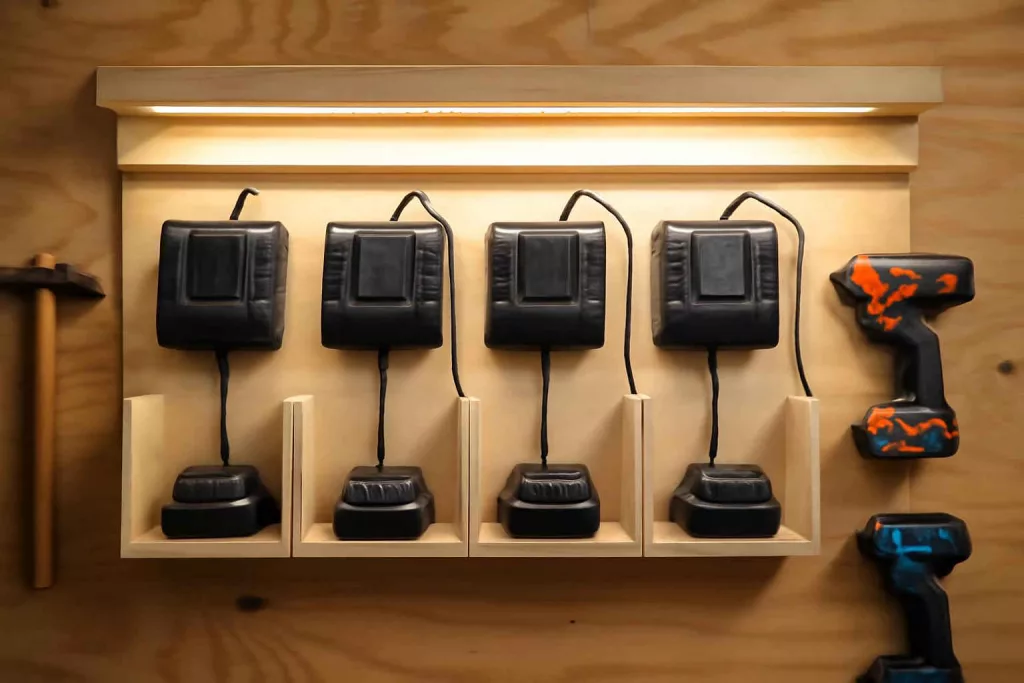
Imagine a small home workshop in a converted garage. A DIY enthusiast installs a 2-foot-wide pine board 48 inches above the workbench, directly over two 120V outlets. They mount a six-outlet power strip behind the board, leaving only the charger prongs visible. Each charger—drill, impact driver, circular saw—slots into a labeled recess. Cable clips keep cords running vertically to the power strip hidden behind the board. The station frees up bench space and ensures batteries are always fully charged before starting the next project.
By adding a small pencil shelf beneath the chargers, the user also keeps battery slots clean and clear of workshop dust. For added convenience, they install a low-profile surge protector with USB ports on the far side to charge a phone or music player while working on projects.
Common Mistakes
- Mounting too high or too low—makes battery removal awkward.
- Overloading a single power strip—risk of tripped breakers or fire hazards.
- Poor cable management—results in tangled cords and wasted time.
- Not securing chargers—batteries can fall and get damaged.
- Ignoring ventilation—chargers generate heat and need airflow to cool.
Tips to Improve
- Use color-coded cable ties to quickly identify chargers for each tool.
- Add a small LED strip above the station for better visibility.
- Install a surge protector with diagnostic LEDs to monitor power health.
- Consider a wall-mounted digital clock with timer to track charging cycles.
- Keep a small brush handy to clean charging contacts before insertion.
Conclusion
Setting up a dedicated power tool charging station transforms your workshop into a more organized and efficient space. By planning the layout, securing proper power distribution, and using clever cable management, you’ll never scramble for chargers or deal with dead batteries again. Start with a simple mounting board, add labeled slots, and expand with docking stations as your tool collection grows. Your next project will begin on time—fully charged and ready to go.