Installing LED strip lighting under your workbench is the quickest way to improve visibility for detailed tasks and reduce eye strain. Whether you’re soldering circuits, crafting models, or fine-tuning wood joints, focused lighting can make all the difference. In this guide, you’ll learn every step—from selecting components to wiring and mounting—so you can finish the job with confidence.
Why Under Workbench LED Lighting Matters
LED strip lighting under a workbench delivers uniform illumination exactly where you need it most. Unlike overhead lights or portable lamps, underbench strips remove shadows cast by your body and tools. That consistency boosts accuracy when marking cuts, inspecting solder joints, or reading small measurements. LEDs also produce minimal heat, draw little power, and offer adjustable color temperatures—so you can switch between warm light for woodworking and daylight for electronic work.
Compared to bulky fixtures, thin LED strips slip into tight spaces. You can mount them under the bench lip, along shelving edges, or inside cabinets. Many kits include adhesive backing and aluminum channels for quick installation. If you shop on Amazon, look for waterproof or high-brightness 12V strips with a built-in diffuser. Here’s an example search link: LED strip lights.
Step-by-Step Installation Guide
1. Gather Components and Tools
Before you start, assemble the following:
- LED strip light kit (12V) with power adapter and controller
- Aluminum mounting channels and diffusers
- Wire connectors (quick-splice or solder joints)
- 12V DC power switch or dimmer (optional)
- Drill with bits for mounting screws
- Wire stripper, screwdriver, tape measure
- Multimeter to verify voltage
- Zip ties or cable clips for neat wiring
You can compare different kits in our Best LED Shop Lights guide to find the brightness and temperature that suit your bench.
2. Plan Your Layout
Measure the length of your workbench edge and overhead shelving. Map where each strip will sit, aiming for even light coverage. Account for interruptions like vise mounts, electrical outlets, or bench dog holes. If you have multiple strips, plan the power connection point so you minimize long cable runs. Mark drilling spots for mounting channels—typically every 12 inches for stability.
3. Mount Aluminum Channels
Secure the channels under the workbench edge using screws or adhesive clips. Pre-drill pilot holes to avoid splitting wood, then drive screws flush. The channels hold the strips and diffusers, protecting LEDs and dispersing light evenly. Keep channels aligned in a straight line to maintain a clean aesthetic. If your bench is steel or metal, self-tapping screws will work without pilot holes.
4. Cut and Place LED Strips
Most LED strips can be cut at marked intervals, usually every 2 inches. Use scissors to trim along the copper cut lines. Peel off the adhesive backing and press the strip firmly into the channel. Ensure polarity arrows line up toward the power input. If you need to route around corners, use corner connectors or solder flexible wire segments. Keep each cut strip’s positive and negative wires available for connection.
5. Wire the Strips Together
For a single strip, simply plug into the power adapter. For multiple strips, splice the wires or use dedicated connectors. Match positive (+) to positive and negative (–) to negative. Twist bare wires, then secure with a solderless connector or solder and heat shrink. Use a multimeter to verify continuity. Bundle wires neatly with zip ties, routing them along the bench underside. Avoid running wires across any moving parts.
6. Install Power Supply and Switch
Find a hidden but accessible spot under the bench to mount the 12V power adapter and switch. You can attach a small mounting board or use Velcro strips for easy removal. Drill a hole for the switch or dimmer control if desired. Plug the combined LED strip harness into the adapter and test before final assembly. Confirm the output voltage with a multimeter—it should read around 12V DC.
7. Attach Diffusers and Final Checks
Slide diffusers into the aluminum channels to soften the light. This helps eliminate hot spots and glare. Turn on the strips and inspect for dark spots or flicker. Tighten any loose screws, adjust strip alignment, and trim zip tie tails. If illumination still feels uneven, consider adding a second strip row closer to the bench surface.
Practical Example
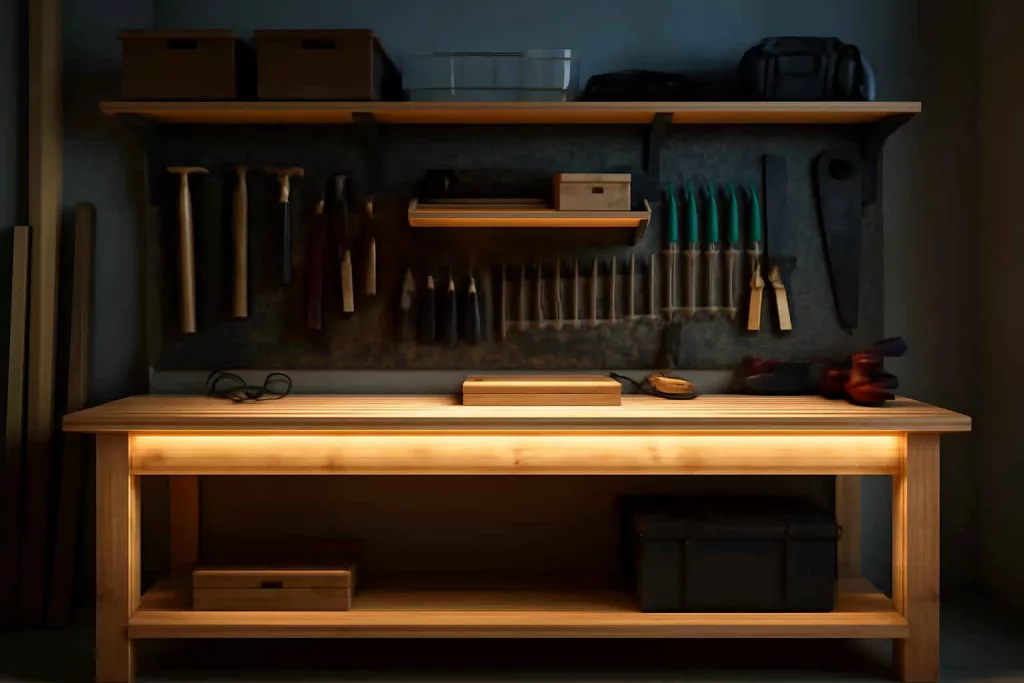
Imagine a woodworking enthusiast setting up a new bench in a garage workshop. They install two 48-inch 12V LED strips under a 72-inch bench lip. One strip runs the full length, while a second shorter strip sits above a vise. The aluminum channels are pre-drilled every 12 inches to align with bench joists. Wires from both strips splice into a single harness, feeding into a 12V dimmer switch inside a wooden mounting block. After adding diffusers, the woodworker switches between 4000K cool white for joinery and 3000K warm white for planing. The result is a uniformly lit bench where shadow zones are eliminated—ideal for precise cutting and sanding.
To complete this setup, the woodworker consulted the Home Workshop Setup Checklist to ensure they had a proper multimeter and mounting hardware on hand.
Common Mistakes
- Ignoring Voltage Drop: Using strips longer than recommended without an amplifier can cause end-of-strip dimming.
- Skipping Pilot Holes: Driving screws into hardwood without pre-drilling leads to splits and misalignment.
- Mismatched Polarity: Reversing positive and negative wires prevents strips from lighting and risks damage.
- Poor Cable Management: Loose wires snag on tools and create trip hazards under the bench.
- Overloading Power Supply: Connecting too many LEDs to one adapter can cause overheating and flicker.
- Not Testing Before Mounting: Failing to power up strips before securing diffusers makes troubleshooting harder.
- Wrong Color Temperature: Using harsh daylight strips for relaxed tasks can cause discomfort over long sessions.
- Insufficient Channel Support: Skipping channels and diffusers leads to adhesive failure and uneven lighting.
- Unprotected Switch Mounting: Exposed switches under the bench can catch sawdust and moisture.
- Ignoring Safety Standards: Using non-waterproof strips in humid environments risks corrosion.
Tips to Improve Your Setup
- Use Magnetic Mounting Channels: For removable strips that you can reposition with ease.
- Add a Motion Sensor: Set lights to turn on automatically when you approach the bench.
- Install a Dimmer Control: Adjust brightness on the fly to match each task’s requirements.
- Color-Coded Strips: Opt for RGB strips to switch between work modes with a remote control.
- Integrate Under-Cabinet Outlets: Combine with your lighting for quick tool charging—learn more in our Under-Workbench Power Strip Mounts guide.
- Use Heat-Sink Backing: Choose strips with aluminum backing for better thermal management and longer life.
- Shadow Diffusers: Angle channels slightly toward the bench surface to minimize side glare.
- Backup Battery Pack: For uninterrupted lighting during power fluctuations in older garages.
- Label Wire Harnesses: Color-code or tag wires to simplify future maintenance.
- Combine with Overhead Fixtures: Layer lighting for full-spectrum coverage without dark corners.
Maintenance and Upgrades
LED strips typically last 25,000 to 50,000 hours, but dust and sawdust buildup can reduce output. Wipe diffusers monthly with a dry cloth. Inspect channels for debris and tighten mounting screws quarterly. If you notice flicker, test voltage under load—it should remain close to 12V. For longer benches, consider installing a secondary power tap halfway along the run to mitigate voltage drop.
Upgrading is simple: swap out standard strips for tunable white or RGBW variants. You can also integrate smart controllers that connect to voice assistants or smartphone apps. This lets you schedule lighting scenes—for example, bright white during daytime projects and soft amber for evening hobby work. If you expand your bench or add overhead cabinets, plan extra wiring channels now to avoid retrofitting hassles later.
Conclusion
Installing LED strip lighting under your workbench upgrades your workshop’s functionality and comfort with minimal cost and effort. A well-lit bench reduces errors, improves precision, and makes every project more enjoyable. Follow this guide’s planning, mounting, and wiring steps to achieve professional results, and explore the related guides for further workshop enhancements.