Creating a mobile workbench with built-in power outlets and a dedicated charging station brings convenience and flexibility to your workspace, allowing you to move your workstation wherever you need it most. Whether you’re working on woodworking, metal fabrication, or general home repairs, having power sources and charging hubs right at hand can save time and keep your workflow uninterrupted.
Why Choose a Mobile Workbench with Integrated Power?
A mobile workbench equipped with power outlets and charging stations offers several key benefits. First, it eliminates the need to hunt for outlets across your shop, letting you plug in power tools, chargers, and accessories directly at your workspace. Second, portability ensures you can adjust your bench position to optimize lighting, ventilation, or proximity to other equipment. Third, an integrated charging station keeps batteries organized and charged, reducing downtime and clutter.
Compared to a static bench, a mobile solution extends the versatility of your DIY rolling tool chest or existing work area. You can roll it into corners for blasting dust extractors or position it under shop lights for precision tasks. With a reliable power strip and designated charger mounts, your tools and devices stay ready for action without trailing cables or messy extension cords.
Design and Planning Considerations
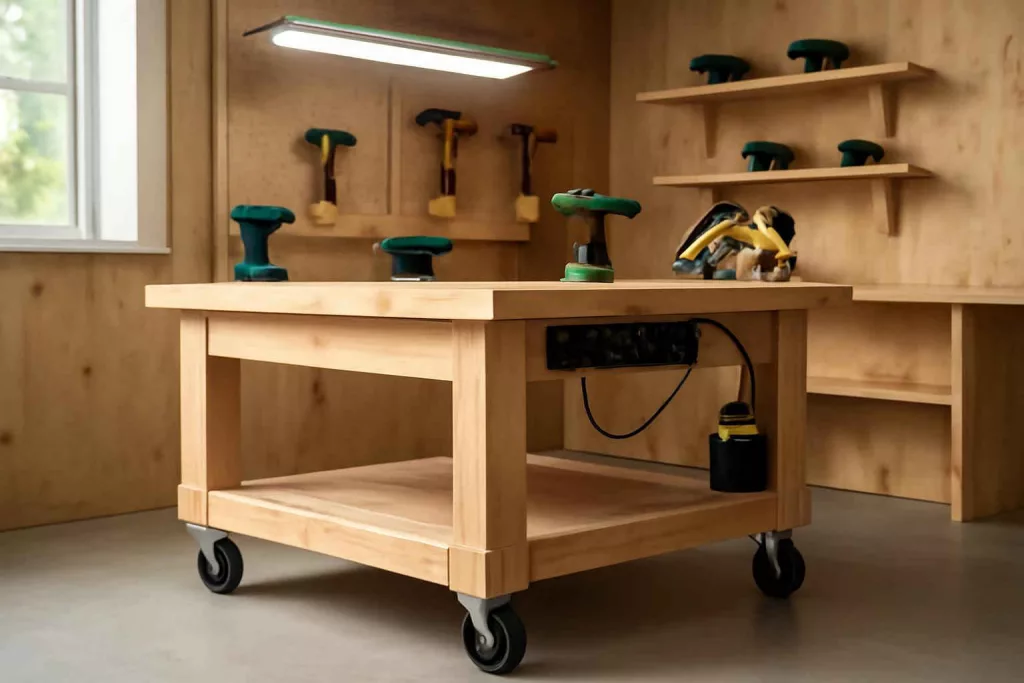
Before breaking out your saws and drills, map out your ideal bench dimensions and layout. Standard bench heights range from 34 to 36 inches to accommodate most users comfortably. Consider the footprint: a 4-foot by 2-foot top offers ample workspace without impeding shop traffic. Wheels or casters should support at least 250 pounds each; lockable swivel casters ensure easy mobility and stable positioning.
Power integration requires planning the location of outlets and chargers. Determine how many devices you’ll need to plug in simultaneously, then choose a surge-protected strip with at least six outlets. If you own multiple battery-powered tools, reserve dedicated charger bays to avoid tangled cords. Sketch your electrical layout, keeping cords hidden under the bench apron or within a cable management channel. For reference on cable organization, see our guide on best cable management solutions for home workshops.
Materials and Tools Required
Gather quality materials and tools before you start. Here’s a checklist:
- Two 2″x4″x8′ lumber boards for frame rails
- One 4′ x 2′ sheet of 3/4″ plywood for the top
- Four heavy-duty lockable caster wheels (2 with brakes)
- Multipurpose metal corner braces and carriage bolts
- A surge-protected power strip with integrated USB ports
- Battery chargers for cordless tools (e.g., drill, impact driver)
- Electrical junction box and UL-listed wiring components
- Wood screws, washers, and cable ties
- Cordless drill, impact driver, circular saw, jigsaw
- Measuring tape, level, pencil, safety glasses
For inspiration on integrating charging hubs, check our DIY cordless tool charging station tutorial.
Step-by-Step Construction Guide
1. Build the Frame
Cut your 2x4s into four pieces: two for the long rails (48″) and two for the short end rails (22″). Lay them out in a rectangle and secure with carriage bolts at each corner. Use a level to ensure the frame sits flat. Reinforce each corner with metal braces for added stability.
2. Attach the Caster Wheels
Position the four casters at each corner of the frame’s bottom. Pre-drill holes for the mounting bolts, then attach the wheels securely. Ensure the two with locking mechanisms are on the same side for easy access. Test roll the assembled frame to confirm smooth movement and proper locking.
3. Install the Work Surface
Center the plywood sheet on top of the frame. Fasten it down with 2″ wood screws every 6″ along the edges. Countersink the screws slightly to avoid tool snags and fill the holes with wood filler for a clean finish. Sand the top surface lightly to remove rough edges.
4. Wire the Power Strip
Mount your surge-protected power strip underneath the top surface at a convenient reach. Run the outlet cord through a drilled hole in the frame side to an electrical junction box mounted inside the frame. Wire the power strip to a heavy-duty input cable rated for your tool loads. Secure all connections with wire nuts and electrical tape. If you’re uncomfortable with electrical work, consult a licensed electrician.
Integrating a Charging Station for Cordless Tools
Create designated bays for each tool charger by installing small plywood shelves along the rear apron. Position the chargers so cords remain short and tangle-free. Use cable ties to secure excess wiring beneath the shelf. Label each bay for quick identification. Consider adding LED strip lights under the top to illuminate the charging area. This setup ensures all batteries remain in one centralized station, reducing clutter and enhancing workflow.
Customization and Add-On Options
Your mobile workbench can do more than just hold tools. Add these features for an even more functional workspace:
- Under-bench drawers or plastic bins for hardware storage.
- Pegboard mounted on one end for hanging wrenches, pliers, and goggles.
- Fold-down side shelf for additional temporary working space.
- Magnetic strips or hooks along the apron for quick-swap tool access.
- Integrated USB ports in the power strip for charging phones and tablets.
These modifications can transform your bench into a central command station for all projects. For more storage solutions, explore our guide on best rolling tool carts.
Maintenance and Safety Tips
To keep your mobile workbench safe and durable:
- Regularly inspect caster bolts and fasteners; tighten as needed.
- Check electrical connections for wear or fraying; replace cords if damaged.
- Clean the top surface after each project to prevent buildup of debris.
- Periodically lubricate caster bearings for smooth mobility.
- Avoid exceeding the weight capacity of your casters and shelf mounts.
Following these steps will ensure your workbench remains a reliable asset for years of projects and repairs.
Conclusion
Building a mobile workbench with integrated power outlets and a charging station elevates your home workshop by combining portability, convenience, and organization in one versatile piece of furniture. With careful planning, the right materials, and attention to safety, you can craft a custom bench that meets your specific workflow needs and adapts to any job. Start planning your build today and discover how this mobile powerhouse can transform your DIY experience.