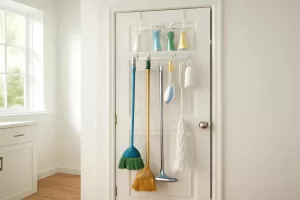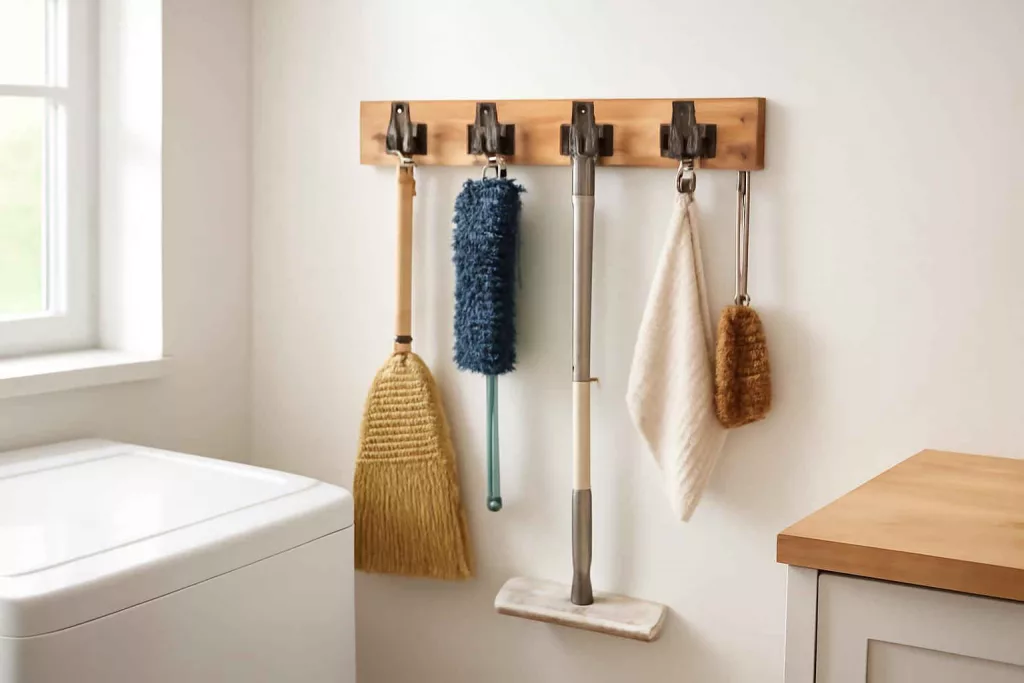
You can install a wall-mounted broom and mop organizer in under an hour and minimal cost to keep your cleaning tools neat and accessible. This tutorial walks you through the essential steps—measuring, mounting, and customizing—to achieve a durable, space-saving solution. A well-placed organizer not only clears clutter but also speeds up your cleaning routine by ensuring each tool has a designated spot. Whether you have a narrow laundry room, garage, or utility closet, a wall-mounted rack can free up valuable floor space and protect broom bristles and mop heads from damage. To see examples of reliable holders, check options like a broom and mop holder that suits your wall type.
Step-by-Step Guide
Step 1: Gather Your Tools and Materials
Before you begin, assemble everything you need: a stud finder, level, drill with driver bits, 2″ screws, wall anchors (if mounting outside studs), a sturdy wooden board or metal rail, and a mix of heavy-duty hooks, clamp-style holders, and cradle mounts designed for brooms and mops. You’ll also want a pencil, measuring tape, and optional paint or stain if you plan to finish the board. Investing in quality hooks rated for at least 10 pounds each ensures your organizer won’t sag over time.
Step 2: Choose the Right Location
Pick a spot with easy access and enough clearance for handle length. Ideal locations include inside a laundry room door, garage wall, or utility closet. Use the stud finder to locate studs—mounting directly into studs offers the strongest hold. If studs aren’t in the right spot, use heavy-duty wall anchors rated for the combined weight of all tools. Make sure the wall surface is clean and dry. Avoid humid areas without a moisture-resistant finish on wood to prevent warping.
Step 3: Measure and Mark Mounting Points
Use your measuring tape to mark the desired height of the board or rail—typically 6 inches above the tallest tool grip. Mark stud locations and decide on hook spacing, usually 8 to 12 inches apart, depending on tool thickness. Draw a level reference line across the wall to guide your board placement. Mark pilot hole positions through the board onto the wall so you drill accurately. Double-check measurements against your tools laid flat to ensure proper clearance.
Step 4: Install the Mounting Board or Rail
Hold the board or rail against the wall, aligning with your level line. Drill pilot holes through the board into studs or anchor points. If using wall anchors, drill the specified diameter hole and tap in the anchor until flush. Secure the board with screws—two per stud or anchor—for stability. Confirm the board sits perfectly level before fully tightening screws. A level board is crucial for proper hook alignment and tool grip.
Step 5: Attach Hooks and Holders
Position clamp-style holders for mops and brooms first. These spring-loaded clamps grip handles and typically need to be spaced 10 to 12 inches apart. Next, install J-shaped hooks for smaller tools like dustpans or handheld brushes. Cradle mounts work well for wider handle grips or gutter mops. Tighten each hook firmly but avoid overtightening plastic parts. Test each holder by rubbing it gently to confirm it’s secure.
Step 6: Test and Organize Your Tools
Slide each tool handle into its assigned clamp or hook. Adjust spacing if any tools overlap or sit at awkward angles. Label each hook with removable vinyl labels or colored tape to quickly identify crew tools, especially useful if you have multiple mop types. Stand back and inspect overall alignment—hooks should appear evenly spaced and handles angled slightly downward to stay in place.
Practical Example: Organizing a Narrow Laundry Room
Imagine a 4-foot-wide laundry closet with space for just the washer and dryer side by side. Floor space is at a premium, and leaning brooms or mops takes up valuable room. In this scenario, remove an existing shelf or leave a 12-inch gap above the washer’s control panel. Mount a 24-inch wooden board painted to match your cabinets. Place two clamp holders for a broom and a microfiber mop on the left, and three J-hooks for a dust mop, lint roller, and small handheld brush on the right. Tools are now off the floor, protected, and within arm’s reach while you switch loads.
For similar wall-mounted rack ideas, check this DIY wall-mounted garden tool rack—the installation method is nearly identical, just swap garden hooks for cleaning tool holders.
Common Mistakes to Avoid
- Mounting on drywall without anchors or studs, leading to pull-out under weight.
- Spacing hooks too close together, causing tools to overlap and fall.
- Skipping a level check, resulting in a slanted organizer and tools sliding off.
- Using lightweight plastic clips for heavy wet mops—opt for metal or reinforced clamps.
- Overloading the board beyond its weight rating, risking damage to wall or organizer.
Tips to Improve Your Organizer
- Use removable adhesive hooks for lighter tools like dusters, avoiding new holes—see alternatives in our over-the-door cleaning tool organizers guide.
- Apply a clear polyurethane coat to wooden boards in damp laundry areas to prevent moisture damage.
- Add a narrow shelf above the rack for spray bottles and cleaning solutions—this small upgrade turns a simple rack into a full cleaning station.
- Color-code handles or attach vinyl labels to each hook so family members return tools correctly.
- Incorporate a small magnetic strip below the rack for metal dustpan edges or small metal scrapers—check our magnetic tool holders for inspiration.
Conclusion
Installing a wall-mounted broom and mop organizer is a quick, impactful project that transforms cluttered corners into an efficient cleaning hub. By following these six steps and avoiding common mistakes, you’ll enjoy a neat, accessible storage solution that protects your tools and frees up valuable space. Ready to upgrade? Find the right broom and mop holder for your wall and get started today!