Building a compact spray paint booth ensures clean, professional finishes on small parts while keeping your workshop safe. By using basic materials like PVC piping, plastic sheeting, and a ventilation fan, you can create an efficient, low-budget spray booth in under two hours. Proper filtration and controlled airflow are key to preventing overspray and protecting yourself from harmful fumes.
Before you start, gather your tools and materials, including a utility knife, measuring tape, PVC connectors, and a spray paint booth ventilation fan. Good lighting and a stable work surface help produce even coats and reduce rework time.
Step-by-Step Guide
1. Plan Your Booth Dimensions
Measure the largest items you plan to paint, then add at least 12 inches to width and height to allow space for airflow. For most small parts, a booth of 24″ W × 24″ D × 30″ H works well. Sketch a simple frame layout and note where the exhaust fan and filters will sit.
2. Build the PVC Frame
- Cut four pipes at 30″ for vertical supports.
- Cut four pipes at 24″ for the base and top width support.
- Use 90° PVC elbows and T-connectors to assemble the rectangular frame: connect verticals to base, then top supports.
- Confirm squareness with a carpenter’s square before fully tightening.
3. Attach Plastic Sheeting
Use clear 6-mil plastic sheeting for walls and roof. Drape it over the frame and secure with spring clamps or grommets spaced every 6 inches. Ensure the front has an overlap opening of at least 12 inches to access parts.
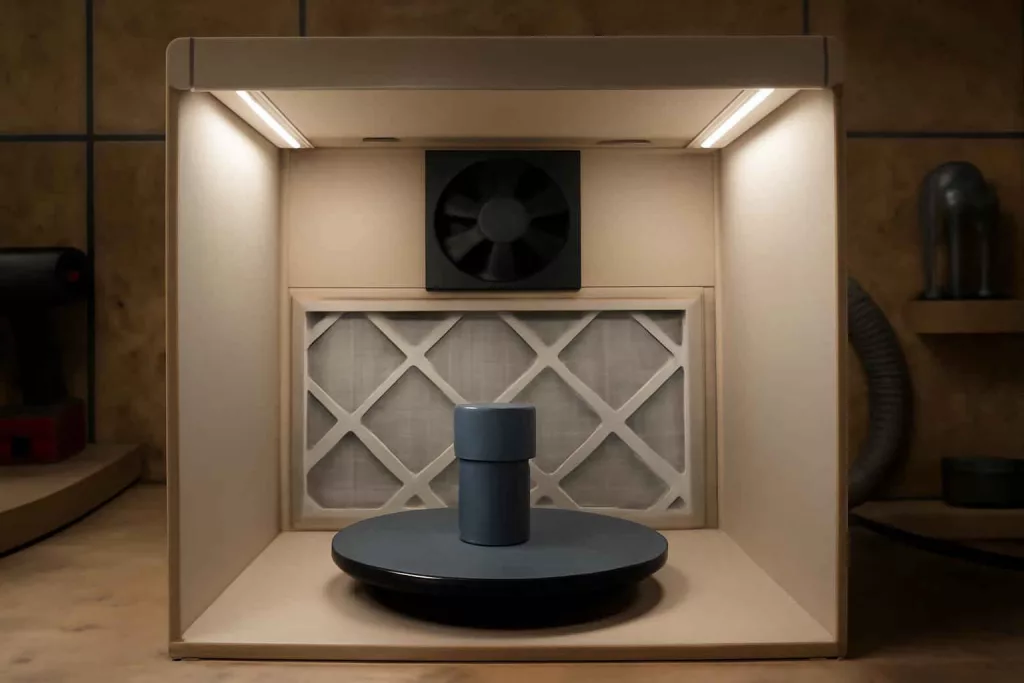
4. Install Filtration and Ventilation
- Cut a 6″ diameter hole on one side at mid-height for the exhaust fan.
- Mount the fan using duct tape and a framing collar to seal edges.
- Place a replaceable paint filter behind the fan inside the booth. Use HVAC furnace filters cut to size or specialty foam spray paint filter sheets.
5. Add Lighting and Work Surface
Clip-on LED shop lights on the top horizontal pipe provide shadow-free illumination. For a sturdy base, set a 24″×24″ plywood or metal grid shelf at waist height. If you need more support, use the home workshop setup checklist to ensure your workbench can hold the weight.
6. Test Airflow and Sealing
Turn on the fan and hold a small piece of tissue paper at each seam to check for drafts. Seal any leaks with vinyl tape. Verify that air is pulling from the front opening and exhausting out the fan.
Practical Example
Imagine you’re refreshing a set of metal cabinet knobs. After degreasing and masking areas you don’t want painted, position the knobs on a turntable inside your booth. Activate the fan and apply thin, even coats of spray paint. The controlled environment prevents dust from sticking to the finish and directs overspray into the filters.
Once the second coat is dry, swap the filters and paint a matching set of drawer pulls. Using the booth cuts clean-up time—overspray collects on filters, not on shop walls. For larger projects, you can build multiple standard-sized booths side by side or link them with ducting for shared exhaust, similar to the concept in our DIY folding sawhorse tutorial, where modular design improved workshop flexibility.
Common Mistakes
- Inadequate filtration: Using old or low-quality filters allows paint particles to recirculate.
- Poor sealing: Gaps at joints can let fumes escape into the workshop.
- Wrong fan placement: Exhaust fans too high or too low reduce airflow efficiency.
- Insufficient lighting: Shadows or dim spots lead to uneven coats and missed areas.
- Skipping maintenance: Failing to replace filters and clean the booth shortens its lifespan.
- Overcrowding parts: Painting too many items at once disrupts airflow and prolongs drying.
Tips to Improve Your Booth
- Use magnetic spray hooks on a metal grid to hang small parts for 360° coverage.
- Install a variable-speed exhaust fan to adjust airflow for different paint types.
- Add a step stool with anti-slip matting for easy access to top-shelf projects.
- Incorporate a particle-resistant adhesive mat at the front to catch drips.
- Upgrade to a clear PVC door panel with zipper for dust-free closure and quick access.
- Keep a small stool or mobile tool cart inside for immediate access to paint, thinners, and gloves.
Conclusion
A DIY spray paint booth is an affordable project that elevates finish quality and safety in any small workshop. By following these steps—planning dimensions, building a sturdy PVC frame, sealing with plastic sheeting, and installing proper ventilation and lighting—you’ll achieve consistent, professional results. Remember to replace filters regularly and test airflow before each use. For ready-made booth kits or replacement filters, check compatible products on Amazon to simplify maintenance and keep your booth running smoothly.
Invest in a reliable setup today and enjoy cleaner air, reduced overspray, and a polished finish on every project.