You can create a tool shadow board by mapping your tools onto a board and painting or tracing each outline for easy access. This DIY workshop guide walks you through planning, material selection, layout, and installation so you can organize your tools effectively.
With just a few materials like plywood, paint, and hooks, you’ll transform a bare workshop wall into a custom tool station. Start by gathering your favorite shadow board kit or magnetic tool board kit and tools for tracing and cutting. A shadow board not only keeps your tools visible but also helps you spot missing items at a glance.
Step-by-Step Guide
1. Plan Your Tool Layout
Begin by selecting a wall or panel that’s easily reachable and at eye level. Lay out all the hand tools you use most often—wrenches, pliers, screwdrivers, hammers—on a flat surface. Group similar items together and leave space between groups so each tool outline is distinct. Sketch a rough arrangement on paper to ensure balanced spacing. This planning phase prevents overcrowding and makes sure every tool has its own place.
2. Gather Materials and Tools
For a wooden shadow board, you’ll need a sheet of ⅝” or ¾” plywood cut to your desired dimensions, paint or permanent marker for outlines, picture-hanging hardware or french cleats for mounting, and S-hooks or peg hooks. You might already have many items in your workshop. If you prefer a magnetic version, a pre-made magnetic tool board simplifies installation further. Don’t forget masking tape and a clear sealant to protect painted lines.
3. Transfer Tool Outlines
Position each tool on the board and secure it with masking tape if needed. Use a pencil or chalk to trace around the tool’s outline. Work methodically from one corner to the next so you maintain alignment. If tracing directly feels shaky, you can use thin card stock as a template—trace the tool on the card, cut it out, and then trace the template outline onto the board. Templates also let you preview spacing without moving heavy tools around.
4. Paint or Mark the Shadows
Once all outlines are traced, choose a contrasting color—black or a bold hue against natural wood—for visibility. A small flat brush and acrylic paint work well. For cleaner lines, apply painter’s tape just outside the outline before filling it in. Alternatively, permanent paint markers offer speed and precision on smooth surfaces. Allow paint to fully dry (usually 24 hours), then peel off any tape or residue and apply a clear spray sealant to protect your work.
5. Attach Hooks and Mounting Hardware
Install S-hooks or peg hooks inside each painted outline. Test-fit each tool to ensure it hangs correctly and sits flush against the board. For mounting, attach picture-hanging hardware or a french cleat system to the back of the plywood. French cleats provide strong support for heavier boards. Level the board on the wall and secure it with screws into wall studs or anchors rated for your board’s weight. Double-check with a bubble level before final tightening.
6. Label and Customize
For groups of similar tools, add small labels below the outlines. Use a label maker or cut vinyl letters for a clean, professional look. You can also paint coded backgrounds behind certain tool categories—red for wrenches, blue for pliers—to speed visual identification. If you have powered accessories like battery chargers nearby, leave open space on the board or install a small shelf beneath for batteries and chargers.
If you’d rather start with a simpler solution, check out our guide to install a pegboard tool wall system, which offers flexibility but lacks the visual snap of a shadow board.
Practical Example
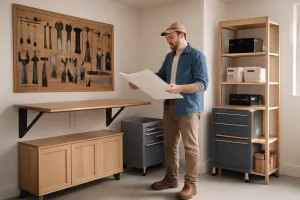
Imagine you’re installing a small bookshelf in your workshop. Without organization, you’d spend minutes rummaging for the right screwdriver or measuring tape. With a tool shadow board installed above your workbench, you reach up, grab your #2 Phillips screwdriver exactly where its outline is painted, tighten screws, and return it—no second thought needed. Under that board, you have a drawer with DIY foam tool drawer inserts for smaller bits and blades, keeping everything at arm’s length.
On the day you need a set of hex keys, you simply spot the keyring hanging in its outline on the board. No fumbling through bins. Meanwhile, behind you hangs a neat workshop setup checklist with must-have safety gear and measuring tools. When you’re done, the board clearly shows if any tool is missing. If you spot a gap, you know exactly which tool needs to be put back or replaced, preventing lost tools and saving time on every project.
For those with rolling storage, integrating a rolling tool cabinet guide under the bench complements the board. Larger power tools live on the lower shelves, while hand tools hang above—no clutter and no guesswork.
Common Mistakes
- Overcrowding the Board: Packing too many tools leaves minimal space between outlines, making it hard to hang or retrieve tools properly.
- Skipping Level Checks: Installing the board out of level leads to tools slipping off hooks and a sloppy appearance.
- Using Weak Mounting Hardware: Relying on flimsy anchors or no cleats can cause the board to pull away from the wall under tool weight.
- Choosing Low-Contrast Colors: Faint or similar-color outlines blend into the board and defeat the purpose of quick visual recognition.
- Neglecting Future Tools: Failing to leave spare space for new or rarely used tools means you’ll end up reorganizing sooner than later.
Tips to Improve
1. Modular Sections: Create the board in sections that can be swapped out. A magnetic strip on the back lets you quickly rearrange modules as your tool collection evolves.
2. Integrated Lighting: Install LED strip lighting above or behind the board to cast light directly on tool outlines. This enhances visibility in dimly lit workshops.
3. Digital Inventory: Snap a photo of the completed board and save it on your phone. If you lend a tool or it goes missing, compare your photo to the board to know exactly what’s gone.
4. Shadow Inserts: Instead of paint, use vinyl adhesive sheets for outlines. These last longer, resist chipping, and can be replaced individually if damaged.
5. Custom Shapes: For odd-shaped tools or battery chargers, use removable adhesive hooks and sketch the outline directly on the wall around them. This eliminates drilling into wood for every hook.
6. Color Coding: Apply a thin colored border around tool groups (e.g., woodworking vs. automotive tools). This speeds recognition when you’re under time pressure.
7. Tool Tags: Attach a small tag or key ring to each handle that matches the outline color or label. This tactile hint ensures you’re grabbing the right tool, even when your view is blocked.
Conclusion
A tool shadow board transforms your workshop wall into a highly efficient tool station. By planning your layout, tracing and painting clear outlines, and mounting hooks securely, you create a visual roadmap that saves time and prevents tool loss. Whether you’re tackling home repairs or serious DIY woodworking, this system keeps everything in its place and in plain sight.
Ready to start? Gather plywood or pick up a tool outline stencil set from Amazon, and put these steps into action today. A well-organized workshop not only boosts productivity but also makes projects more enjoyable. Happy building!