Regular cleaning and maintenance of your cordless leaf blower keeps it running at peak power and extends battery life. By following a simple routine—removing debris, inspecting components, and caring for the battery—you’ll avoid clogs, overheating, and premature wear.
Why Regular Maintenance Matters
A well-maintained cordless leaf blower delivers consistent airflow, reduces stress on the motor, and prevents unexpected breakdowns. Outdoors, dirt, dust, and grass clippings build up inside air intakes and around fan housings. Over time, this debris restricts airflow, forces the battery to work harder, and shortens overall lifespan.
Investing a few minutes after each use not only preserves performance but also ensures safety. Loose screws or damaged components can create hazards. A quick inspection helps you spot issues early and avoids costly repairs.
Step-by-Step Guide
Follow these actionable steps after every few uses—or more frequently if you tackle heavy-duty work.
1. Cool Down and Disconnect
- Turn off the blower and let the motor cool for at least 5 minutes.
- Remove the battery pack by pressing the release button and sliding it out.
- Store the battery separately in a cool, dry place.
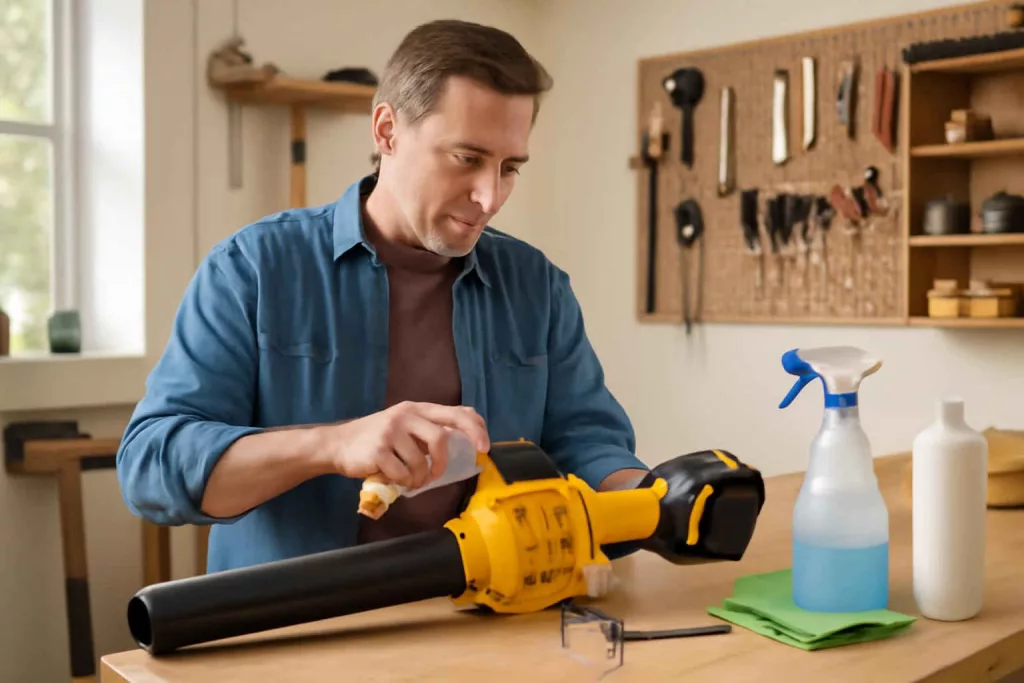
2. Remove Debris from the Nozzle and Housing
- Use a soft brush or a clean cloth to clear leaves, grass, and dust from the nozzle.
- Inspect the air intake vents around the motor housing—gently blow compressed air (or use a handheld air compressor) to dislodge dirt.
- For stubborn buildup, a toothbrush or detailing brush works well in tight spaces.
3. Check and Clean the Air Filter
- Locate the air filter cover—usually held by screws or a snap latch.
- Remove the filter and gently tap it to knock off dust or rinse under lukewarm water if washable. Allow it to dry completely before reinstalling.
- Replace the filter every 6–12 months or sooner if it shows signs of damage.
4. Inspect Fan Blades
- Open the blower housing according to your owner’s manual to access the fan blades.
- Look for bent or cracked blades—smooth edges keep airflow efficient.
- Gently wipe blades with a soft cloth and mild soapy water if greasy. Dry thoroughly before reassembly.
5. Tighten Screws and Bolts
- Use the correct screwdriver to check all visible fasteners on the blower body.
- Ensure the nozzle attachment is secure—loose parts can affect performance and cause vibration.
6. Lubricate Moving Parts
- Consult the manual for recommended lubricant points—usually the motor shaft or switch.
- Apply a drop of lightweight machine oil on pivot points or hinges.
7. Charge and Store Battery Properly
- Clean battery contacts with a dry cloth to remove any residue.
- Charge the battery on a flat, non-flammable surface, away from direct sunlight or damp areas.
- Store batteries at room temperature, ideally between 50–77°F (10–25°C), and charge to about 40–50% if storing for more than a month.
Practical Example: Weekly Maintenance Routine
Last Saturday, Sarah noticed her leaf blower’s airflow seemed weaker while clearing her driveway. She followed this routine:
- She removed the 5.0 Ah battery and wiped the contacts with a dry microfiber cloth.
- With a small detailing brush, she swept out grass clippings from the nozzle and vents.
- She checked the foam air filter, rinsed it under water, and let it air-dry on a paper towel.
- After reassembling and charging the battery on its stand, she tested the blower—it sounded quieter, and the airflow felt stronger.
- Sarah then stored it in her workshop, hanging it on a ceiling-mounted storage rack to save floor space.
This simple 15-minute session boosted performance and prevented Sarah from renting a replacement leaf blower mid-season.
Common Mistakes
- Skipping battery maintenance—dirty contacts lead to poor charging and shorter runtimes.
- Using water on non-washable filters—permanent damage renders filters useless.
- Over-tightening screws—stripped heads and cracked housing.
- Ignoring airflow checks—unnoticed clogs stress the motor.
- Storing batteries fully discharged or fully charged for long periods—degrades battery health.
Tips to Improve Longevity
- Rotate between two batteries when tackling larger jobs—avoids deep discharge on a single battery.
- Invest in a cordless leaf blower with metal fan blades—they’re more durable than plastic ones.
- For wet leaves, let them dry before blowing or switch to a vacuum setting if available to prevent wet debris from sticking.
- Use a dust mask and safety glasses when cleaning vents—blasts of debris can cause eye or respiratory irritation.
- Check for firmware updates if your blower has a smart battery interface for optimized power management.
Additional Resources
- Explore top cordless leaf blowers in our Best Cordless Leaf Blower for Small Yards guide.
- Learn how to keep other garden tools sharp in our Garden Pruning Shears Maintenance article.
Conclusion
By integrating this cleaning and maintenance routine into your schedule, your cordless leaf blower will run efficiently, last longer, and save you money on repairs or replacements. Spend a few minutes after each use to remove debris, inspect parts, and care for the battery—your leaf blower will thank you with reliable performance season after season.